


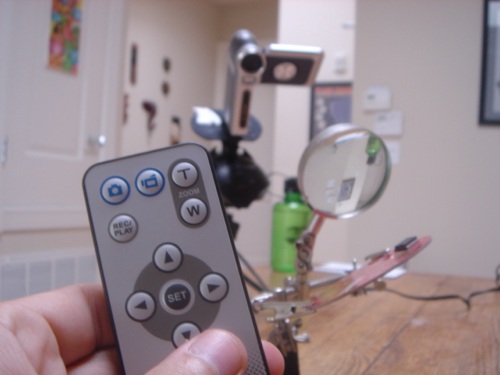


One of the hardest things about doing projects is oddly enough, documenting them. New tools/sites like Instructables and Flickr make it a lot easier, but there’s a lot of room for the hardware/setup we’re using to be more Maker-documenting friendly. One of the challenges is taking photos from the same spot, over and over and not touching the camera – most digital still ones, well, the cheaperish ones do not come with remotes, I found a cheap-ish ($300) digital video and still camera called the Supacam. It plugs in to AC power (so it won’t turn off) and it comes with a remote – there’s a tripod mount and I’m using a “TrackerPod” to control the camera on a little robotic base. I also have a clamp that can stick the camera on most benches (I got this years ago, you can make your own, easy). The camera also has a flip around LCD screen so you can glance, zoom and take photos/video while you’re working. It’s unclear if this is a best set up, but it’s getting closer. With this set up, you could work on just about anywhere in a workbench type setting and document away.
Dremel is doing a lot of interesting tools lately (See our short Dremel Stylus review here). I’m wondering if they would consider a workbench camera set up. They could get a camera OEM (like Supacam) – rebrand the camera and ship a ton of accessories made for documenting your projects, even a cheap lighting set up (we’ve posted tons here)…I’ll send them off an email and see what they think, Makers post up what you’re using in the comments – What would the ultimate (inexpensive) project documenting set up look like? I suppose the Kodak WiFi camera is a good option, but it would need a lot of software work to get “no touch” photo send as you document.
Links:
10 thoughts on “Documenting projects (photos and video) – some ideas”
Comments are closed.
ADVERTISEMENT
Join Make: Community Today


So, what do you think of the supacam? A lot of compromise, or a good performer?
I use a remote, its needed for project action shots i.e. soldering/cutting etc. Timer is also critical.
Too often documentation captures a before or after stage and taking a during step will save you having to write up what you could have captured.
For cameras that dont have a trigger input, i.e. cheap, why not just open up the case, solder a pair of wires either side of the shutter button and build your own remote.
msprague, so far so good, it does what i need (640 x 480 video) remote, flash and tripod mount. for $300+ its not bad.
radio, yah – im not sure a lot of people will solder in triggers (i did for a kite cam, but all my friend wont crack open their camera) – perhaps we could source a cheap one, and document how easy it is for a trigger?
alternatively you hack a mechanical push button trigger, what are they called? and build a rig to hold the camera
Getting a little silly though. Tell your friends to buy a screwdriver and soldering iron… or fork out for a prosumer with external switch.
Or use the timer. Also check out that 802.11b/g wireless enabled SD thats about to come on the market.
I’ve been thinking about doing a documentation setup instructable.. busy with other things…
I’ve had to do a few of these kind of pictures, for the RAZR cradle and other things.
I rigged up a microphone stand as a camera holder (“tripod”) by attaching a piece of threaded rod to it with a hose clamp. This allows the camera to rest on the floor, but hang over the table with the parts, so that it can shoot downward.
I’m always going to shoot from now on with a bright white background or with a bright white object for reference. The Gimp has a good tool that lets you use this for color correction.