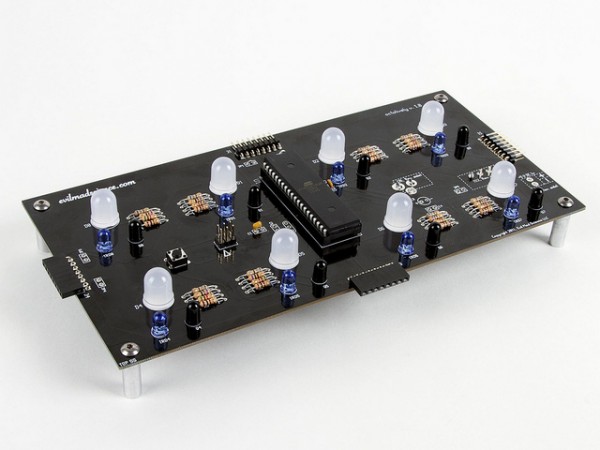

I want to buy, like, 100 of these interlocking motion-responsive LED modules from Evil Mad Science Laboratories and cover an entire wall in my house with them. Unfortunately I can’t afford to do so at the moment, either in terms of money for that many kits or in terms of time to solder the individual boards together.
(Sigh.)
Oh well, maybe one of you can do it and post some nice video so I can live vicariously.
Long-time readers might recall the original Interactive LED Dining Table, the infamous Interactive LED Coffee Tables, or the third-generation, not-very-creatively-named Interactive LED Panels. All of these surfaces were based on fully-analog circuitry with large circuit boards and a fairly high ratio of LEDs to sensors– typically 20:1.
Octolively, by contrast, is based on smaller, lower-cost circuit board modules, “only” 4×8 inches in size. Part of the reason for this is so that there’s more flexibility in making arbitrarily shaped arrays. Arrays can now be as skinny as 4″ wide, or as wide as you like.
Each module features 8 LEDs and 8 independent proximity sensors– one for each and every LED. The LEDs are (huge) 10 mm types, and that chip in the middle of the board is an (also huge) ATmega164 microcontroller. Each sensor consists of an infrared LED and phototransistor pair, which– together with polling and readout from the microcontroller –acts as reflective motion sensor. The LEDs are spaced on a 2-inch grid, and the edge connectors allow boards to be tiled seamlessly.
As of this writing, the Octolively costs $35 (with generous price breaks starting at 10 units) and will begin shipping from EMSL on Monday.
16 thoughts on “Open Source Interlocking, Interactive LED Surface Modules from EMSL”
Comments are closed.
ADVERTISEMENT
Join Make: Community Today


A wall of these would be really cool, esp in a hallway. I can see it lighting your path as you walk by.
like this perhaps? http://www.youtube.com/watch?v=z-kRun7dBYU
A wall of these would be really cool, esp in a hallway. I can see it lighting your path as you walk by.
I remember seeing that with RGB led. They were mounted under a table and they would take the color of what was placed over them. That was very cool. I’d like to see that as an option for these modules.
From what I can see, it would not be an easy upgrade to put RBG leds in this kit. The Octolively uses IR sensors to detect movement, and IR sensors can’t see colors.
The way the rbgy worked was that it had one light sensor (a LED plugged in reverse) per module (16 LEDs IIRC).
The RBG led would flash Red for a few microseconds and during that time the light sensor would register the level of reflection for the color Red. Then the RBG led would flash Blue and register the level of blue, same thing for Green. After that (15 microseconds IIRC), the RBG led would light up to match the levels of Red, Blue and Green measured.
After a couple seconds, it would restart the process by flashing Reb, Blue, Green and adjust the color of the RGB LED to the levels measured.
I actually tried to make one at home but I lost my motivation trying to make an op-amp to bring the light sensor signal to a level readable by my arduino… Op-Amps make my head hurt! :(
Ok, I’ll stop replying to my own posts now…
From what I can see, it would not be an easy upgrade to put RBG leds in this kit. The Octolively uses IR sensors to detect movement, and IR sensors can’t see colors.
The way the rbgy worked was that it had one light sensor (a LED plugged in reverse) per module (16 LEDs IIRC).
The RBG led would flash Red for a few microseconds and during that time the light sensor would register the level of reflection for the color Red. Then the RBG led would flash Blue and register the level of blue, same thing for Green. After that (15 microseconds IIRC), the RBG led would light up to match the levels of Red, Blue and Green measured.
After a couple seconds, it would restart the process by flashing Reb, Blue, Green and adjust the color of the RGB LED to the levels measured.
Or this?
Have a look at http://www.nullohm.com or http://www.dobpler.com for more info