


By Paul Stern
When I first heard the words pâte à choux in baking class, I thought my teacher had sneezed. Also known as choux pastry, it is pronounced pat-ah-SHOO. Had she said, “We will be making cream puffs next class,” I would have known what she meant.
Anyway, the main pastry ingredient is eggs. Lots of eggs. The one time I made pâte à choux in a large quantity, I thought I would never have enough eggs. Luckily, the kitchen at Paul Newman’s Hole In The Wall Gang Camp had an entire case on hand.
At least this version of the formula uses only 1 dozen large eggs to produce more than 3 dozen medium-sized cream puffs. You might want to cut the ingredients in half to make 18 cream puffs. The recipe also uses bread flour rather than all-purpose, because the higher protein content produces a better result.
Ingredients
1 cup milk
1 cup water
8 oz unsalted butter
1 tsp salt
1 1/2 cup bread flour
1 dozen eggs
Confectioner’s sugar for dusting and whipping
1 pint heavy cream for whipping** to fill the pastries
1 1/2 tsp granulated sugar (optional)
Optional egg wash: one or two eggs diluted with a little water
**Note: This recipe is for the pastry, not the pastry-filling cream. In this recipe I used whipped cream, but you can also use ice cream. (Frozen cream puffs containing ice cream are called profiteroles.) There is also a way to make savory puffs for hors d’oeuvres that include cheese in the dough, but that’s for another day. If you plan to fill your puffs with pastry cream, you will need to consult another recipe for this. You might want to try this traditional pastry cream recipe.
Note about eggs: Large eggs in the shell must weigh 2 ounces, or no less than 24 ounces per dozen. There are about 9 1/2 eggs without their shells in a pound.
Equipment
The equipment for making pâte â choux is pretty standard, with the possible exception of a large pastry bag. If you don’t have one, use a large spoon or plastic storage bag with one corner cut off. (In the interest of being cheap, that’s what I did.)
Measuring cups
Large saucepan
Wooden spoon
Electric mixer with paddle attachment
Parchment paper
Sheet pan or pans
Rubber spatula
Pastry bag with plain tip and/or star tip
Pastry brush
Small strainer for dusting
Instant read thermometer (recommended but not necessary)
Digital scale (recommended but not necessary)
Directions

Step 1: Assemble your equipment and measure out your ingredients. (In a professional kitchen, the French term for this is mise en place – everything in its place.) Preheat your oven to 475° F. For best results, put your oven rack toward the bottom, nearest the heating element.

Step 2: Put the milk, water, butter, salt, and sugar in the saucepan and bring to a boil.
Step 3: Remove from the heat and add all the bread flour. Stir it quickly to combine.

Step 4: Put the pan back on the burner at low to moderate heat and continue stirring vigorously until the mixture forms a dough mass that pulls away from the sides of the pan. The idea is to cook off the flour’s raw flavor but not to overcook, since overcooking will inhibit its ability to absorb the eggs that you will be adding soon.

Step 5: Empty the dough into the bowl of your mixer and mix slowly until the paste has cooled to around 125° F. (This is hot, but not too hot to touch.)

Step 6: Continue mixing at medium speed as you add a few of the eggs. When they are absorbed, add a few more. Continue in this fashion until there is only one egg left. If the paste is the proper consistency for piping, stop. If it seems thick and is not shiny, mix in the last egg.

Step 7: Line your sheet pan(s) with parchment and load the choux paste into your pastry bag. For cream puffs, use a 1/2″ plain tip, and a star tip for éclairs. You will find it easiest to load the pastry bag if you insert it into a tall glass or pitcher.


Step 8: Use a little of your choux paste dough to glue down the corners of your parchment paper.

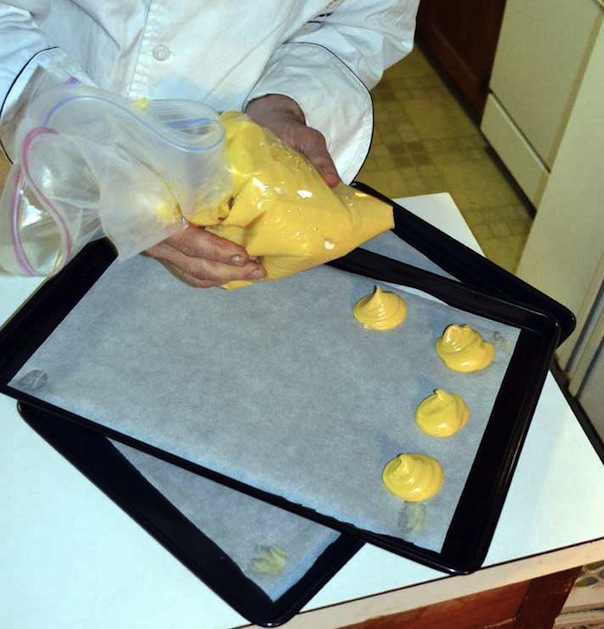
Step 9: Pipe out small mounds of paste for the cream puffs. A large cream puff should be a little more than 2″ around. Small ones can be as little as 1″. If you don’t have a pastry bag, you can use a plastic storage bag with one corner cut out, or use two spoons and simply scoop and plop uniform blobs onto the parchment.
Step 10: Wet your finger in water or milk and use it to round off any peaks you left in the piping process. If you use the egg wash step, the pastry brush will achieve this effect.
Step 11: Put your pan of puffs on the oven rack near the bottom of a 475°F oven and after about a minute reduce the temperature to 375° F. Small puffs will take from 5-10 minutes, larger ones as much as 20. You are shooting for a product that is golden brown.
While the puffs are baking, whip your heavy cream, which will be the filling for your puffs. Add sugar to taste. You can also whip in a teaspoon or two of cocoa powder if you want a chocolate whipped cream. Of course, if you are planning to fill your puffs with pastry cream or another type of filling, skip this part of Step 11.


Step 12: When the puffs are done, take them out of the oven until they have cooled considerably, then put them back in and leave the door open. This will dry them out properly. You can cut them open and hollow them out to fill them, or freeze them for filling another time. (When freezing, make sure they are completely at room temperature, then wrap them tightly before placing in the freezer. Defrost at room temperature, too.)


Step 13: Once cooled, cut the puffs in half horizontally and pipe in your whipped cream or other filling. Be generous. If you have made a pastry cream and it is a little lumpy, you can use a rubber spatula to force it through a strainer. This provides a very smooth consistency.
Replace the tops, sprinkle with powdered sugar, and serve. (Another option is not to cut, but to simply jab the puffs with the piping tip and squirt in some filling. This, to me, is not as appealing, since you can’t see the filling before you eat it.)
About the Author:

Paul Stern is a part-time chef and freelance writer from Connecticut who enrolled in culinary school after 35 years as a journalist at newspapers from Fort Lauderdale to Hartford. In addition to cooking, his interests include helping his wife convert a 300-year-old house into a bed-and-breakfast.
ADVERTISEMENT
Join Make: Community Today


