


Dads are super stars. They’re great at keeping you organized and getting you to school, sports, and your best friend’s birthday party promptly. It’s easy to forget how much they do and it’s time you gave a little back to them, too. This cigar box organizer is great for any type of dad. For the fixer-upper, it makes a great tool kit. The behind-the-desk-dad can fill it with everyday office supplies. You can adjust the compartments to fit his organizational needs.
Even if your dad doesn’t smoke cigars, you can swing by a smoke shop and ask for an empty cigar box. That’s how I got mine. The divider trays are made from chopsticks. And cording or ribbon helps create the upper divider area. Not only do you get extra credit for creating a personalized project, most of the materials are free. You can even decoupage the outside of the box for extra bonus points.
Crafting up an organizer is a great way to tell your dad you love him. Hand over your newly made cigar box and watch his face light up.

Materials
Cigar box
Chopsticks
Ribbon or cording
Hot glue gun
Scissors or utility knife
Ruler
Pencil
Directions
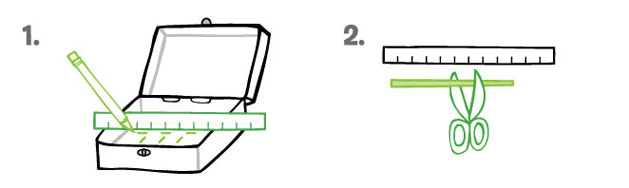
Step 1: Make light pencil marks on the inside of the box to mark how big you would like each compartment to be. It helps to use a ruler so each compartment is evenly spaced.
Step 2: Cut the chopsticks down to the desired length of each compartment side. You can use a pair of strong scissors to cut off the excess stick. If the chopstick wood is thick, you’ll need utility knife to score and break it where you’d like your chopstick cut.

Step 3: Take a cut chopstick and place it where you want your first compartment wall. Use hot glue to hold the chopstick in place, then glue each stick on top of the next until you’ve reached the desired height. We used four stacked chopsticks for a 2″ tall box. Check to make sure you can still close the box! Now continue gluing the chopsticks until you’ve finished all the compartments.
Step 4: Next, measure the inside of the cigar box lid. Cut three pieces of your ribbon or cording that are 1/2″ longer than the height (from top to bottom of the lid), and cut two pieces 1/2″ longer than the width. (That extra 1/2″ gives you a little space so you can slip things behind the ribbon to store them.)

Step 5 Using a dot of hot glue on each end of the three pieces, secure the ribbon or cording at the top and bottom of the inside lip of the lid. Make sure the pieces are evenly spaced and glued so that they are taut. Now take your two long pieces and weave them under and over the short pieces. Glue the ends to the left and right inside lip of the lid. Again, make sure to space the pieces evenly. The ribbon/cording will form a grid.
Step 6: Fill up the organizer and close it up. There may be no cigar, but there’s a whole lot of crafty love inside! Happy Father’s Day!

About the author:

Tiffany Threadgould is a design junkie who gives scrap materials a second life. She’s the head of design at TerraCycle, a company that collects and creates products from waste. She also keeps up her own green biz, RePlayGround, where you can find ReMake It recycling kits and oodles of DIY projects. Tiffany thinks that garbage has feelings too and can sometimes be found talking to her pile of junk at her design studio in Brooklyn, N.Y. For more DIY upcycling projects, check out her book, ReMake It!, from Sterling Publishing.
ADVERTISEMENT
Join Make: Community Today


