


People can and do hit up the big-box stores of the world for all of their pre-packaged winter holiday celebratory materials. But not everyone. No, some of us aren’t content to express our holiday sentiment with cheap, mass produced, injection molded plastic bits. Instead, a visceral compulsion to put hand to LED and battery overtakes them and they create. Check out this short roundup of some of these more inventive of these creations.
1: Polycarbonate Christmas Tree Star


YouTube maker Jeremy Cook used some fairly advanced tools and techniques to construct this beautiful polycarbonate Christmas tree star. For starters, the creator used DraftSight, a nearly identical free clone of AutoCAD to create the design. Then he converted the drawn shape into a G-Code file. Then a CNC router cut out the shapes. Machined into the star shapes are slots for some LEDs and a circular pocket for a Coin cell battery. A bit of handwork was then used to put the whole thing together. The final result does look really cool though.

2: New Year’s Eve Countdown Timer
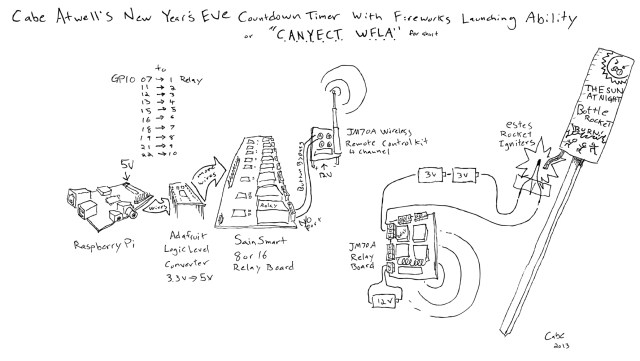
There is noticeably fewer New Year’s Eve projects than Christmas projects. I guess New Year’s Eve doesn’t spark the creative impulse like other holidays do. It did however inspire the writer/engineer/maker Cabe Atwell (That’s me!) to create this Raspberry Pi based New Year’s Eve countdown timer. New Year’s Eve countdown, big deal, right? Well this one sets off bottle rockets. For each of the last ten seconds in the year, a relay bank ignites a rocket. The whole project is a cool kludging together of parts. I had a Raspberry Pi 2, a relay bank, breadboards, battery packs and a wireless remote control usually used for garage doors. While I used the relays to set off fireworks, you could just as easily activate any accessories you want like horns and lights. See more on this build at element14.

3: Interactive Christmas Card


This is such a cool idea. This all-in-one, holiday card, controller and game console is the creation of Kerve Creative. If you are the type to enjoy retro and retro-style gaming, and if you received one of these then you probably are, then the card is also a gift! Not just a purveyor of well-wishes. To use, just plug the card into the USB port of your computer. (PC users may need to wait for the drivers to update). After a bit, a game loads where it looks like you play a Santa type figure that is trying to hack down a Christmas tree. BTW, Kerve Creative seems to offer this level of creativity in the form of services that you can purchase.

4: Animated Christmas Star


Over 1000, 10-millimeter diameter LEDs went into the construction of this mesmerizing Christmas star. The exact number of LEDs isn’t specified. I wonder if the creator lost count? I don’t even want to think too hard about the level of patience and attention to detail this must have taken. You just know that along the way a bunch of those LEDs got wired up backwards. The whole works is controlled with a Freetronics Eleven board. The Eleven board is essentially an Arduino UNO that has been improved with better parts and better part placement. 74HC595 shift registers and TIP122 transistors interface all those lights to the control board. I really would have liked to see the creator of the star put up the code and a circuit diagram. As cool as it is, I suspect that there is some room to streamline this project. Follow on YouTube for more.

5: WiFi Christmas Star


A unique addition to the list are these WiFi controlled Christmas Stars (okay, and one that’s heart-shaped). Watch the video of the construction montage to see some high-level wood and aluminum craftsmanship at about 8x the normal speed. The creator, screen name kitesurfer1404, uses his cellphone to control the stars. He is able to pull off this trick because at the heart of the on-board electronics is the ubiquitous ESP8266 WiFi module. The ESP8266 sends signals to a PCB ring with 7, WS2812 LEDs on-board. WS2812 are little, digitally controlled 5mm by 5mm plastic squares that contain really bright red green and blue LEDs. Having some of these decorations around would be awesome for some interactive Christmas light tricks. Lucky for you, kitesurfer1404 has posted his code on github so you can build these yourself. Go to Kitesurfer’s page for more.

6: Neo-pixel sweater

This fellow definitely gets points for creativity. He may not win the ugly sweater contest this year, but he would certainly get the “most distracting” award. I can’t imagine trying to hold a conversation with someone wearing this. But I bet it would start a lot of conversations. He is using an Arduino 101 to control six of the aforementioned WS2812 LED modules on each of the 5 snowflakes. An Arduino 101 looks like an UNO at first glance, but it has two cores running at 32MHz. It also comes with built-in Bluetooth LE and a 6-axis accelerometer. Two 32Mhx cores may have been overkill for a sweater but there may be less obvious factors that require all that computing horsepower. Head to YouTube for more information.

7: Paper menorah

This is a cool Hanukkah project for kids. It is a menorah that is constructed from copper traces that have been applied to a paper backing. LEDs and batteries are added on each of the eight nights of Hanukah. The LEDs are affixed to the traces with short lengths of the copper tape. While the configuration shown is definitely in more of a traditional menorah pattern, I would have changed the topology so that it used a single 9-volt battery. With batteries, instead of oil, the lights will almost certainly last for eight days. See Kiwicrate for more on this build.
8: LED Tree with Shared Internet Control

At first glance, this project looks to be really simple. It’s just some LED strips on a cartoon tree shaped piece of construction paper, right? Well, you are partially right. This project is unique because you share control of it with anonymous people over the internet. Someone else can come along and change the colors at any time. The site TeleToyland.com makes this possible by connecting users to robots, cameras and art all over the world. In fact, this is a TeleToyland project. Running the tree and connecting it to the internet is an Adafruit Huzzah. The Huzzah is essentially a WiFi module with an 80MHz ESP8266 microprocessor running inside. They have a very good write-up on how they did all this at Instructables.
9: Raspberry Pi with Falcon Pi player Christmas lights


This project is incredible. A Raspberry Pi syncs some dramatic Christmas music with some light strings.
At the heart of this system is a Raspberry Pi running Falcon Player, which is a sequence player designed to run on single board computers like the Pi. A sequence player allows you to apply precise timing to your lights or other electronically controllable events. The upshot of this — besides looking cool — is that you can sync your music with your lights. The creator also 3D printed a huge wireless button to start the show. The Pi is connected to a whole bunch of Arduino Nanos via the Ethernet connection from ENC28J60 Ethernet modules. The Nanos in turn control the bundles of WS2811 LED strips you can see in the video. The one picture shows how a power supply, Arduino Nano and ENC28J60 are all placed inside what looks to be plastic NEMA 4X enclosures. Presumably because the system will be installed outside. The end result isn’t cheap or simple but it is super neat. The complete details are viewable at the Hackaday link.


10: Plexiglas PIC controlled ornament


Created by open-electronics.org contributor, Boris Landoni, are some more CNC machined, Christmas themed shapes. These little guys light up when the ambient light drops below a certain level.
This fellow could have used an Arduino but he pounded it out with that old hobbyist workhorse, the PIC microcontroller. The code was written in PIC Basic PRO. A photoresistor is wired into analog input AN0 on the PIC where the value is read from the photoresistor and then compared to a threshold value in the firmware. The whole works is powered with a CR2032 coin cell. Boris gives very complete instructions for the project electronics and he also includes G-Code (files with the “.tap” suffix) for the shapes.
ADVERTISEMENT
Join Make: Community Today


