


Making your own flashlight can seem like an intimidating project, and the examples online of custom, lathe-turned titanium-bodied flashlights don’t help with that impression. However, making a basic but functional flashlight doesn’t have to be hard. This flashlight can be completed on a modest budget with commonly available parts and inexpensive tools (you can get most of them at the hardware store). It’s a fun project and also makes a great way to learn soldering and basic circuits.

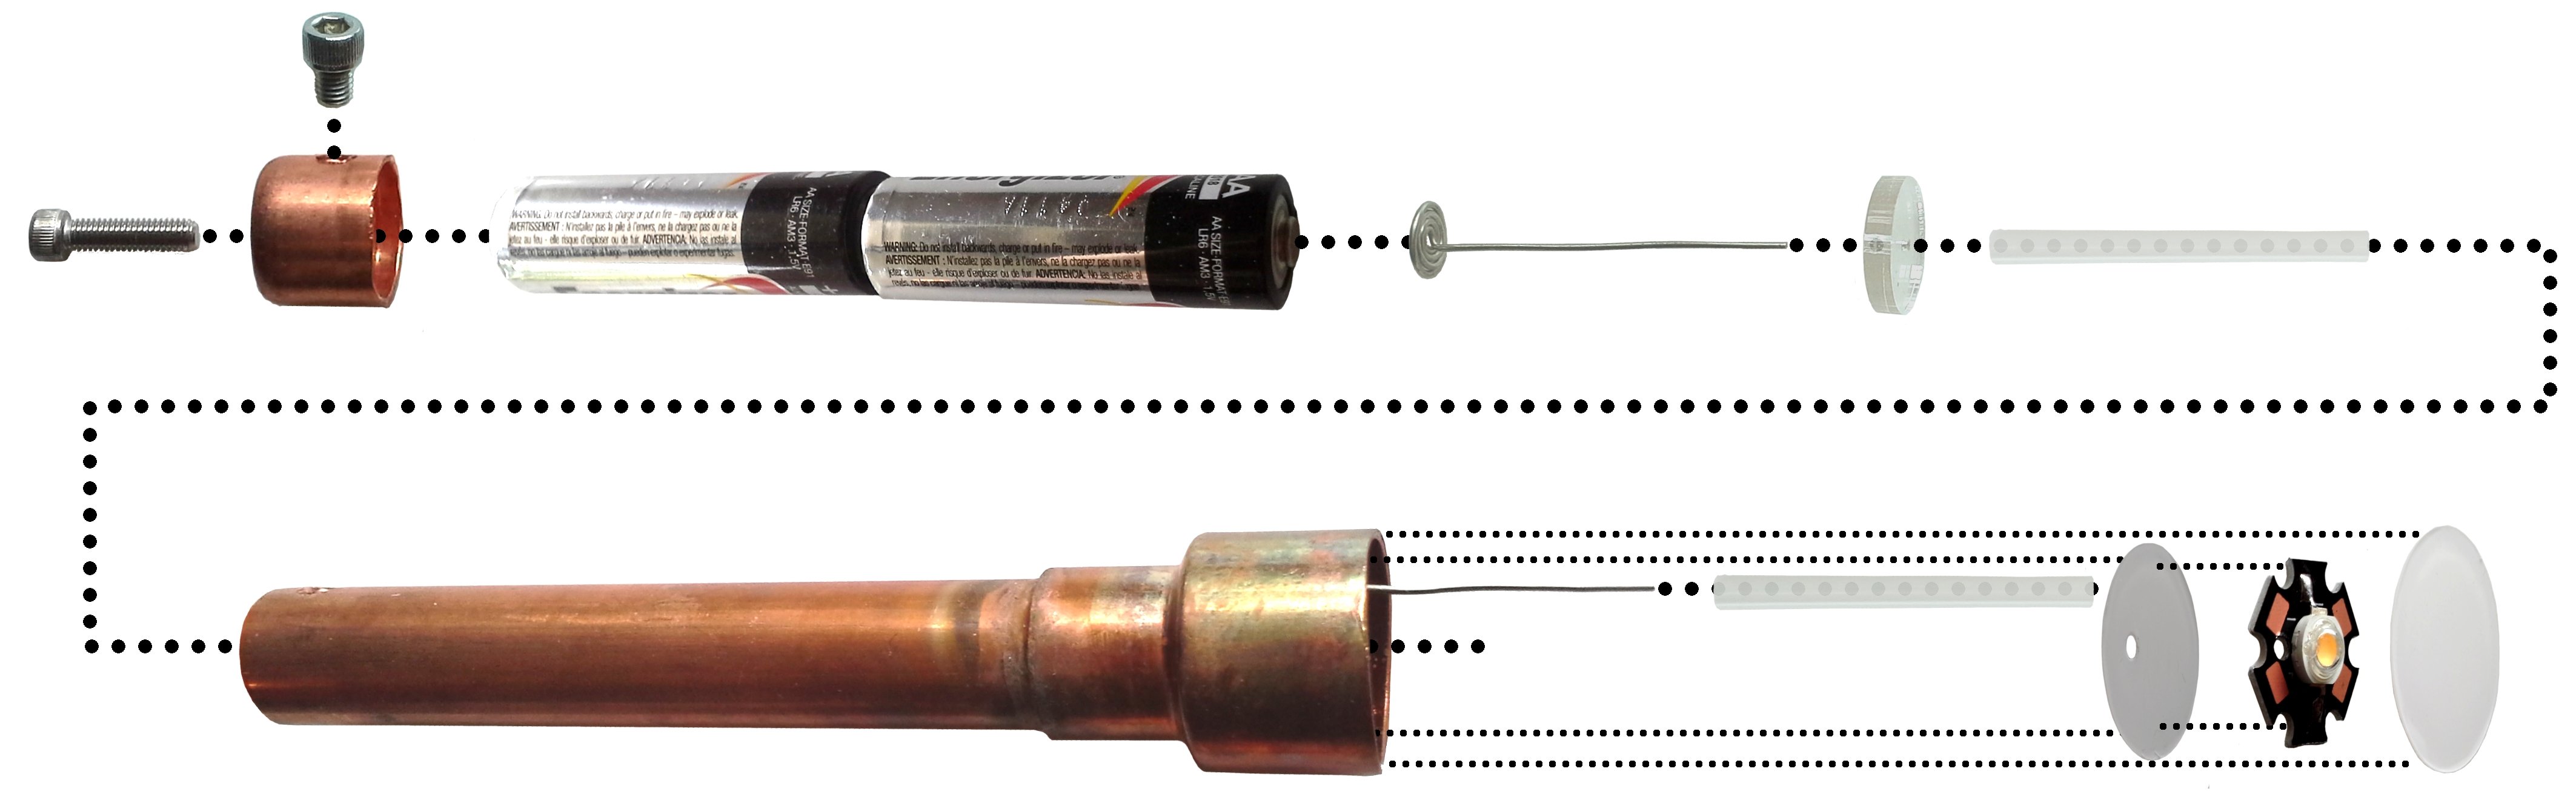
The steps described below can be used to make a single flashlight for fun, or to run a workshop/class for summer camps, fairs, hackerspaces, youth outreach programs, etc. It uses an inexpensive surface-mount LED and no control circuitry (the internal resistance of the alkaline AA batteries is sufficient to limit current to the LED and keep it from burning out). The body is made from commonly available copper water pipe and fittings. The switch mechanism is a socket screw; tighten it to complete the circuit and loosen it to break the circuit.
The only other materials required are some heatshrink, some wire, some scrap plastic, and any decorative elements you want to add. Required tools include a tubing (pipe) cutter, a butane torch, a metal punch, a soldering iron, a heat gun (or hairdryer), a hammer, an Allen wrench, scissors, an Exacto knife, and pliers. Also, you should wear safety glasses or other eye protection throughout, and a heat resistant glove or a small vice would be useful.
Part I: Preparation
If you want to run this project as a workshop/class (especially for children), it’s strongly suggested that you complete these steps ahead of time.
Cut some 1/2 inch nominal, type M copper pipe into a 4-1/2 inch length piece with a tubing cutter. It’s very important that you get the correct kind of pipe; the inner diameter of this size/type combination is just wide enough to fit in the AA batteries that will power the flashlight. It’s worth noting that nothing on a ‘1/2 inch nominal’ pipe actually measures 1/2 inch; the inner diameter in this case is actually about 0.569 inches. After cutting, remove the bur (ridge) on the inside of the pipe with sandpaper and/or an Exacto knife (if you use an Exacto knife, don’t press too hard; you could shatter the blade).

Solder an 1/2 inch nominal by 3/4 inch nominal expansion coupling onto one end of the piece of pipe. This will be the head of the flashlight. A soldering iron does not generate nearly enough heat; you will need to use a butane torch or similar (if you don’t already have one, you can get a torch/canister set for about $20 at the hardware store). Before you start soldering with the torch, be sure to remove all flammable material from the vicinity. The coupling and pipe will get very hot, so don’t plan on being able to hold them with your bare hand while you solder! Prepare the joint with plumber’s (acid) flux; be sure to clean this off well after soldering. While the coupling is hot, also solder the end of a few inches of tinned, solid copper wire onto the inside of the coupling. This will allow you to connect the flashlight body to the LED later on (the flashlight body is going to be part of the circuit).

Select two, #10-32 stainless steel socket screws (thumbscrews would also work), one about 3/4 inch long and the other about 1/4 inch long. Using screws a few sizes larger or smaller will not be a problem, as long as you size the holes for them properly (see below).
Drill a hole in the center of the top of a 1/2 inch nominal copper pipe cap. Don’t try to hold the cap with your fingers; use gloves, a clamp, a vice etc. Use a drill bit slightly smaller in diameter than the threaded diameter of the screws you are using. Slide the cap all the way onto the tail end of your piece of pipe (i.e. the end without the expansion coupling). Use the same drill bit to drill another hole through one side of the cap and through the pipe underneath it. Take the cap off the pipe, and enlarge the hole in the side of the pipe with a drill bit that is larger than the threaded diameter of the screws you are using.

You can brute-force a decent job of tapping (forming threads in) the hole in the side of the tailcap with the shorter screw. First, get the threads to ‘bite’ into the copper by lightly hammering the screw into the hole. Then, tighten the screw using an Allen wrench or ratcheting screwdriver with a hex bit. After you have screwed it in and out a few times, it should work easily enough to tighten or loosen with your fingers. If you plan on making a large number of flashlights, a tap wrench will save time. If you just want to make one, though this method will work fine and saves buying another tool. Tap threads with the longer screw into the end hole in the cap in the same fashion. The short screw will act as a ‘set screw’ to keep the tailcap on the flashlight, while the long screw will be your switch.

Using a small pair of pliers, bend another length of tinned copper solid wire into a flat spiral with a straight wire lead coming out from the center. The spiral should be about 2/3 as wide as the inner diameter of the copper pipe (the length of wire you need will depend on its diameter), and the straight wire should come out from the middle of the spiral about 1.75 to 2 inches. This spiraled piece of wire will be the positive leg of your circuit (connecting battery positive to LED positive).

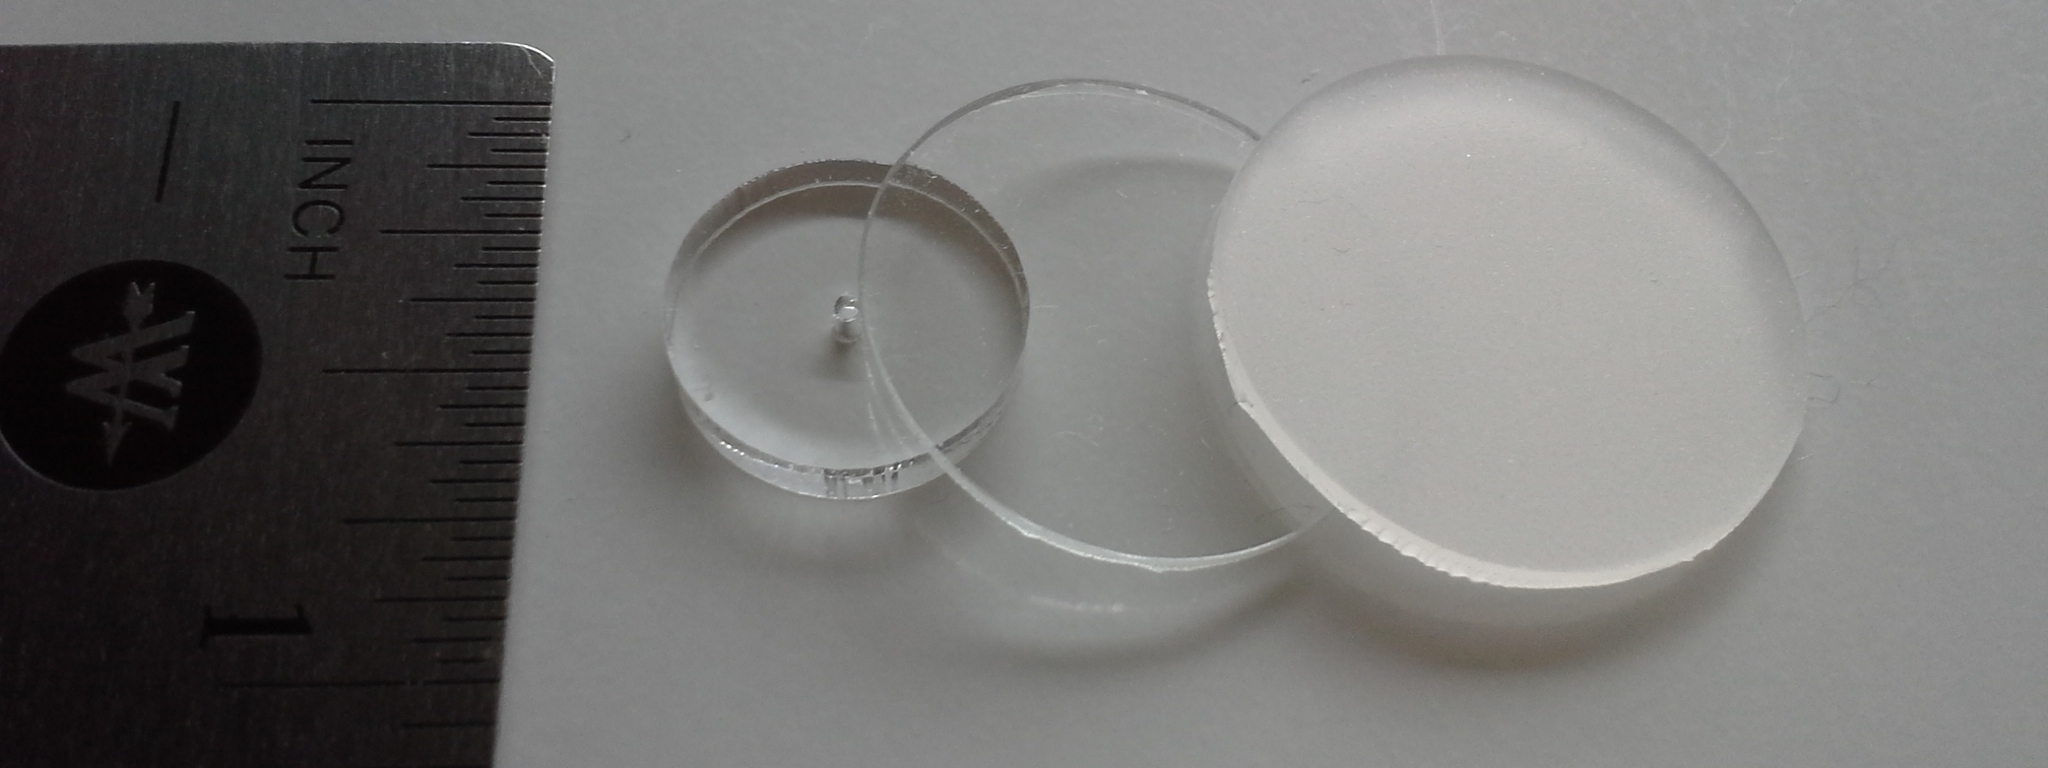
The last preparation step is to cut some circles out of plastic sheets. One circle should be 0.565 inches in diameter (just small enough to fit inside the copper pipe), with a hole in the middle just large enough to fit your tinned wire. Another should be 0.874 inches in diameter (just small enough to fit inside the end of the expansion coupling), and another should be 0.965 inches in diameter (the outer diameter of the coupling). All of these should be cut out of relatively stiff plastic; the piece with the hole in the middle should be at least 0.060 inches thick; the others can be as thin as 0.030 inches. The 0.965 inch diameter piece should be cut from clear frosted plastic. That way, it will diffuse the light from the LED and you won’t damage anyone’s vision if you accidentally shine it in their eyes. Because these pieces of plastic are so small, you can usually use scrap from other projects or even things like plastic clamshell packaging. The easiest way to cut circles is with a compass cutter (or a cutting machine if you have access to one); if you have a lot of patience you can just use scissors and sandpaper to get the diameters right.

If you want to skip Part I entirely, you can also just buy a kit.
Part II: Final Assembly
If you want to run this project as a workshop/class, you can teach your students the skills necessary to complete these steps. Depending on your class size and their prior skills, these steps should take students between 20 and 90 minutes.
Pick a color of LED. You should use an LED mounted on a 20 millimeter diameter (or smaller) aluminum power control board; the LED should be rated for about 3 volts and at least 3 watts.
Glue the LED board onto the 0.874 inch diameter plastic circle (try to get it centered). After the glue has dried, punch a hole through the LED board/plastic circle as close as you can get it to the LED (be careful not to punch the LED or smash it on the upstroke; it’s easy to break them). Try not to punch through any of the traces (visible as raised lines) that connect the LED to the soldering pads on the LED board. If you must punch through a trace, mark which soldering pad you just disconnected. Use a different pad when you need to solder to one in the steps below.

Use a soldering iron to solder together the spiral that you made earlier. Fill in the all the gaps between wires with solder, so that it becomes a solid disc.

Thread the wire lead of the of spiral you just soldered through the hole in the 0.565 inch diameter plastic circle. Use a heat gun or hairdryer or other heat source to insulate the (positive) wire lead connected to the spiral you just soldered, as well as the (negative) wire lead connected to the flashlight body. Leave a small amount of the end of each lead exposed; this will allow you to solder them to your LED board.

Drop the plastic circle/wire spiral through the body of the flashlight from the back, with the positive wire lead pointed forward. The plastic circle will catch where the copper pipe meets the copper coupling, and the positive wire lead should be sticking out from the middle of the front of the flashlight. Now drop in 2 AA alkaline batteries after it; put a piece of tape or paper in after them to block the circuit. Put the tailcap on over the batteries, and tighten down both the ‘set screw’ and the ‘switch screw’. This mock assembly will hold the spiral and wire lead in place while you solder the positive lead to the LED.

Thread the positive lead (connected to the spiral) through the hole in the LED board/plastic circle and solder it to a positive pad on the LED board. Solder the negative wire lead (connected to the flashlight housing) to a negative pad on the LED board. The LED board will act as a powerful heat sink, since it is made of aluminum. This is good for keeping the LED from overheating, but also makes it difficult to solder to. If you cannot get the solder to melt and flow properly due to the LED board drawing heat away, you can use a more powerful soldering iron, or just aim your heat gun at the LED board as you solder. This will counteract the heatsinking tendency of the LED board.

Now it is time to test your flashlight! Remove the tape/paper that’s blocking the circuit and reassemble the flashlight. When you tighten the screw in the back, that should complete the circuit and turn your LED on. If it does not, check that:
- you removed the tape/paper from the batteries
- the batteries are oriented properly (positive/nub end toward the head of the flashlight, negative/flat end toward the tailcap)
- all your solder joins are mechanically strong and making good electrical contact
- you don’t have any short circuits (where positive and negative conductors connect directly)
- the LED is soldered in the right way: negative lead from the flashlight body to a negative pad, positive lead from the spiral to a positive pad
- you didn’t punch a hole through the trace of either of the pads you chose to solder to.
Once you have your LED tested and working, put the tape/paper back in (so the LED won’t shine in your eyes as you finish the flashlight), and put the batteries/tailcap back in place. Now carefully push the LED board/plastic circle into the head of the flashlight. You need the batteries and tailcap in place so you have something to push against. You will have to tilt the LED board to get under the spot where the negative lead is soldered to the inside of the flashlight head. Once the LED board is is pushed all the way in, take any slack in the leads and bend it to the sides so it doesn’t obstruct the light from the LED.

The following steps are optional; you could skip them and just glue the lens (your frosted plastic circle) on the head of the flashlight. That being said, without decoration or color of some kind the flashlight looks a bit like a pipe bomb, so it’s probably not a good idea to carry it around that way.
Now you can decorate your flashlight! Wrap it with colored tape, paint it, wrap wire around it to create a ‘grip’, carve patterns into it; do whatever you like to personalize it and make it yours. Once you are done, use a piece of 1 inch diameter clear heatshrink to seal your decorations in place and hold the flashlight lens (your frosted plastic circle) in place. Place the lens over the head of the flashlight, and slide the heatshrink over both so that it protrudes about 1/4 of an inch beyond the lens. Use your heat gun to heat the last two inches or so of heatshrink evenly so that it encapsulates the head. If you use the heat gun for a long stretch, the flashlight body will get too hot to hold with your bare hands, so have a glove or rag ready to hold it with. Get the heatshrink that protrudes past the end of the head quite hot so it will be soft and pliable, then press and hold the head against a smooth surface until it cools down. It should now be lying flat against the lens.

Shrink the rest of the heatshrink onto the flashlight body. If the heatshrink overlaps the tailcap, cut off the heatshrink that overlaps. Or, heatshrink the body and tailcap, and when it cools cut a line around the end of the tailcap with an Exacto knife so you can still take it off (also cut a hole for the set screw). Your flashlight is complete!

ADVERTISEMENT
Join Make: Community Today


