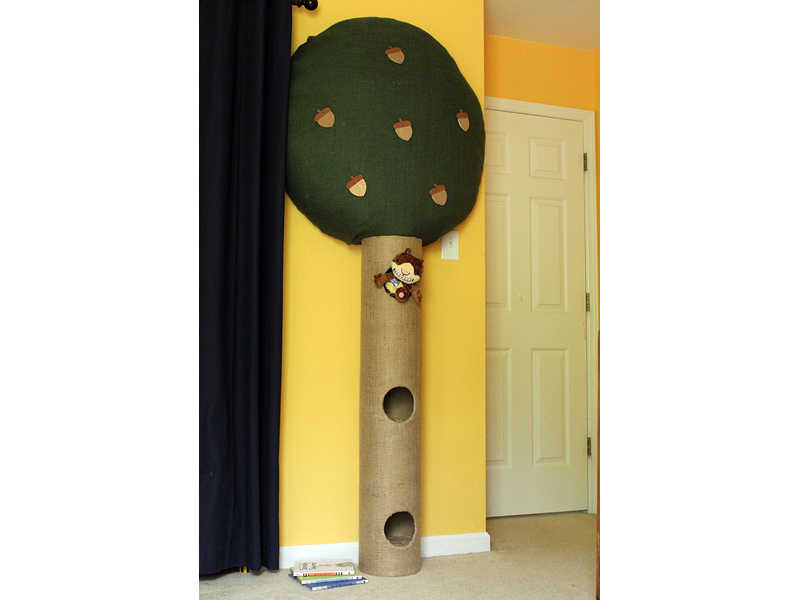
This guide will demonstrate how to build a fake tree for a child’s room. Our tree was made to house a certain frightened squirrel featured in a popular book series, but this build could be adapted for any number of tree-bound lovies.

Project Steps

In order to make sure that your tree will fit in the room, choose the wall to which it would be fastened and then lay out an outline with painters’ tape. This step is especially important for figuring out the diameter of your foliage.

A fantastic material for your trunk is a concrete form tube, available for under ten dollars at your local building store. For our tree, we chose an eight-inch diameter tube.

In order to simulate bark, there are a number of things you can do, from brown construction paper to paper maché. In the interest of expediency, I picked up a roll of brown burlap from the building store. As the package says, it has “Hundreds of Uses!”

Burlap is a tricky material. Simply stapling it might work, but a glue and clamp solution will be more secure. On the back side of the tube, I sandwiched the ends of the burlap between two wooden strips, with a thick bead of construction adhesive in there, as well. Note that we are not attaching the burlap yet, just preparing for later.

When deciding how big the habitat holes should be, use the largest part of the inhabitant’s body to set your compass. If you don’t have a compass handy, make one using a couple wood scraps, a nut, a bolt, a pencil, some zipties, and a nail.

Draw your holes on your tube. If you are cutting more than one, it will be tricky to keep them in a straight line. If that sort of thing drives you nuts, plumb the tube against a wall and then draw a plumb line down the front of the tube using your level. Alternately, you could put holes on opposite sides or in some other interesting arrangement.

The cardboard form tubes are thick enough to treat as wood from a tool perspective. I used a drill to start the hole, a jigsaw to cut it, and a rasp to clean up the holes.

Trace the inside of the tube onto the wood for each hole’s floor. You don’t want the stuffed animals to fall to the bottom of the tube when inserted, so put a floor under each opening. If you have cats or other curious pets, you may want to also put ceilings on the holes to reduce the probability of your pets getting stuck.

As for the material, I used some 1/4-inch OSB I had laying around. If I was going to buy something thicker that would be easier to mount.

If your floor material is too thin to accept screws from the side, you should figure out some other attachment method. I put three little legs on each floor to accept screws from outside the tube. Having big targets like these was much easier than trying to drive a small screw into a thin board.

Cap the ends of the tube, as well, to make it easy to attach the tree’s trunk to the foliage and to attach the trunk to the floor, if necessary.

By this point you should have something looking like this.

It is time to add the tree’s bark. This was such a tricky step that I forgot to get any in-progress pictures. The process is straightforward, it’s just the execution that seemed to require extra hands I didn’t have.

Two layers of burlap is enough to obscure the tube’s labeling. Attach each layer separately, starting by glueing the end, wrapping the tube, cutting, then glueing. Use a wood scrap or a putty knife to flatten your glue beads into the burlap. Repeat for the second layer, then attach the other end of the wood-strip clamp.

To cut the burlap over a hole, make three cuts that cross each other in the middle, dividing the hole into six wedge-shaped flaps. Tuck each flap into the hole and secure it on the backside with glue. I went through a lot of rubber gloves on this step, basically squirting glue onto my fingers and then smearing down each flap while trying not to get any glue on the front of the tree trunk.

Cutting burlap is easiest with a sharp and tight pair of scissors.

Even though I’d only finished the trunk at this point, I couldn’t resist checking the holes for inhabitability. Judging by his grin, this squirrel is happy.

Based upon the earlier layout step, you should already know how big to make the foliage portion of the tree.

Before cutting, though, keep in mind that the material you use to cover to the stuffing in the foliage portion will need to reach across the foliage at it’s narrowest dimension. This is not a problem if you are using a green bed sheet, but if you have a four-foot wide strip of green burlap, you may want to limit the diameter of your foliage to something shy of three feet. Lay the materials out on the floor and experiment to make sure you’ll have room to get in enough stuffing.

Once again, if you don’t have a compass handy to draw a big circle, whip one up with a strip of wood and some cable ties. Alternately, you could make the foliage portion a more tree-like shape and not just a simple circle. I was not confident enough in my upholstery skills to attempt this.

I used two and a half 32-oz bags of pillow filler from the local craft store. I also threw in some chunks of styrofoam that were previously just taking up space in the garage.

For the covering material, I used green burlap that I had left over from another project. I put on two layers to make sure the fill could not be seen.

A whole mess of staples later, you should have a finished foliage pillow thingy. Of course, you could skip the upholstering step if you could find a deal on a small green bean bag chair…

Mount the tree trunk and the foliage in the room. The exact steps will vary depending on your situation. Ideally, you’d have a stud running right behind the tree trunk, and you could just drive a few screws in through the openings.

Finish nails work great for the burlap-covered foliage. Drive them to the burlap with a hammer, then finish with a nail set. When you pull out the nail set, the burlap will close back up again.

What is a nut tree without nuts? Put the scraps from the earlier steps to use and cut out some acorn shapes. Google Images will give you plenty of patterns from which to chose. Mask off the lower half and paint or stain just the top portion darker.

If you’re feeling artsy, throw in a bit of a pattern to show the acorn’s texture.

Voila! A finished nut tree with its happy new owner.