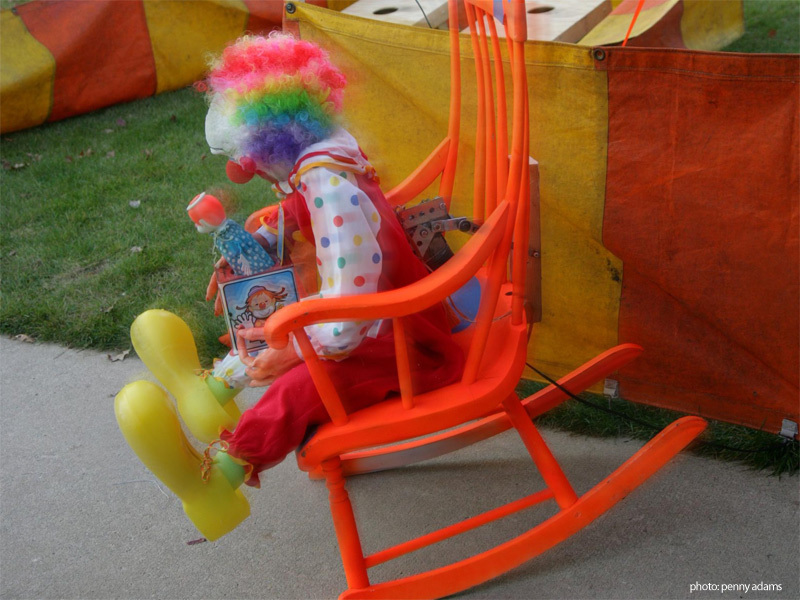
There are quite a few resources online for using surplus windshield wiper motors in Halloween props to achieve animation.

After seeing an example of a $400+ rocking chair prop I went into MAKE mode to see if I could recreate the prop myself for much less.

This project will take you through the steps of building your own animatronic rocking chair prop.

YouTube player

Project Steps

FIND MATERIALS

ROCKING CHAIR – Keep an eye out for an old standard rocking chair. I found mine on Craigslist for about $20 and a few months later found one out at the curb for trash pick up.

WIPER MOTOR – Windshield wiper motors can be purchased online new or picked up at a local junkyard for cheap. Also, there are other motors you could use to power this prop. The goal is to find a motor that runs about 10-20 RPM.

MASK/HEAD – Depending on whom you want sitting in your chair you can use just about any Halloween mask or you can sculpt your own head as I did. We won’t go into detail on sculpting heads in this project so be creative.

POWER SUPPLY – For this project I used a switching power supply from an old arcade machine that I had lying around. You can use a ‘wall wart’ or just about any other DC power supply that puts out 5-12 volts with a minimum of 2 amps. Lower voltage means slower RPM at the expense of torque (pushing power).

THE MECHANISM

This prop is very simple in theory.

The motor shaft rotates a linkage which converts rotational motion to linear motion.

The linkage moves a lever which is attached on one end by a hinge allowing the other end to move forward and back.

This forward-and-back movement causes the rocking chair to rock back and forth.

CUT THE WOOD

Cut 2 pieces of 2×4 wood to serve as your base and lever.

BASE: Cut 1 piece 6″-8″ in length.

Your base can be fairly short as its primary function is to lift the hinge point up from the seat and secure the mechanism to the chair.

LEVER: Cut 1 piece 16″-20″ in length.

Depending on the overall size of the body you want to place in the chair, cut this piece of 2×4 as long as the distance from below your prop body’s belly button to its sternum. This piece will act as the prop’s rigid “spine.”

Cut one piece of wood approximately 6″-8″ long to attach to the back of the chair.

This piece will be the attachment point for your motor’s linkage on the chair and can be made of wood, slotted angle steel or simply a small fabricated bracket.

BUILD THE MECHANISM

Lay out your base and lever pieces end to end and attach a door hinge between the two pieces. Position the hinge so the 2 pieces can close onto each other.

Mount your wiper motor a little more than halfway down from the top of the spine.

There are a variety of methods to attach the wiper motor to the lever. I use galvanized plumber’s strapping connected to the motor’s mounting bolts. You can also modify a 4×4 post cap bracket to mount your motor.

If you got your motor from a salvage yard you might have been lucky enough to grab the metal linkage which mounts to the motor’s armature as well. This linkage normally snaps on with a ball on the motor side.

Cut this linkage at the end opposite the motor leaving as much usable length as possible for adjustment.

If your motor did not come with linkage you will need to make your own. Linkage should be rigid and can be made from straight or angled metal. Drill a hole in one end which will fit over the ball or bolt on the motor armature.

ATTACH MECHANISM TO CHAIR

With the motor facing the back of the chair, secure the base of the mechanism to the seat of the chair centered on the seat from left to right and front to back.

Attach the linkage mount (bracket or 2×4) to the back of the rocking chair at about the same height as the motor. You can use screws, strapping or pipe clamps as long as this mount doesn’t move once installed.

WIRE MOTOR POWER

All motors are not created equal so there is some wiggle room in this step. Wiper motors have 2 speeds, fast and slow. We want to wire it up to run on the slow speed.

If your power supply has a voltage adjustment you will have to try fast and slow speeds with some adjustment to the voltage to obtain the optimum speed to keep the chair rocking smoothly.

Remember, adjusting voltage is not the BEST way to adjust speed but it will do for this prop since not a lot of torque is needed to drive the prop.

Run your wires neatly down the spine and out through the back of the chair, securing them with staples along the way. Ensure that there is no binding or pinching of the wire through the spine’s entire range of motion.

If using a computer power supply or one that is larger than a wall adapter, you can run the wires under the chair and mount the power supply below the chair as shown.

Note the photo and connect your wiper motor to your power supply using crimp-on female blade connectors or equivalent, keeping in mind that your motor connections may be different.

WARNING TIME: We’re messing with electricity. Ideally, anything on the motor side of the power supply will be 5-12v at 2 amps or so; not really a problem. But that all plugs into AC house current so still be careful.

CREATE AND ATTACH MOTOR LINKAGE

This is probably the trickiest and most frustrating portion of the project unless you’re some kind of physics major or mechanical engineer. You will be attaching the linkage to the motor and the chair. The amount of travel will depend almost entirely on the length of linkage and its attachment location on the mount.

WATCH YOUR FINGERS! YOU’VE BEEN WARNED! (I will spare you from the gross photos of my gnarly finger after it got caught in the linkage.)

Using either the original wiper motor linkage or a piece of drilled/slotted steel, connect one end of the linkage to your wiper motor’s armature.

Turn the motor armature by hand until it is at the 12-o’clock or 6-o’clock position (no easy feat because of the gearing). This is the position of the motor when your prop is sitting straight up in the chair.

While holding the “spine” in a vertical position, perpendicular to the seat/base, attach the free end of the linkage to the mount so that the linkage arm is perpendicular to the spine and/or parallel to the seat.

Remove your fingers from the motor area and power up the motor. Hopefully you had it on the slow setting or it may wind up surprising you. Keep an eye on the assembly to make sure that nothing is binding and that it is not putting so much stress on any of the pieces that it may tear apart under its own power. (Did I mention, WATCH YOUR FINGERS!?)

If your chair is rocking to the point of tipping over, you can secure the chair so it doesn’t rock and only the spine/motor combo is moving at this point.

ADJUST MOTOR LINKAGE

This is where we will fine-tune the rocking chair’s motion. Keep in mind that when you add the prop’s upper body and head, the center of balance will change. We’re not worried about perfect rocking motion right now. We need to make sure that the range of motion is correct.

You can adjust the range of motion of the prop using any one, or a combination, of the following adjustments through some trial and error.

Move the linkage mounting point up or down on the mounting bracket (2×4).

Move the mounting hole on the linkage where it attaches to the mounting bracket (2×4) closer to or farther from the end of the linkage.

Detach the mechanism base from the seat, move it forward or backward in the seat and reattach.

Ideally you want the prop to NOT hit the backrest of the chair when it leans back, or lean so far in either direction that the chair will tip. Additionally, you will want to make sure that the prop leans a sufficient amount in each direction to cause the chair to rock both forward and back.

See this video for an example of the acceptable range of motion.

DRESS IT UP - BODY FRAME

You can build your dummy’s upper body with 3/4″ PVC pipe and a T fitting. Using your own body as a guide, measure the segments of your arms and cut a piece of PVC to the length of each of those segments.

2 forearms, 2 upper arms, 2 shoulders, 1 neck, 1 spine

Leave the neck and spine PVC parts long until you are ready to install the head and attach the upper body to the 2×4 spine.

If you would like to bulk out the arms a little, you can use inexpensive foam pool noodles cut to length and slid over the PVC pipe prior to the next step.

Drill a hole in each end of the upper arms, one end of the shoulders and one end of the forearms. Attach the arm sections with bailing wire, electrical wire, rope, zip ties, etc. The arms should be floppy at all “joints” and bind as little as possible.

Using pipe clamps, metal strapping or just screws, attach the upper body assembly to the 2×4 spine. (Pipe clamps or brackets are recommended so that height adjustment is possible.)

Create legs in the same way, except that here you can choose to make the legs rigid by using a single piece of PVC or jointed by using segments. The legs can be attached directly to the chair once pants are put on. (See image for knee types.)

DRESS IT UP - DETAILS

This is where it gets fun. Now you can dress your prop any way you like.

Last year I created an old man caretaker for our graveyard theme using papier mâché, latex caulk, a plastic skull and some ping-pong ball eyes I made.

This year the prop was reborn as a creepy clown looking down at a traumatizing toy from my childhood. This head was also made from a cheap plastic skull and papier mâché but I used some human-sized acrylic doll eyeballs and air-dry clay to sculpt the details of the face.

The hands used for both props were cheap hands from a Dollar General store. If you look through the rack you can usually find left and right hands. These hands are typically painted somewhat bloody / red by the manufacturer but some dry brushing with acrylic craft paint takes care of that.

Hit up the local thrift store, Goodwill or Salvation Army to find all the clothes you’ll ever need for your props including shoes, hats, etc.

Conclusion

This prop is fairly basic but takes some tweaking to get the motion right. The realism of the prop mostly depends on what you put in the rocking chair. The more realistic a body you put in the chair, the more convincing the prop will be.