Photographed by Ulrich Schmerold. Translated from the original German by Niq Oltman

This article is from Make Vol. 73! Subscribe now to make sure you don’t miss out on any of our awesome builds.

For low-power applications around your home and yard, professional wind turbine installations are just too pricey. If all you need is a bit of juice for LED illumination or a Raspberry Pi Zero project, paying thousands for a small wind energy system seems disproportionate. And for experiments in school, the cost and time required should be minimal, too — schools are often strapped for cash. In this article, we’ll show you how to build your own small wind-power installation from old bike parts and stuff from the hardware store. With just a little more than a breeze, it can provide about 1 watt of power. That’s enough to charge a small battery, so you’ll still have power when it’s calm.

This small wind turbine is more of an experiment to teach you the basics; it won’t provide you with 100 percent reliable power. No miracles here! Also, please beware of strong winds and storms: this machine is not designed to handle that kind of weather and would likely disintegrate. You must protect it from such potential damage, as flying debris could cause injury.

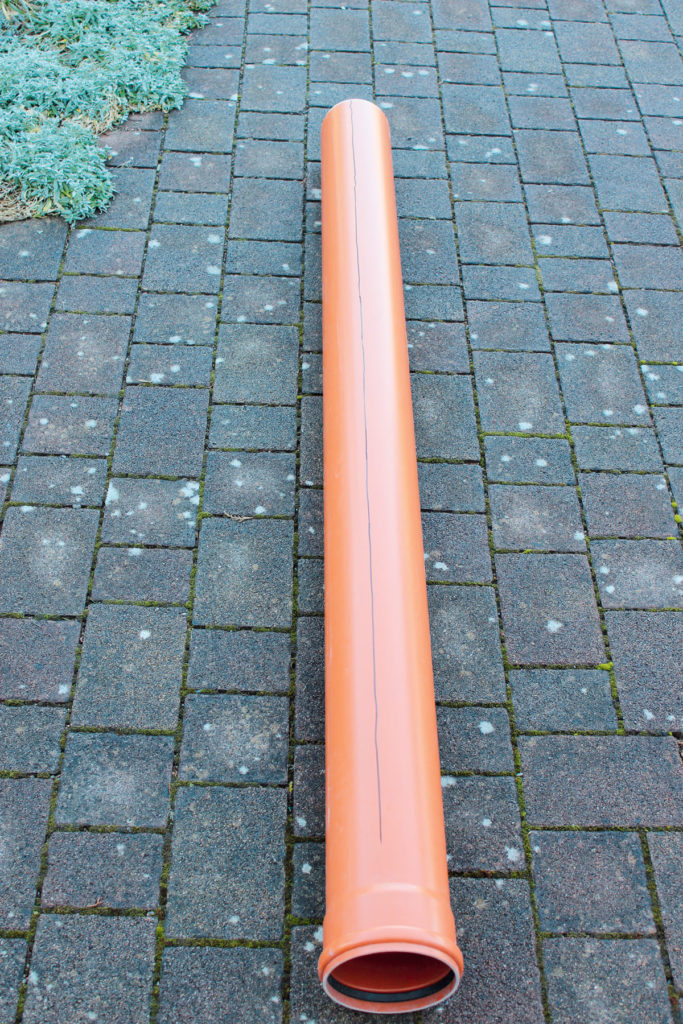
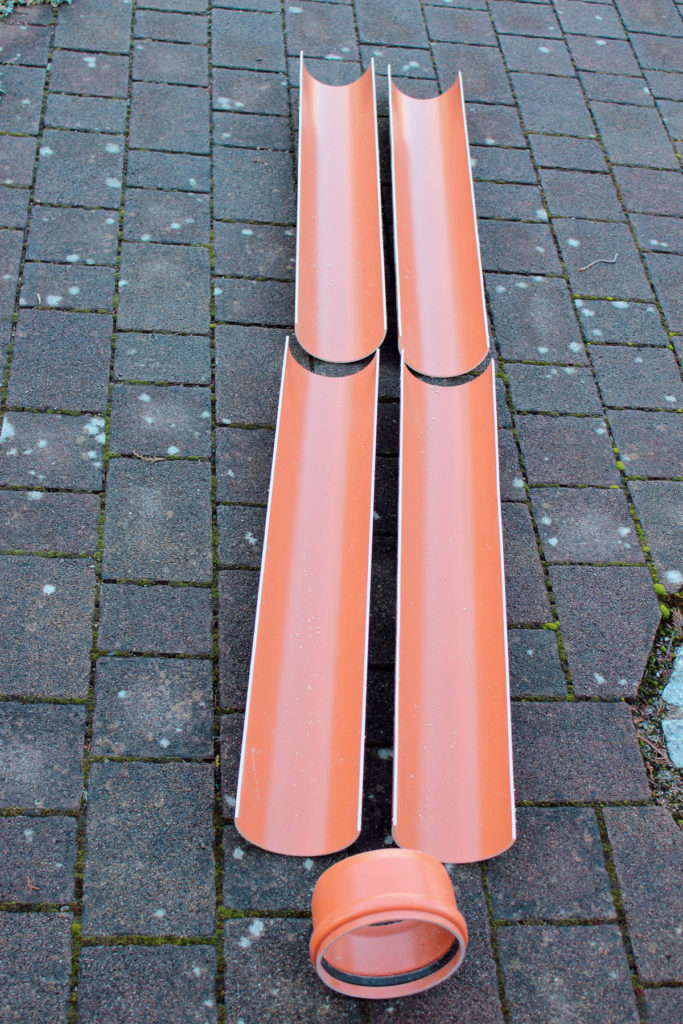
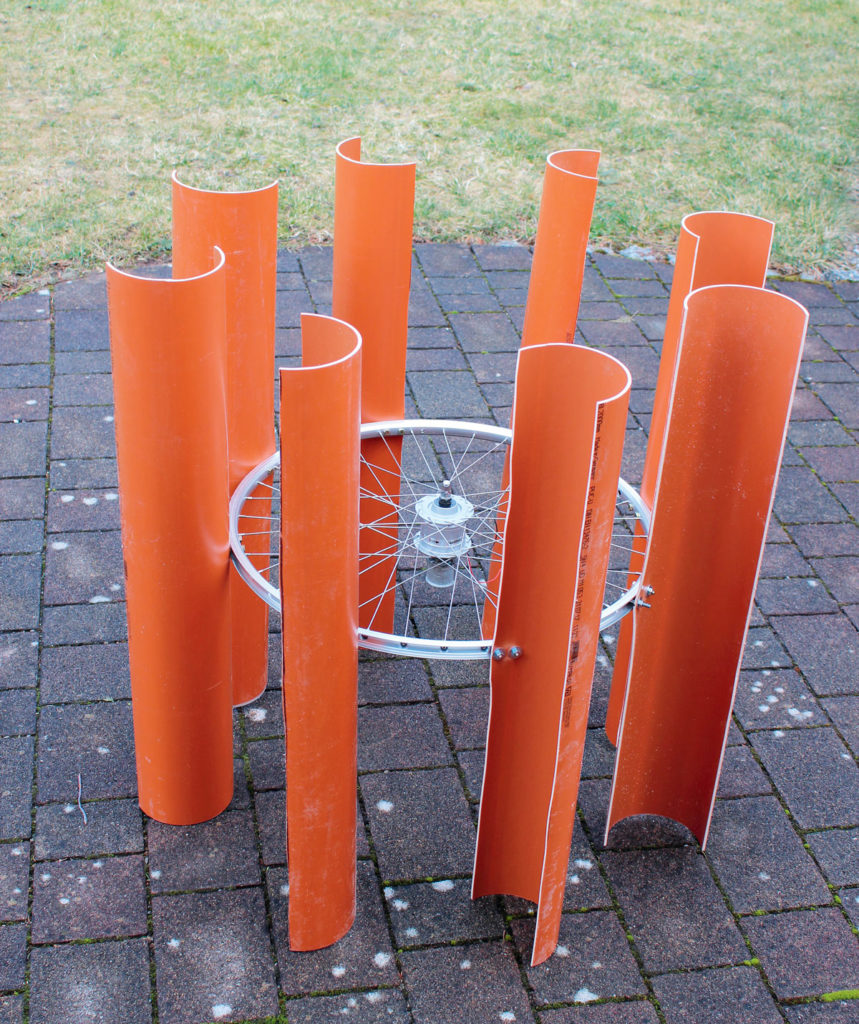
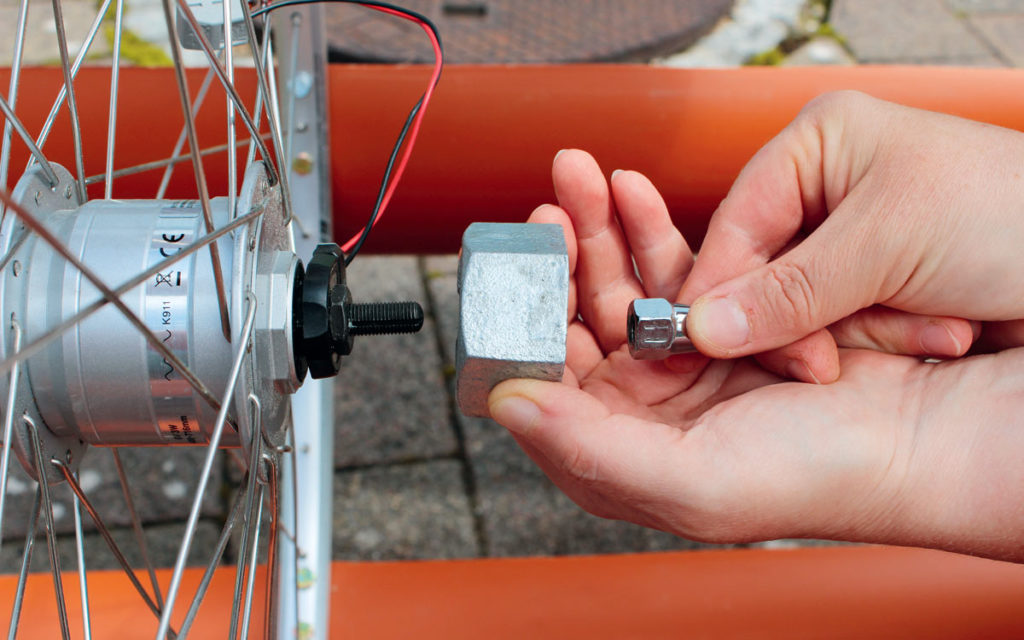
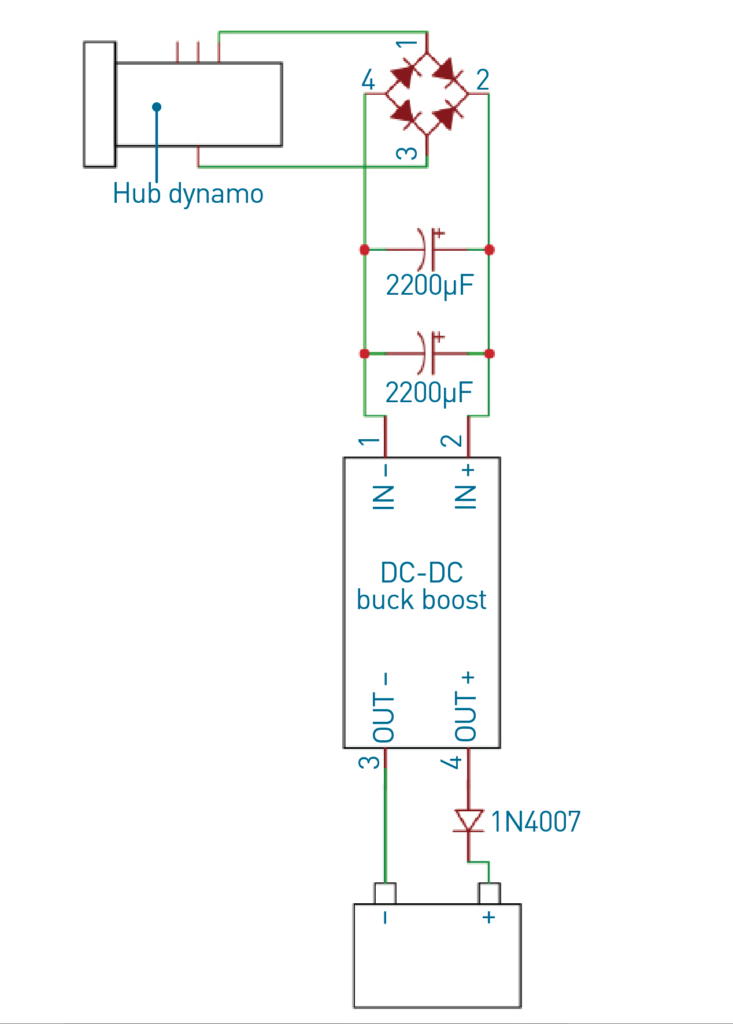
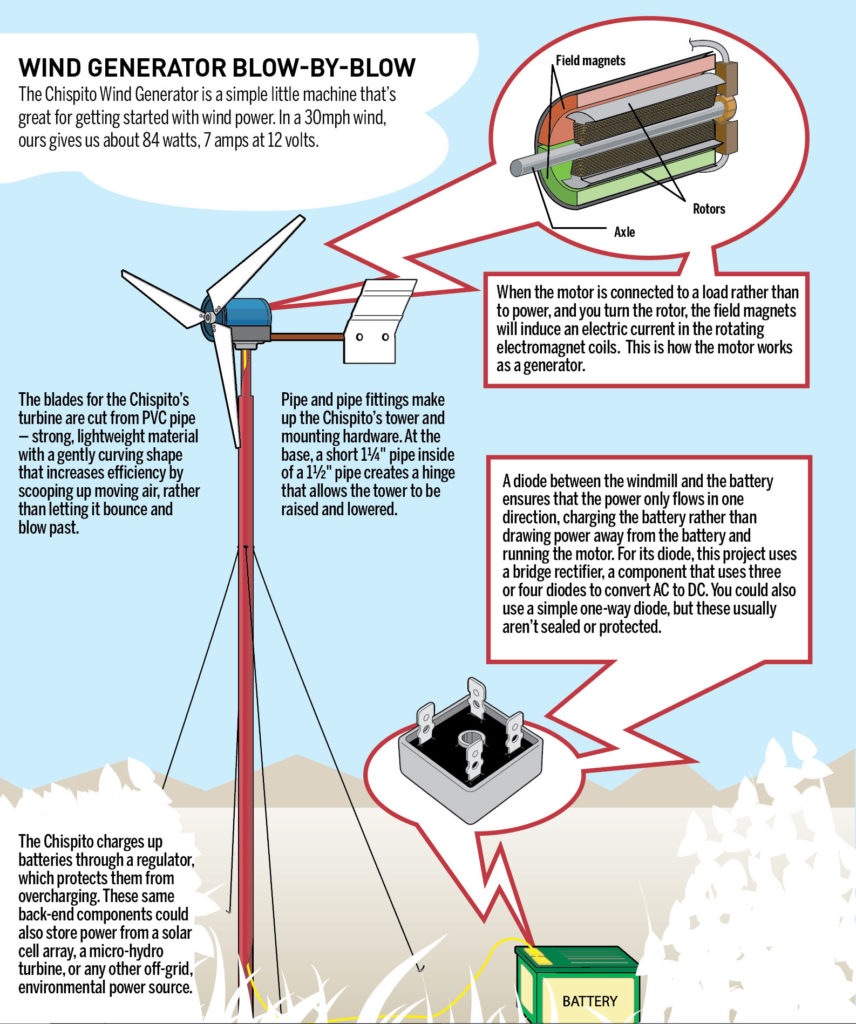
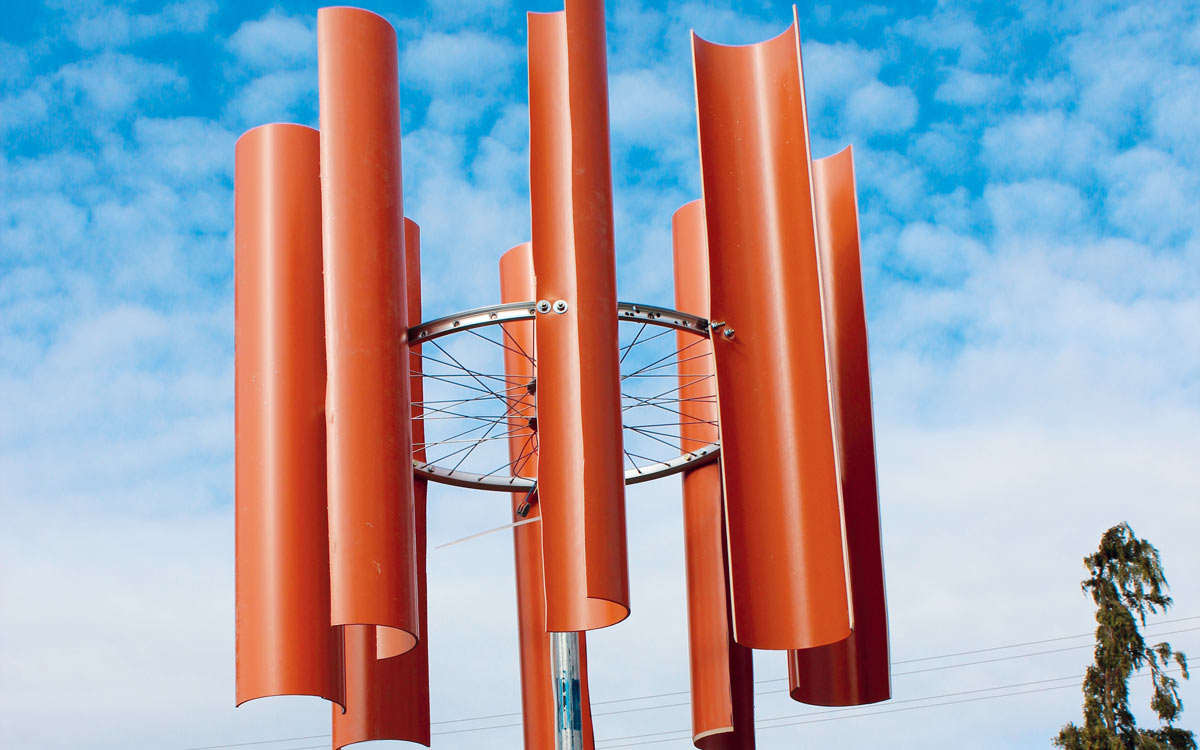
In contrast to the typical three-blade commercial wind turbines, we use a vertical rotor shaft. This eliminates the need for wind directional tracking and leaves us with a very simple design. Essentially, it’s just a vertically mounted bicycle wheel with a hub dynamo. For rotor blades, we use eight “half-pipes” cut from cheap plastic (PVC) drain pipe, vertically attached to the rim.

Our turbine will start spinning as soon as wind speeds reach about 2 on the Beaufort scale, or 5mph. With a stiff breeze of 20mph or 5 Beaufort (see the conversion table below), it provides around 1W of power output (we measured 147mA at 6.7V).

The wind speed scale we use today dates back to the 18th century. Originally, it was made to describe the effects on windmill vanes. British seafarer Sir Francis Beaufort (1774–1857) was by no means the first to publish such a scale; his work descended from that of civil engineer John Smeaton (1759) and geographer/hydrographer Alexander Dalrymple (1790). Even earlier scales were created by astronomer Tycho Brahe (1582), polymath scientist Robert Hooke (1663), and tradesman, rebel, spy, and Robinson Crusoe novelist Daniel Defoe (1704). But from 1829 on, Beaufort, who had now been appointed hydrographer to the British Admiralty, shared his scale with all interested parties. The Beaufort Scale has since become a standard. (Source: Wikipedia, en.wikipedia.org/wiki/Beaufort_scale)

Build Your Bike Wheel Wind Turbine

Let’s start by building the rotor-and-generator unit. You’ll be using a mast made from a steel water pipe, probably secured in the ground using poured concrete. Check your local requirements for the foundation and the mast height, and adjust accordingly. Depending on local conditions, you may also need to anchor your mast using wire cables.

Project Steps

Cut the turbine blades

We used thin-wall PVC drain pipe to make our turbine blades (Figure A). In Germany, where we live, this stuff is orange; in North America it’s usually white.

Figure B

Using a jigsaw, you can cut 4 blades from a 6′ or 2m length of pipe (Figure B). We need 8 blades in total. Take care to cut the pipe exactly in the center — ideally, the blades should all be the same weight.

Attach blades to generator

ch blades to generator

Figure C

For the generator, we use a bicycle wheel (rim) fitted with a hub dynamo (Figure C). Rims made from aluminum work best, as they can be drilled easily. If you’re taking parts from a used bike, make sure to remove the tire and inner tube, and any brake discs.

Figure D

Attach the 8 turbine blades as shown, using 2 screws, nuts, and large washers each, spaced evenly (try counting the spokes), and centered on the rim (Figure D).

Make the mast

ake the mast

Figure E

Make the mast from zinc-plated steel water pipe threaded at both ends (Figure E). Drill a 9mm hole into the end cap and tighten your hub nut onto the bike wheel’s axle to attach the wheel to the cap (Figure F below). Once the mast has been mounted securely in the ground (!), you can screw the cap onto the mast.

Figure F

For erecting the mast, the thread at the other end may come in handy. You can thread a matching tee piece onto it, and encase the tee in the concrete block that you’ll pour in the ground. The concrete should be sufficiently heavy to both support and anchor the turbine, and must be fixed firmly in the ground. Then, whenever a storm comes up, you can simply unscrew the mast from the concrete block and take the turbine somewhere safe.

Don’t make the mistake of underestimating the forces created by winds. They grow proportionally to the cube (third power) of the wind speed! If necessary, guy out the mast with wire cables.

Assemble the electronics

e the electronics

Figure G

Our device is set up for charging a lead-acid battery using the current generated by the dynamo (Figure G). The hub dynamo produces alternating current, which we’ll convert to pulsating direct current using a full-bridge rectifier. To smooth it out, the pulsating DC is fed into the two 2200µF (microfarad) electrolytic capacitors.

The smoothed DC is then passed to a buck-boost converter (about $10 on eBay) which we’ll use as a charging regulator. This will convert any input voltage from 1.25V to 30V into an adjustable, constant output voltage. We’ll set the converter’s output to be 0.7 volts above the end charging voltage of our battery (compensating for the diode’s forward voltage). The 1N4007 diode is required to prevent current flowing back from the battery to the converter.

For example, a 6-volt lead-acid battery has a charging voltage of 7.2 volts. Adding the diode’s forward voltage of 0.7V, the converter should be set to an output voltage of 7.9V.

Your electrical load (whatever’s going to consume the power, an LED lamp, for instance) will be connected to the battery’s output. Be aware that the load must be able to handle the output voltage set for the converter. While the generator itself may only be able to provide a small amount of current, the battery may output several amps. In case of a short circuit, the consequences may be dire (fire hazard). To prevent accidents, you’ll need to safeguard accordingly whatever circuit you’re connecting to the battery.

Storm Warning!

With the electronics assembled, you’re ready to wind-power your setup! Enjoy your new capacity as a wind turbine owner.

This wind turbine is meant as an experiment, a low-cost practical demonstration of how wind turbines work in principle, for instance in a school setting. It’s not intended to withstand strong gales or severe storms. When not in use, or when wind speeds exceed 6 on the Beaufort scale, it should be dismantled.

The bike wheel and the mounts for the rotor blades aren’t designed for permanent operation, in particular with strong winds. We recommend you take your own steps to strengthen this design if you want to make it permanent. (That said, the construction was more stable than expected. I left it in the garden all the time, whatever the weather. Only when a cable tie gave out, the mast fell over and a blade was destroyed.)

Do you operate a wind turbine? We’d love to hear from you at wind.turbine@make.co (send us photos and specs, please). We’ll include your contributions in a future report.

Mast from the Past

In 2006, New Mexico homesteaders Abe and Josie Connally wrote an excellent how-to in Make: Volume 05 for building their Chispito Wind Generator from PVC pipe and an old exercise treadmill motor. Three years later, John Edgar Park built the project on national TV for PBS’ Make: television.

The Chispito is still popular today — Abe and Josie later posted the project on Instructables where it garnered hundreds of comments, and on their own site velacreations.com, where they document all kinds of wonderful off-grid DIY projects. Their solar food dryer, top-bar beehive, and earth block floors were all featured in Make: as well.

Raised on a mast 10’–30′ high, the Chispito will generate 84 watts of power in a 30mph wind; be sure to follow the updated instructions for shaping the blades at velacreations.com/chispito.

Illustration by Tim Lillis

Conclusion

More Wind Power Projects