Object-oriented programming: a style of computer programming that uses different modules of code that build on each other or work together to create a program. OOP (for short) is commonly used today rather than line after line of code, to make programs more organized as collections of smaller units. This is an essential technique in programming today, and I will teach it to my best ability in this tutorial using the well-known programming language (and my favorite) Java. Note: this tutorial is currently a rough draft, but will be improved soon! Good luck!

Project Steps

Setup:

Before you begin coding, you need something called the JDK. This stands for Java Development Kit, and is Java’s free way of letting you program in their language. Just click this link, and you will be led to the JDK 5.0 download page.

After downloading the JDK package, follow the instructions to install it on your computer. Make sure to use the default options for where you install the JDK, because that will come in handy later.

Setup, part 2:

Next, to make programming in Java easier, download and install NetBeans. NetBeans is an Integrated Development Environment, or IDE for short, that was created just for Java. NetBeans can be downloaded here. I’d recommend that you install the Java SE package if you’re new to Java.

Setup, part 3:

Simply open the NetBeans installer and walk through the process. It will ask you where to install NetBeans and where the JDK was installed. If you used the default option for this in the JDK installer, you should be fine accepting the default option here. Check the checkbox that instructs the installer to open NetBeans when you’re done and click “Finish.” The installer will close, NetBeans will open and we can get started!

Beginning your first project in NetBeans:

To start, go to File -> New -> Project. A window will open. Click “Next”, and give your project a name (I will use “OOPExample1”). Once that’s done, click “Finish.” A file (“OOPExample1.java”, if you used that name) will appear.

Goal:

Now we decide what will happen in our program. For this project, I will teach you how to make the game RPS (rock, paper, scissors): a simplistic yet fun game, great to learn to program. I will try to keep this tutorial simple to follow, and will explain the code as best I can.

Code:

The following code may not make much sense if you are new to Java, but it will after I explain. The code has been attached to this project and can be accessed as RPSCode.pdf in the “Files” section. Open it, delete everything in your “OOPExample1.java” file, and paste this code inside. Now, hit the “Run” button (it looks like a “Play” button on a DVD player, green), and some text will appear. You can now play Rock, Paper, Scissors with your computer! To play again, hit the “Run” button again.

Explanation of the Code:

We made it through the programming! Next is to understand it. Look back at your code.

The first line just tells what “package” this piece of code is in. This simply tells where your code is stored. The next line is an import statement: it lets you use extra commands so that you can do more stuff with your program. Scanner (what it imports) is a module that reads what you type in when the program asks for your move.

public class OOPExample1 just starts a new class (a collection of functions and variables). Inside there is a method (function): public static void main(String[] args). This is the main method, which runs when the program runs.

Inside is a bunch of code, the first of which is the line CPU cpu1 = new CPU();. This may look confusing, but all it does is create an instance (kind of like a personal copy) of the CPU class, which comes later. It also makes an instance of a Scanner: all that does is read what you type. These instances can be called by their names (cpu1 and sc1, respectively).

Next, we define (make) two variables: validmove (type boolean, either true or false) and userMove (a String (bunch of text) that stores what the user’s move is).

The code inside the loop prints the message instructing you to type your move, (the System.out.println command), reads what you type (the nextLine command), converts it to lowercase (the toLowerCase) command, and tests it to see if the input is either “rock”, “paper”, or “scissors” (the if command; || means “or”). If one of those is true, validmove is set to true, and the loop ends. Phew! Now we have the user’s move!

After the while loop, there is a command that defines another string: CPUMove. It’s kind of self-explanatory what this string does: it stores the CPU’s move. This line uses a method (function) called getCPUMove in the CPU Class (once again, a collection of variables and methods) to decide (randomly) what the computer’s move should be. Finally, CPU’s comparemoves method is called and it is given the strings CPUMove and userMove to let it know what moves have been made by the players.

Explanation of the Code, part 2:

(Note: don’t rely on this image for the code, because I could not fit it all into one image). Now I will explain the CPU class! By the way, if you have any questions about what any of this terminology is, there is a great tutorial here about understanding OOP, created by the makers of Java.

The first method is called comparemoves. Guess what it does? (Compares moves!). Inside are a bunch of if statements. Some of these are inside of each other, which might seem a little weird. Basically, all it does is see if the user played rock, paper, or scissors. Once it finds out which one he/she played, a bunch of if statements inside that find out what the CPU played and tell a different method, outputmoves, what to print on the screen.

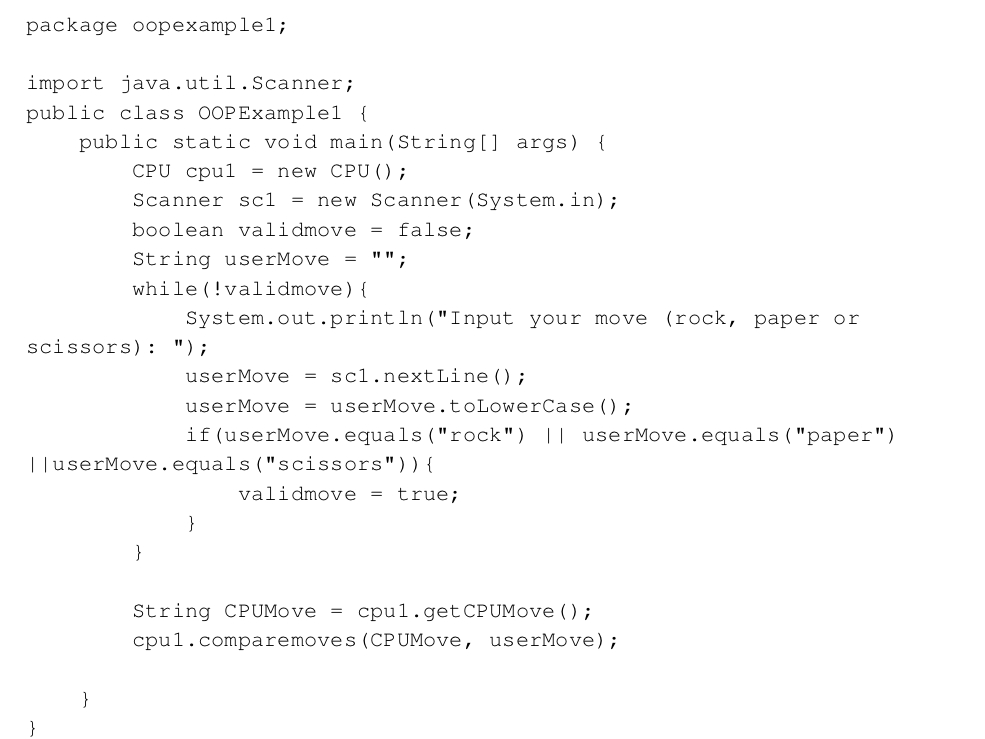
Note that this method is called public void comparemoves. Void means that when it’s called, it doesn’t return anything. Returning a value means that the function passes back a value to the instruction that called it. The line String CPUMove = cpu1.getCPUMove(); takes what was returned from the method getCPUMove in cpu1 and puts it in the string CPUMove. Make sense?

Now let’s talk about the outputmoves method, which the comparemoves method calls. All it does is put together a string, output, and print it to the console, where you typed your moves earlier. The System.out.println statement is pretty simple, as all it does is print the string output. The String output = ... statement might be a bit confusing, however. It seems pretty normal, but what’s this concat() thing? It’s a method that concatentates (fancy word for “pins onto the end”) the thing in parentheses to the string before it.

This helps us put together the sentence “I played . !” using the parameters that were passed to it (things that were given to it to work with).

Finally, we reach the getCPUMove method. This method randomly chooses what move the computer plays. The first line chooses a random number from just above 0 to just below 3. Then, the number is floored, or the decimal part is removed, making it a random integer from 0 to 2. Finally, it is cast (changed) to an integer type (it wasn’t completely an integer before because of the fractional part), and is stored into choice. Next, a string rpsmove is created and set to nothing (“”). Finally, there is a switch statement, which is a variant of the if statement.

All that it says is if choice equals 0, then rpsmove = "rock". If it equals 1, it is set to “paper”, and if it is none of those (it must be 2), it is set to “scissors”. Then it returns the move in the string rpsmove. Voilà! We’ve returned a random move from the computer! But before I finish, I’d like to point out some things about the switch statement. Notice that the variable being tested is inside the parentheses next to the word switch, and that there are break statements after each case. All these do is clear the path for the next case. OK! We’re done!

Wrap-up:

Thank you for reading this! It must have taken a great effort to read. It took me a great one to write. I hope that this project got you interested in Java programming (if it didn’t bore you to death with all of the explanation), and that you will continue to explore this beautiful language. For a link to the beginning of a complete tutorial on Java, click here.

Good luck!