duckie

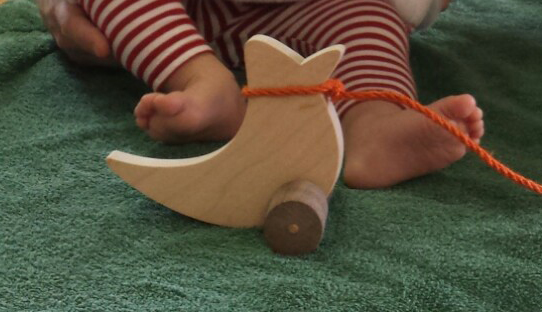
What’s more classic than a kid’s wooden pull toy? Nothing! I’ve made the most awesome wobbly duckie for my daughter Annabelle just in time for Christmas and thought at least one of you handy folks might enjoy a last minute excuse to get out to the shop!

Alright let’s get on with the project. First you’ll need an elf… Well, there are actually no elves required, just this template and your own awesomeness!

Project Steps

Print out template

Print out your copy of the Mr. Quackers template (no scaling).

Spray some Super 77 on the back of the paper, then attach it to a piece of maple (or the wood of your choice) for Mr. Quackers’ body.

When you spray Super 77, it’s a great idea to wear a mask so that the particulate doesn’t end up in your lungs. Think about it. Atomized adhesive, dust, and lungs = no good!

Bandsaw Mr. Quakers

Cut out Mr. Quackers on the bandsaw.

Profiling

Head over to the sander and smooth out the profile as much as possible. You’ll have to do some hand work in the corners of the beak.

Oh, don’t turn on the sander with Mr. Quakers propped up like shown in the photo unless you want to see him fly across the shop!

Onto the hand work. I used a couple files and a hand sanding block to smooth out the corners around the beak.

Drill for the axle

Head over to the drill press (or use a hand drill) and put a 3/8″ hole where shown on the template.

More sanding!

Now it’s time to break out the palm sander and sand up to 220 grit! Go nuts here, if you want, and take it up to 800. Just keep in mind that it’s a kids toy and is sure to have some dents and scratches after a while.

Finish sanding with some 120 or 220 grit to soften the edges.

Turn

Now onto my favorite part of the project! Time for some turning! If you decide to buy a dowel for your wheels instead of making them, you can skip this step. Now, there are many many ways to make dowels, but for this project I only made a section big enough for the project. Here’s how I went about it.

Chuck up a segment (or turn between centers) and turn as much as you comfortably can to get the diameter between 1¼” and 1½”.

Flip this segment and turn to get the same diameter. Yes, I changed chucks…

Drill the wheels

Once this section is turned, drill a ¼” hole through the length of the dowel. The axle will go in this hole.

Watch yer fingers!

Ok, this next step isn’t exactly for the faint of heart so use as many hold down clamps as needed to complete these next few steps.

First true up each end at 90°. Note the zero clearance fence and support that the dowel is resting on.

Now set the blade to 10° and cut through the zero clearance fence and support material. This way you’re only cutting the dowel when it’s time to do so. Line up and cut the dowel in half. I aimed for each piece to be about 1½” long, but make it work for you.

Optional clean up

This next step is totally optional so feel free to skip it if you’d like. Put each wheel back on the lathe and just true up the side that’s cut at 10° as shown in the photos. I feel like this just tidies up the appearance a bit.

Assembly

Alright, awesome sauce. It’s time for assembly! Rough out a length of ¼” dowel for the axle and cut it on the bandsaw. Round over one end of the axle on the bandsaw and press it into one of the wheels. Feel free to glue these in place, but I find that the press fit is sufficient.

Now slide the axle through the ⅜” hole in Mr. Quackers and press the other wheel on so that the 10° angles are opposite each other. Be sure to leave enough clearance on either side so that the wheels do not bind on the body as they rotate.

Quality control!

All that’s left is to tie the pull string around Mr. Quackers’ neck and have your certified toy inspector give it a look!