This hand-cranked capstan pulls down kites easily and quickly but is lightweight and portable. A power option can be added for even more ease of use.

The line ends up on a removable halo spool, so spools of line with varying weights can be used on the same winder. The winder is built from standard hardware-store parts with common tools in a few hours. Because the line storage is not limited by the size of the winder, the mechanical advantage of a small capstan can be used to pull in a lot of line.

The conventional method of winding the line directly on a lightweight spool under high stress risks collapsing the destination reel due to the elastic band effect. The design shown here limits the tension on the takeup reel to the minimal amount needed to make sure the line will all get on the reel.

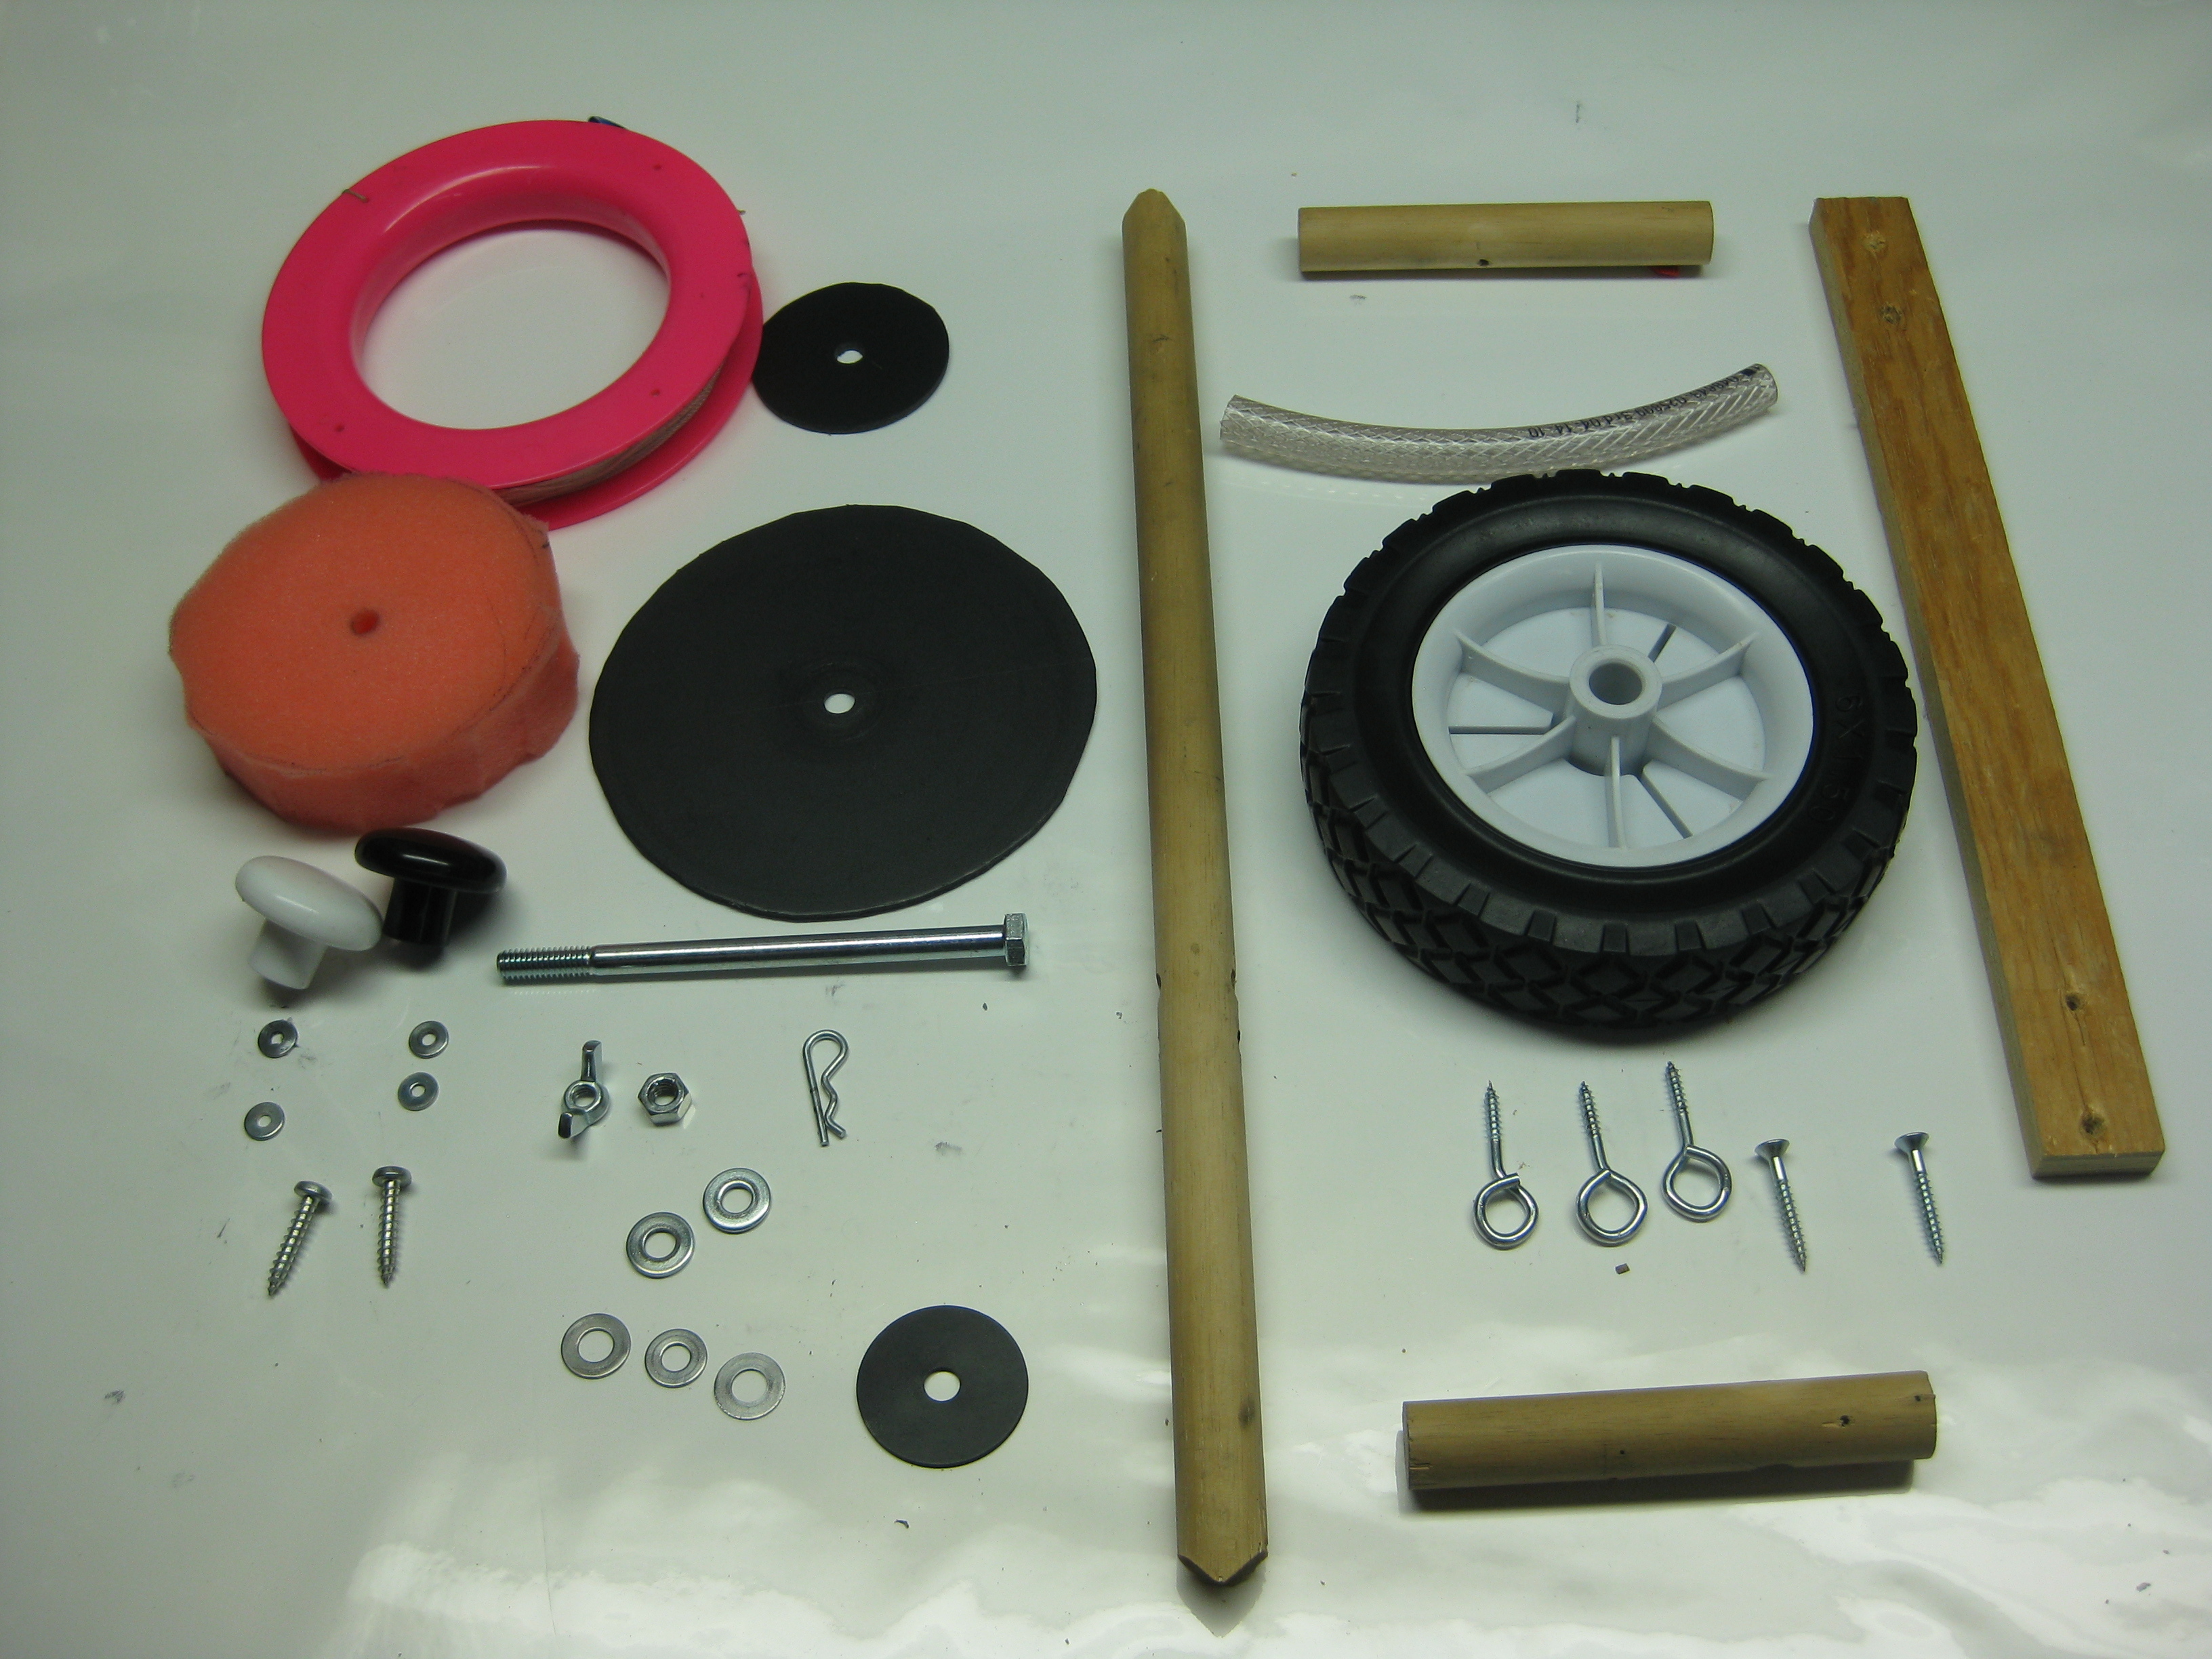
The robustness, strength, and small size of the reel/winch comes from the hub of a small lawnmower wheel as a capstan with a long 5/16″ steel axle bolt mounted on a hefty wooden dowel. The widely available, lightweight halo reel is supported with soft, lightweight open cell foam that forms part of the slipper clutch that limits the winding tension.

The dowel is fitted for one hand to hold braced against the cranker’s waist while the other hand powers the capstan with either the high power or high speed knobs on the crank handle (or a drill chucked with a nut driver to match the axle bolt head).

The materials are chosen for easy construction in a home workshop. The trickiest operation is cross-drilling the axle twice for a cotter pin and a hitch pin.

Some care is needed for threading the kite line on the winch—especially with a kite that is pulling strongly (use gloves)—but it is a straightforward operation once learned. Then launching and flying the kite to altitude is easily done with just the halo, and the winding down is done with the winch. The winch can be used to wind out line also but this requires extra manual care, or a drum adaptor specific to the halo size.

Project Steps

Parts needed

See above for the detailed list.

Cut some pieces to size

Saw the tire off the lawnmower wheel.

Cut the dowel into 3 pieces with the longest 3″ longer than half your arm length and the two shortest about 8″ long. The long piece is the spine of the winder, the short ones are the cross pieces.

If you have a drill bit large enough, drill across the ends of the dowel to form mouths large enough to hold the short pieces neatly and rigidly at right angles to the long spine dowel. Try to orient the mouths so that the cross dowels are parallel with respect to each other.

If you don’t have such a large drill, cut the ends of the dowel into an open fishmouth shape of about 60 degrees at the base with your saw(s) and carve the end dowels to match.

The fancy shapes at the ends of the spine are intended to hold the cross pieces from twisting and pulling the string out of alignment into a tangle.

Cross drill a 5/16″ hole for the axle bolt in the same plane as the cross pieces at least 5″ from the top end of the spine.

Lubricate the hole with some powdered graphite. Be sure to cover one end before puffing the graphite or you will have black graphite everywhere! Check the fit of the axle bolt in this hole. It should turn smoothly and easily without wobbling. Ream the hole out if needed by re-drilling it until the axle fits well.

Use a hole saw to cut a disk at least 2 1/4″ across and make the center hole 5/16″ to fit loosely over the axle bolt.

Cut another disk around 6″ in diameter with a 5/16″ central hole. A perfect circle is not necessary but try to have the hole in the center and don’t leave any points or sharp edges.

Cut the crank handle to 10″. It should span the wheel hub and extend 3″ extra on one side for the high-power knob.

Drill holes for the high- and low-power knobs 3/8″ from each end of the crank handle centered in its width. Drill a 5/16″ hole for the axle bolt so the handle spans the hub; crossing both edges eliminates places where the string can catch.

Prepare the axle for the capstan

Use the hacksaw to notch the bearing collar inside of the wheel across the central hole to catch a cotter pin which will be shoved through the axle later. Keep the notch as small as possible to preserve the wheel strength while ensuring that the wheel can turn the axle with some force.

Mark the axle bolt for a cross hole to hold a hitch pin in the wheel notch with the bolt threaded through the crank handle and the wheel hub. Disassemble and center-punch the mark to guide the drill in the next step.

Cross drill the bolt at the marked point with a bit big enough to hold one hitch pin. Be sure to:

use oil or wax to lubricate the drill bit;

hold the bolt in a vise or in vee blocks to keep it safely steady;

drill straight through the bolt starting at the punched dimple. Check and re-check your setup prior to drilling!

Find the place to drill for the hitch pin by assembling most of the axle components:

First put the handle and then the hub on the axle (they will be loose for now),

shove the capstan locking hitch pin through the bolt,

add a washer and a shim washer on top,

push the bolt through the hole in the spine dowel

and add another pair of thick washers.

Mark the place to drill for the hitch pin that will hold the axle on the spine. Leave a bit of room between where the hole will go and the second washer to account for the thickness of the pin. Take all the stuff off the bolt and cross drill it as for the first hitch pin.

Make sure the knob holes in the crank are big enough to let the screws turn freely.

Install the crank knobs with washers on both sides of the crank and tighten the screws just enough to remove wobble while letting the knob spin with little effort.

Make sure the knobs are on the same side of the crank!

Now shim the wheel hole down from its normal 1/2″ diameter to the 5/16″ diameter with the vinyl hose. Cut the hose just long enough to fill the axle hole from the outside to the bottom of the inside notch.

Press the hose into the axle hole. This should be a tight fit so the vise may have to do the pressing with some blocks of wood to protect the wheel and some liquid soap to temporarily make stuff slippery.

Ream out the vinyl hose shim with the 5/16″ drill to make it a tight fit for the bolt.

Push the axle through its hole in the handle; make sure the bolt head is on the same side as the cranking knobs.

Press the axle through the shimmed axle hole.

Use a wrench to twist the axle so that the cotter pin hole lines up with the slot. Insert the pin and spread the ends to fix it in place.

Re-assemble the axle and washers onto the spine dowel as previously done, but this time insert the second hitch pin.

Add or remove thick and/or thin washers to ensure free turning with little end-to-end play.

Add the rubber washer outside the second hitch pin.

Add the larger thin disk outside the washer

Cut an insert for the kite line halo that fits tighly inside the central hole.

Punch a 5/16″ I.D. hole in the center of the foam disk with the blunt end of the 5/16″ drill by mashing the foam against a hard surface and rolling the edge of the drill end around to cut the foam. Alternatively, use 5/16″ O.D. tubing for better results.

Pop the foam disk onto the axle, add the smaller thin disk, a washer and a hexagonal nut.

Tighten the hex nut enough that the foam and discs rotate with the axle when cranking but the inside disc can be stopped with the pressure of a bare thumb.

Twist on the wing nut until it solidly touches the hexagonal nut. The nuts will jam together to resist the tendency for the slipping reel clutch to loosen or tighten itself.

Drill through the crank and the hub close to the inside of the rim for the bolts to carry the cranking torque to the wheel hub. Use any web structures available to help carry the twisting forces.

Use nylock nuts or equivalent on top of washers at both ends to solidly fix the crank to the hub.

Twist the loops of the eye screw out of line so that a kite line can easily be slipped in diagonally but will not wander out if pulled at right angles to the loop. 1/16″ is enough for most kite line up to 150 pound test.

Drill a hole for the eye screw in the flat end of the dowel that will be the top crosspiece. Screw the loop in until it can barely be adjusted for alignment.

Pre-drill and screw the lower dowel crosspiece onto the spine. This is a belly brace to help with holding the winch with one hand while the other cranks. This should be glued later after any fit adjustments.

Pre-drill and screw the upper crosspiece so that the inside hole of the loop on the end is aligned with the outermost part of the flat spot on the wheel hub. Align the loop so that the twisted-out part is away from the wheel hub.

Drill a hole for a second screw eye aligned with the innermost flat spot of the wheel hub.

The third screw eye will be aligned with the centerline of the halo reel, so fit it on the foam insert and drill the mounting hole.

Twist in screw eyes with the loop oriented along the crosspiece. Alignments with the reel and hub can be adjusted by twisting as needed.

Threading the line on the winder

Threading this machine is less complicated than threading a sewing machine, but it is as important to get it right.

The line is threaded in from the bottom of the halo reel to the kite as follows:

It feeds up from the bottom of the reel

to the reel-side fair lead

to the capstan takeoff fair lead

around the capstan 4 times in the same direction as the takeoff reel

then through the capstan fair lead to the kite.

Conclusion

Putting the winder to use

Compared to a simple halo this winder is complex, and that may not be appropriate for a simple flying session. But, if you have to move a lot of line quickly under high tension, this unit will save a lot of effort and pain, especially if you can use the drill power option.