YouTube player

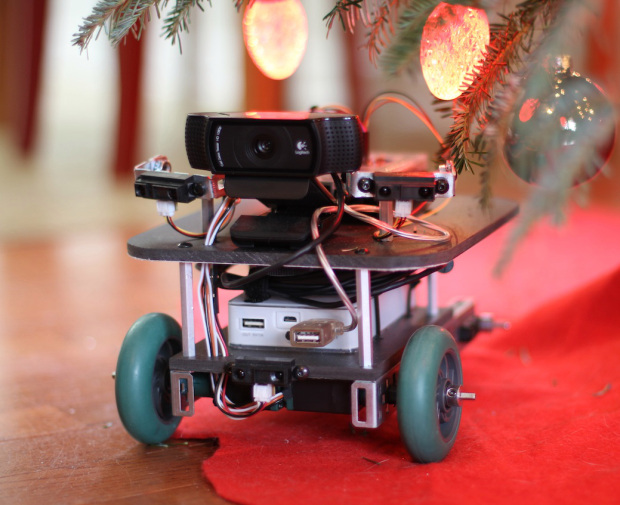
The CheerBot is a robot that roams the house and looks for certain colors using its camera. When it finds one of the colors I’ve told it to seek, it changes the color of the lights on my Christmas tree to match. It also submits the color to the Cheerlights service, which synchronizes the color of participating light displays around the world. It’s a complicated setup, but I’ll walk you through the basics. Most folks will find plenty of opportunities to learn with this project. I know I did.

CheerBot Diagram

To summarize the build process, you need to make a robot that can drive around without bumping into things, and then put a camera on it with code analyzing the video and tweeting when certain colors are found. As with most projects, there are near infinite ways to go about it. I’ll give you guidance on one way, but I challenge you to learn new things and make the project your own.

Cheerbot

Project Steps

Setup BeagleBone Black

The BeagleBone Black is ready to boot out of the box, but you will need to connect it to the Internet. I suggest powering the BeagleBone with a 5V, 2A wall adapter until your battery is ready. Likewise, connect to your home network with an ethernet cable until you get WiFi setup.

  • To get your system clock to set itself on boot, use Derek Malloy’s tutorial (http://derekmolloy.ie/automatically-setting-the-beaglebone-black-time-using-ntp/) to have your BeagleBone Black set its time upon boot.

  • Setup WiFi

    Connect your Beaglebone to your wireless network so it can update the Cheerlights service while roaming the house. When using a WiFi dongle, be sure to have your BeagleBone plugged into a 2A power source (be it wall wart or battery), and use a powered hub on the BeagleBone to connect the WiFi dongle. If the BeagleBone is only getting power from a connection to your computer’s USB port, it does not get enough to power a WiFi dongle with its own USB port.

  • I had trouble connecting my BeagleBone Black to WiFi because I installed the latest version of Ångström, and most wifi setup instructions don’t work with the latest kernel. I found one that did work for me:

    http://www.codealpha.net/864/how-to-set-up-a-rtl8192cu-on-the-beaglebone-black-bbb/

  • Install GPIO Library

    http://learn.adafruit.com/setting-up-io-python-library-on-beaglebone-black/installation

  • This will allow your BeagleBone to read sensors and control motors using the Python language.
  • Adafruit’s tutorial mentions the optional but recommended step of flashing your BeagleBone Black with the latest version of Ängström. I did this, but it messed up my WiFi setup and I had to find a different way to setup WiFi.

  • Install OpenCV for Python

    
    opkg install python-opencv


    Install TweetPony

    This library allows you to tweet from a Python script.

    
    opkg install python-pip
    
    pip install tweetpony


    Install CheerBot Code

    
    git clone "https://github.com/BabyWrassler/CheerBot.git"
    
    
  • The code in color.py should work for many cameras, but the code in avoid.py is for a very particular set of IR sensors in a particular arrangement on the robot with certain values in the voltage dividers. In other words, you’ll almost certainly have to modify it.
  • “avoid.py” and “color.py” run on the BeagleBone Black on the robot. “cheerServer.py” runs on a Raspberry Pi with an XBee radio that talks to an Arduino with an XBee running “tree.ino”.

  • Create Twitter Account, Setup Developer App

    Create a Twitter account for your robot, or let it use yours. Login into dev.twitter.com/apps/new with the account of choice. Setup an “App” with the required information on the first page. Then go to settings tab and change “Application Type” to “Read and Write”. Click the button to “Update Application Settings”. Go back to the “Details” tab and “Create my access token”. Wait a minute, then refresh the page. Your token will be ready to have its various parts copied and pasted into the CheerBot Code (both color.py and cheerServer.py).

    Solder Up BeagleBone Cape

    The servos require a separate power source than the BeagleBone, but need to be connected to the PWM outputs of the BeagleBone. The infrared sensors output 5v, but the BeagleBone can only accept 1.8V to its analog-to-digital converters, so resistor voltage dividers are needed.

  • Watch this excellent video on voltage dividers to learn how they work and how to build your own: http://www.youtube.com/watch?v=XxLKfAZrhbM
  • For mine, I just used three 10k resistors, one between the ADC pin and ADC ground, and two between the ADC pin and the output from the IR distance sensor.
  • To keep all I this neat and tidy, use a BeagleBone Cape. It’s a prototyping board that sits on the back of the BeagleBone and provides connections to the pins as well as space for your own components. I used female headers for the servo and sensor connections and a male header for the servo power battery. Using a male header on the Cape means the battery has a female header, which is safer knocking around my cluttered bench.

  • Make Power Cables

    The BeagleBone Black prefers to be powered through its 2.1mm barrel jack. For the CheerBot, we’re using a battery that outputs power via USB jacks. We need to make a cable that takes power from a USB connector and feeds it to a 2.1mm barrel plug.

  • Depending on the power requirements of your camera and WiFi dongle, you will probably need to use a powered USB hub. In that case, you’ll need to power the hub from a battery, so you’ll need to make a power cable for that, too.

  • Build Robot Chassis

    I much prefer to scrounge for materials rather than place a big parts order for every project. For this project, we need a robot that wanders around without hitting anything, and is big enough to carry all of our hardware around. To build mine, I sat down and started fitting things together until they worked.

  • I happened to have a few infrared distance sensors that output an analog voltage that the BeagleBone can read through a voltage divider. If all you have on hand are sonar sensors that require precise timing, you might want to use an Arduino to read the sensors and either do all the driving or pass the sensor values to the BeagleBone.

  • I used Vex parts for my robot chassis, but if you don’t already have a set of those, it will make more sense for you to use something different. You can even buy ready-made robot chassis, and get a motor controller that will allow a BeagleBone to drive regular DC motors with pulse width modulation.

  • Calibrate Sensors

    Before letting it loose with your furniture, it’s a good idea to test the sensor code and connections. Put blocks under the frame so the wheels aren’t touching anything and move your hand in and out of range of the sensors. Watch the speed and direction of the wheels to see how the robot reacts. Basically, if an obstacle approaches on the left side, the right motor should slow or stop to make the ‘bot turn away from the obstacle.

  • You may want to change the colors in color.py, as well. I set it up for the colors easily found around my house, while purposefully excluding certain colors that got found too often on uninteresting things such as walls and floors. The line you’re editing for each color looks like:
    
    cv.InRangeS(imgHSV, (0, 200, 100), (3, 255, 255), imgColorProcessed)
    
    
  • Use an online HSV color calculator to help you figure out the numbers. In my code, the first number, Hue, is in a range from 0-180. The second two numbers, Saturation and Value, range from 0-255. If you use a calculator that outputs numbers in a different range, you’ll need to map them to the new range yourself.
  • During sensor calibration and other testing, it might be a good idea to comment out the line in color.py that sends the actual tweet. Until you’re ready, that is, to start evaluating the pictures to get an idea what the robot spotted.
  • If you decide to add more colors to be recognized, keep in mind that the robot may be slow to respond if it has a hard time processing the video. It may still avoid obstacles alright, but not actually get around to stopping and tweeting until it has moved away from the color it spotted. Moving the OpenCV to a C++ implementation would help with this, I imagine.