Illustrated by Damien Scogin

Here’s a rewarding weekend project that turns an ordinary shop vacuum into a capable mini dust collector. It creates a swirling vortex of airflow to spin out all the big chips and sawdust particles, so that only the finest of fines will exit the top to be captured by your vacuum. Plus it’s see-through, so your friends will love watching the cyclonic action, and you’ll get to brag, “Yeah, I made that!”

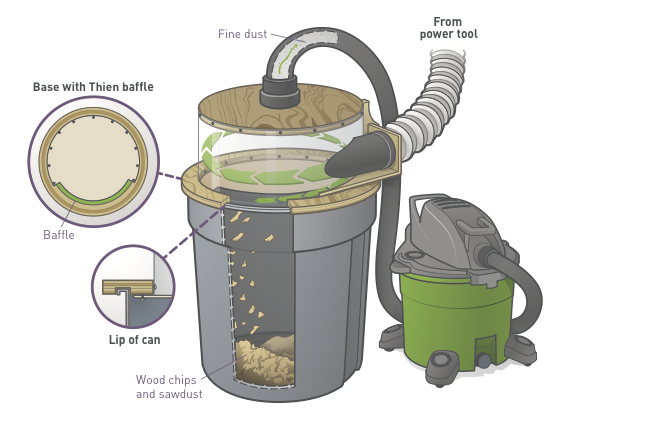
This is an easy-to-build dust separator with a baffle based on J. Phil Thien’s well-known “cyclone” design. It works because the incoming air is forced around the outside wall, where the heavier dust and chips fall through a slot in the baffle, into the large trash can below. When driven with a blower like I use, the baffle removes the need for a standalone dust collection system (which not everyone has the money, space, or power to accommodate). When used with a shop-vac, this simple dust collector will greatly prolong the life of your filters and prevent the constant need to empty the vacuum bin, which is typically small and difficult to remove.

IMPORTANT: The measurements presented here are tailored to fit the trash can I used. If you’re using a different collection vessel, you’ll need to alter all of your measurements to fit.

YouTube player

m50_SS_Dust_Sawdust-4 copy

DIY Dust Collection

Whether it’s sawdust, carbide grit, aluminum shavings, or powdered circuit boards, you don’t want that stuff clogging your workpiece, your eyes, or your lungs. A dust collection system not only protects your health, it also keeps your tools cleaner and safer, reduces fire risk, and keeps mess off the floor.

Systems for big workshops typically have a powerful central vacuum and dedicated 6″ or 4″ hoses for each tool, with “blast gates” to shut off the suction to tools not in use. That’s a doable DIY project if you’ve got lots of space. But most small workshops can benefit greatly from a movable system based on an ordinary wet/dry shop vacuum and its standard 2½” hose — like the cyclone separator described here.

Dust Collection Tips

  • Newer bench/table tools may have a standard 2½” dust port, where you can plug in a shop-vac hose. Hand tools like sanders are easier to operate with a 1¼” hose.
  • To mate different ports and hoses, you can buy standard adapters at your local home store or cut down a universal adapter to fit — but you should still plan on needing duct tape, because many toolmakers haven’t yet standardized their dust fittings.
  • Ditch the dustpan — instead, push debris into a dedicated “floor sweep” box attached to your vacuum.
  • Swap your shop vac’s filter for a HEPA filter to capture the finest dust. But wear a mask or respirator anyway — a shop vac has good static pressure but doesn’t move enough air volume to filter all the air in your workspace.

—Keith Hammond


Project Steps

STEP 1: THE BASE

The base of the separator sits on top of the collection vessel and forms a seal. The inner dimensions of the bottom piece will determine the size of the top piece, so if you are using a different collection vessel, adjust accordingly.

  1. Cut a 20″ circle from your ¾” plywood.
    BUILD-Dust-Separator-1-1
  2. Using the router, cut a circular dado that is ¾” wide and ½” deep. The idea is to create a slot for the lip of the trash can to fit inside. Using the 20-gallon Rubbermaid can, the inner diameter should be 18″.
    BUILD-Dust-Separator-1-2
  3. From the 20″ circle, cut out a 16″ diameter circle from the middle. You will be left with a 2″ wide ring of plywood with a groove in one face. If you are using a bandsaw to remove the middle, fill the slot in the ring with scrap and trim to fit.
    BUILD-Dust-Separator-1-3.1BUILD-Dust-Separator-1-3.2BUILD-Dust-Separator-1-3.3BUILD-Dust-Separator-1-3.4BUILD-Dust-Separator-1-3.5

STEP 2: THE TOP

The top of the separator connects to the vacuum or blower and provides a path for air to leave. The top is the same size as the center section you removed from the bottom piece. If you are using a different collection vessel, adjust accordingly.

  1. Cut a 16″ circle from ¾” plywood. If you were able to salvage the center 16″ circle from Step 1, you can use it for the top.
  2. In the center, cut a hole to match the outer diameter of the pipe you will use for the outlet. In the video, I am using 3″ DWV pipe, which has an OD of 3-½”.
    BUILD-Dust-Separator-2-2

STEP 3: SIDE WALLS

By using polycarbonate for the side walls, you can see how well the collector is working without lifting the lid. You can also tell at a glance if your collection vessel is full.

  1. Form a circle with the polycarbonate and insert it into the base ring.
    BUILD-Dust-Separator-3-1
  2. Using a marker or knife, mark the point at which the polycarbonate makes a complete circle.
    BUILD-Dust-Separator-3-2
  3. Trim the polycarbonate to length. There should be no overlap. I used a tool designed for scoring plastics, but you can also cut it with a saw or utility knife.

STEP 4: ASSEMBLING THE BODY

This step involves some tricky drilling, so take your time and work carefully. Polycarbonate can crack if too much pressure is applied, which is why we are using pan-head screws (which have a flat-bottomed head) and driving them by hand.

  1. Insert the bottom of the polycarbonate walls into the base ring.
  2. Drill pilot holes every 4–6 inches as needed from the inside. These holes should NOT be countersunk!
  3. Attach the base to the polycarbonate walls with pan-head screws.
    BUILD-Dust-Separator-4-3
  4. Insert the lid into the polycarbonate. Use the masking tape to hold everything in place.
    BUILD-Dust-Separator-4-4
  5. Drill and screw the polycarbonate to the lid. Again, do NOT countersink these holes!
    BUILD-Dust-Separator-4-5

STEP 5: THE INLET AND OUTLET PORT

This is easily the most difficult part of the project and requires a good deal of finesse. The inlet needs to be cut to match the curve of the side walls, and any gaps will result in pressure loss and a sloppy joint that requires a lot of hot glue to seal. For best results, watch the video before attempting this part of the project.

  1. Cut two pieces of DWV pipe, one 6″ long and one approximately 9″ long.
  2. Cut the two DWV couplers in half just to one side of the inner seam.
    BUILD-Dust-Separator-5-2
  3. Cut a 3-½” hole in a 5″×6″ piece of plywood. If using different pipe, adjust accordingly. 
    Note: This will be easier if you start with an oversized piece, then trim it to the final size.
    Note: This will be easier if you start with an oversized piece, then trim it to the final size.
  4. Mount the 9″ length of DWV pipe in the hole by sandwiching the two halves of the DWV coupler around the plywood. Make sure it’s a tight fit. If not, you may want to add some hot glue to hold it in place.
    BUILD-Dust-Separator-5-4
  5. Form an “L” by screwing the 5″×6″ piece with the hole in it to the 5″×8” piece of plywood.
    BUILD-Dust-Separator-5-5
  6. Place the pipe and plywood inlet assembly, and place it on top of the baffle assembly. The pipe should be angled such that the incoming air is sent around the walls of the baffle, so you want to mount the pipe such that it is tangential to the circular baffle assembly. Scribe a line on the inlet assembly where it overlaps the baffle assembly.
    BUILD-Dust-Separator-5-6
  7. Make a paper pattern from the bottom and transfer it to the top where it will be visible.
    BUILD-Dust-Separator-5-7
  8. Cut the curve on the bandsaw. If you do not have a bandsaw, cut the inlet assembly at an angle, then sand the plywood to fit. You can use a file or rasp to add the same curve to the plastic pipe.
    BUILD-Dust-Separator-5-8
  9. Mount the inlet bracket on the base temporarily and add a vertical support that will cover the seam in the polycarbonate. you will need to either cut or sand the vertical support to match the 16″ radius.
    BUILD-Dust-Separator-5-9.1BUILD-Dust-Separator-5-9.2BUILD-Dust-Separator-5-9.3
  10. On the inside of the polycarbonate, mark out the location of the inlet port with a permanent marker. You can either cut this out with a rotary tool as shown in the video, or you can disassemble the baffle and use the jigsaw to follow the line.
    BUILD-Dust-Separator-5-10.1BUILD-Dust-Separator-5-10.2
  11. Use hot glue to seal any gaps between the inlet pipe and the polycarbonate walls.
    BUILD-Dust-Separator-5-11
  12. Mount the 6″ length of DWV pipe in the top plate using the remaining two halves of the DWV coupler to sandwich it in place.
    BUILD-Dust-Separator-5-12

STEP 6: BOTTOM BAFFLE

  1. Cut an 18″ circle from the 1/8″ MDF.
  2. Scribe a line 2″ in from the edge of the circle. This is easiest to do with a compass.
  3. Mark out a 120° section (⅓ of the circle). Cut away the 2″ outer section from this area using a bandsaw or jigsaw. 
    NOTE: This deviates from the Thien Baffle design, which removes 240 degrees (⅔ of the circle). I did this partially because of the thin material I used and partially so I could tune the system later (which ended up not being needed). If you want to use a wider Thien-style slot, you should use a thicker material for the baffle itself.
    NOTE: This deviates from the Thien Baffle design, which removes 240 degrees (⅔ of the circle). I did this partially because of the thin material I used and partially so I could tune the system later (which ended up not being needed). If you want to use a wider Thien-style slot, you should use a thicker material for the baffle itself.
  4. Mount the bottom baffle under the bottom ring using the pan head screws, placing the beginning of the slot just behind the inlet port.
    BUILD-Dust-Separator-6-4

Conclusion

dust-seperator-final

At this point, your separator is ready to use. I almost exclusively use mine with a DeWalt 735 thickness planer. The planer has a built-in blower so no suction is required; however, this creates positive pressure in the collection vessel and you will need to clamp the lid on. The separator also works quite well with a Shop-Vac, but you will need to adapt the 4″ fittings to fit your Shop-Vac hose.

Keep in mind that if you clog the hose or overfill the collection bucket, the internal cyclone will stop working and the dust will instead escape through the top port.

hByCF
Make: engineering interns Anthony Lam and Jenny Ching built this dust separator based on a design by Ray Mowder, who was inspired by the original cyclone baffles by J. Phil Thien. It’s a “top-hat” style that sits on a 20gal trash can without modifications to the can, so it’s easy to move or stow when not in use.

TWnjD