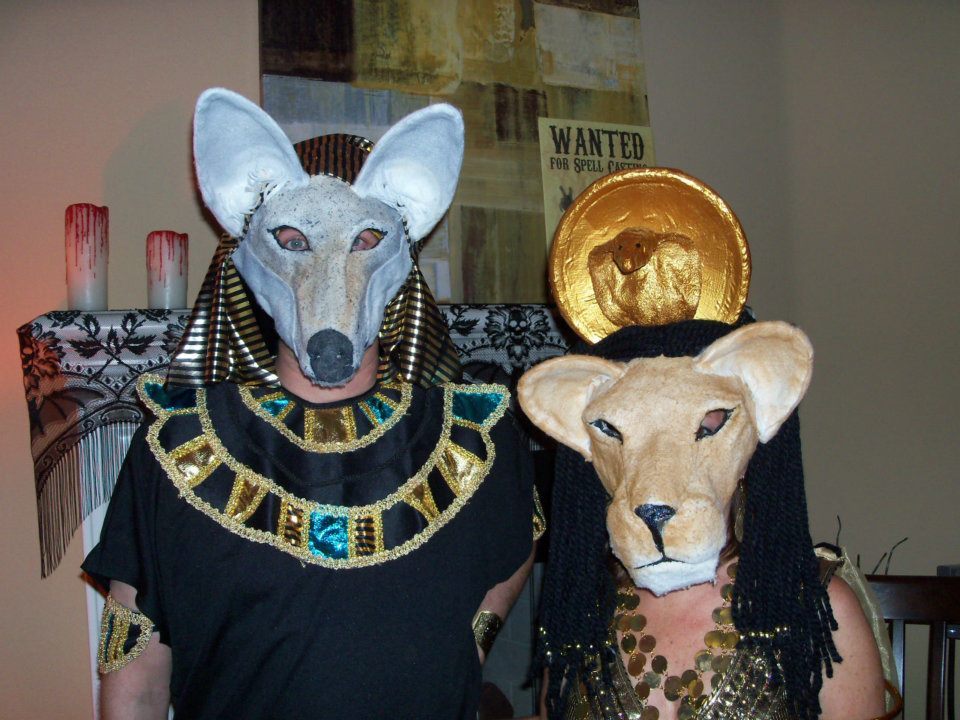
These masks are an homage to two well-known Egyptian gods: warrior goddess Sekhmet, and god of the underworld, Anubis.

The warrior goddess, Sekhmet, has the head of a lioness and a crown of gold featuring the cobra and the Eye of Ra (the Sun god). Sekhmet has also been known as the Lady of Slaughter and the Mistress of Dread.

Anubus, also known as the god of mummification and the protector of the dead, has the head of a jackal. As two of the best-known Egyptian gods and goddesses, this pair seemed the obvious (and most recognizable) choice for our Halloween costumes this year.

The underlying structure of the masks is wire, mounted to baseball caps. They were then covered with felt and airbrushed with acrylics. Sekhmet features hair of thick yarn, while Anubus uses fabric to cover the back of the mask and hat.

As I am not a trained artist, the majority of the initial time was spent in trying to get the animal heads proportionally correct using clay models (maquettes). This will likely go more quickly for those with a background in art or sculpture.

The original intent for the construction of the masks was to be decidedly more high-tech. However, this was not a feasible approach and ultimately I settled for a tried and true, although much more labor-intensive, method.

Project Steps

First, I used plasticine (an oil-based modelling clay) to build the maquettes.

I then scored a grid on each maquette, and took a photo from the X, Y, and Z axes and scaled the photos up to the full size of the mask. This gave me a very rough guide to create the wireframes.

In the case of Sekhmet, I used toothpicks to highlight the corners of the eyes, mouth and nose (and to make it look more like that dude from Hellraiser).

I inscribed around the ears on the maquette so I would know where they had been, then cut them off and flattened them.

To make the basic structure of the mask I started with hoops made from galvanized wire. I fixed the hoops vertically in holes drilled in a small stick of wood and kept them from sliding with toothpicks.

Then I began to hot glue aluminum wire mesh to the hoops to make the basic form of the mask using the maquette as a guide.

Hot glue does not stick well to the galvanized wire, so I could only tack it in place until the wire mesh had taken more shape. The wire mesh is much easier to glue together because of the large amount of surface area.

Tip: A sandwich of 2 layers of felt, covered on both sides with aluminum foil, all glued together with spray adhesive and coated with a thin layer of dish soap makes an ideal helper to flatten down layers of hot glue. The felt protects your hands from the heat, the aluminum conducts the heat away quickly (so the glue congeals faster), and the detergent acts as a release agent so the foil won’t stick to the glue.

Continuing to add more wire and mesh to complete the wireframes.

I added piping cord to act as the muscles around the eyes, forehead and mouth This allowed for fullness and the ability to tweak the final look with very little extra weight.

To size the ears correctly, I traced a line onto the wireframe in the same shape as the inscribed line on the maquette (from step 3). I then measured the length of the line and enlarged the photo of the ear appropriately. I printed it and used it as a pattern for creating the ear.

For covering the masks with felt I tried two methods.

The first was to glue the felt to the wire mesh that was already glued on the mask. This seemed to work better for areas with a high rate of curvature.

The second was to glue the felt to a piece of wire mesh with Sculpt or Coat®, then cut and fit it over the mask. This method seemed more stable (the ‘skin’ did not dent as much) but worked better for flatter parts of the masks.

After the covering is finished, the wires at the bottom were cut off the wood stick. The wires were turned in so they don’t stick you in the head :)

Then they were airbrushed and hand painted with acrylics. I used a cheap single-action external-mix airbrush, as I needed it more for spraying on custom colors than doing anything more advanced.

Next, prototype Anubis’s headdress on your dog. Do not skip this very important step!

The headdress material came with my store-bought Egyptian costume.

I fixed the mask to a baseball cap with the brim cut off (picture not shown). Extra strands of wire had to be added to bond the mask to the cap. At first it didn’t look like the eyes were at the right height, but tipping the mask down by about 45 degrees with respect to the cap helped a lot.

I added thick yarn for Sekhmet’s hair.

The solar disc was made from foam rubber, edged with piping cord, coated with fabric and glued on with Sculpt or Coat®. It was painted with a mixture of Sculpt or Coat and gold-colored paint.

The cobra was built in a similar fashion, except that I used a heat-hardening clay for the head and 1″ piping cord for the body stiffened with wire. The outline of the body was made with wire, covered with wire mesh, fabric and gold-colored Sculpt or Coat.

Finished, yay! Time to party!

Conclusion

This was a long, fun project. In the future I would like to redo parts of the masks (such as the eyes and hair), add more accessories, and design and create a more appropriate costume for Anubis.