dsc8221_3

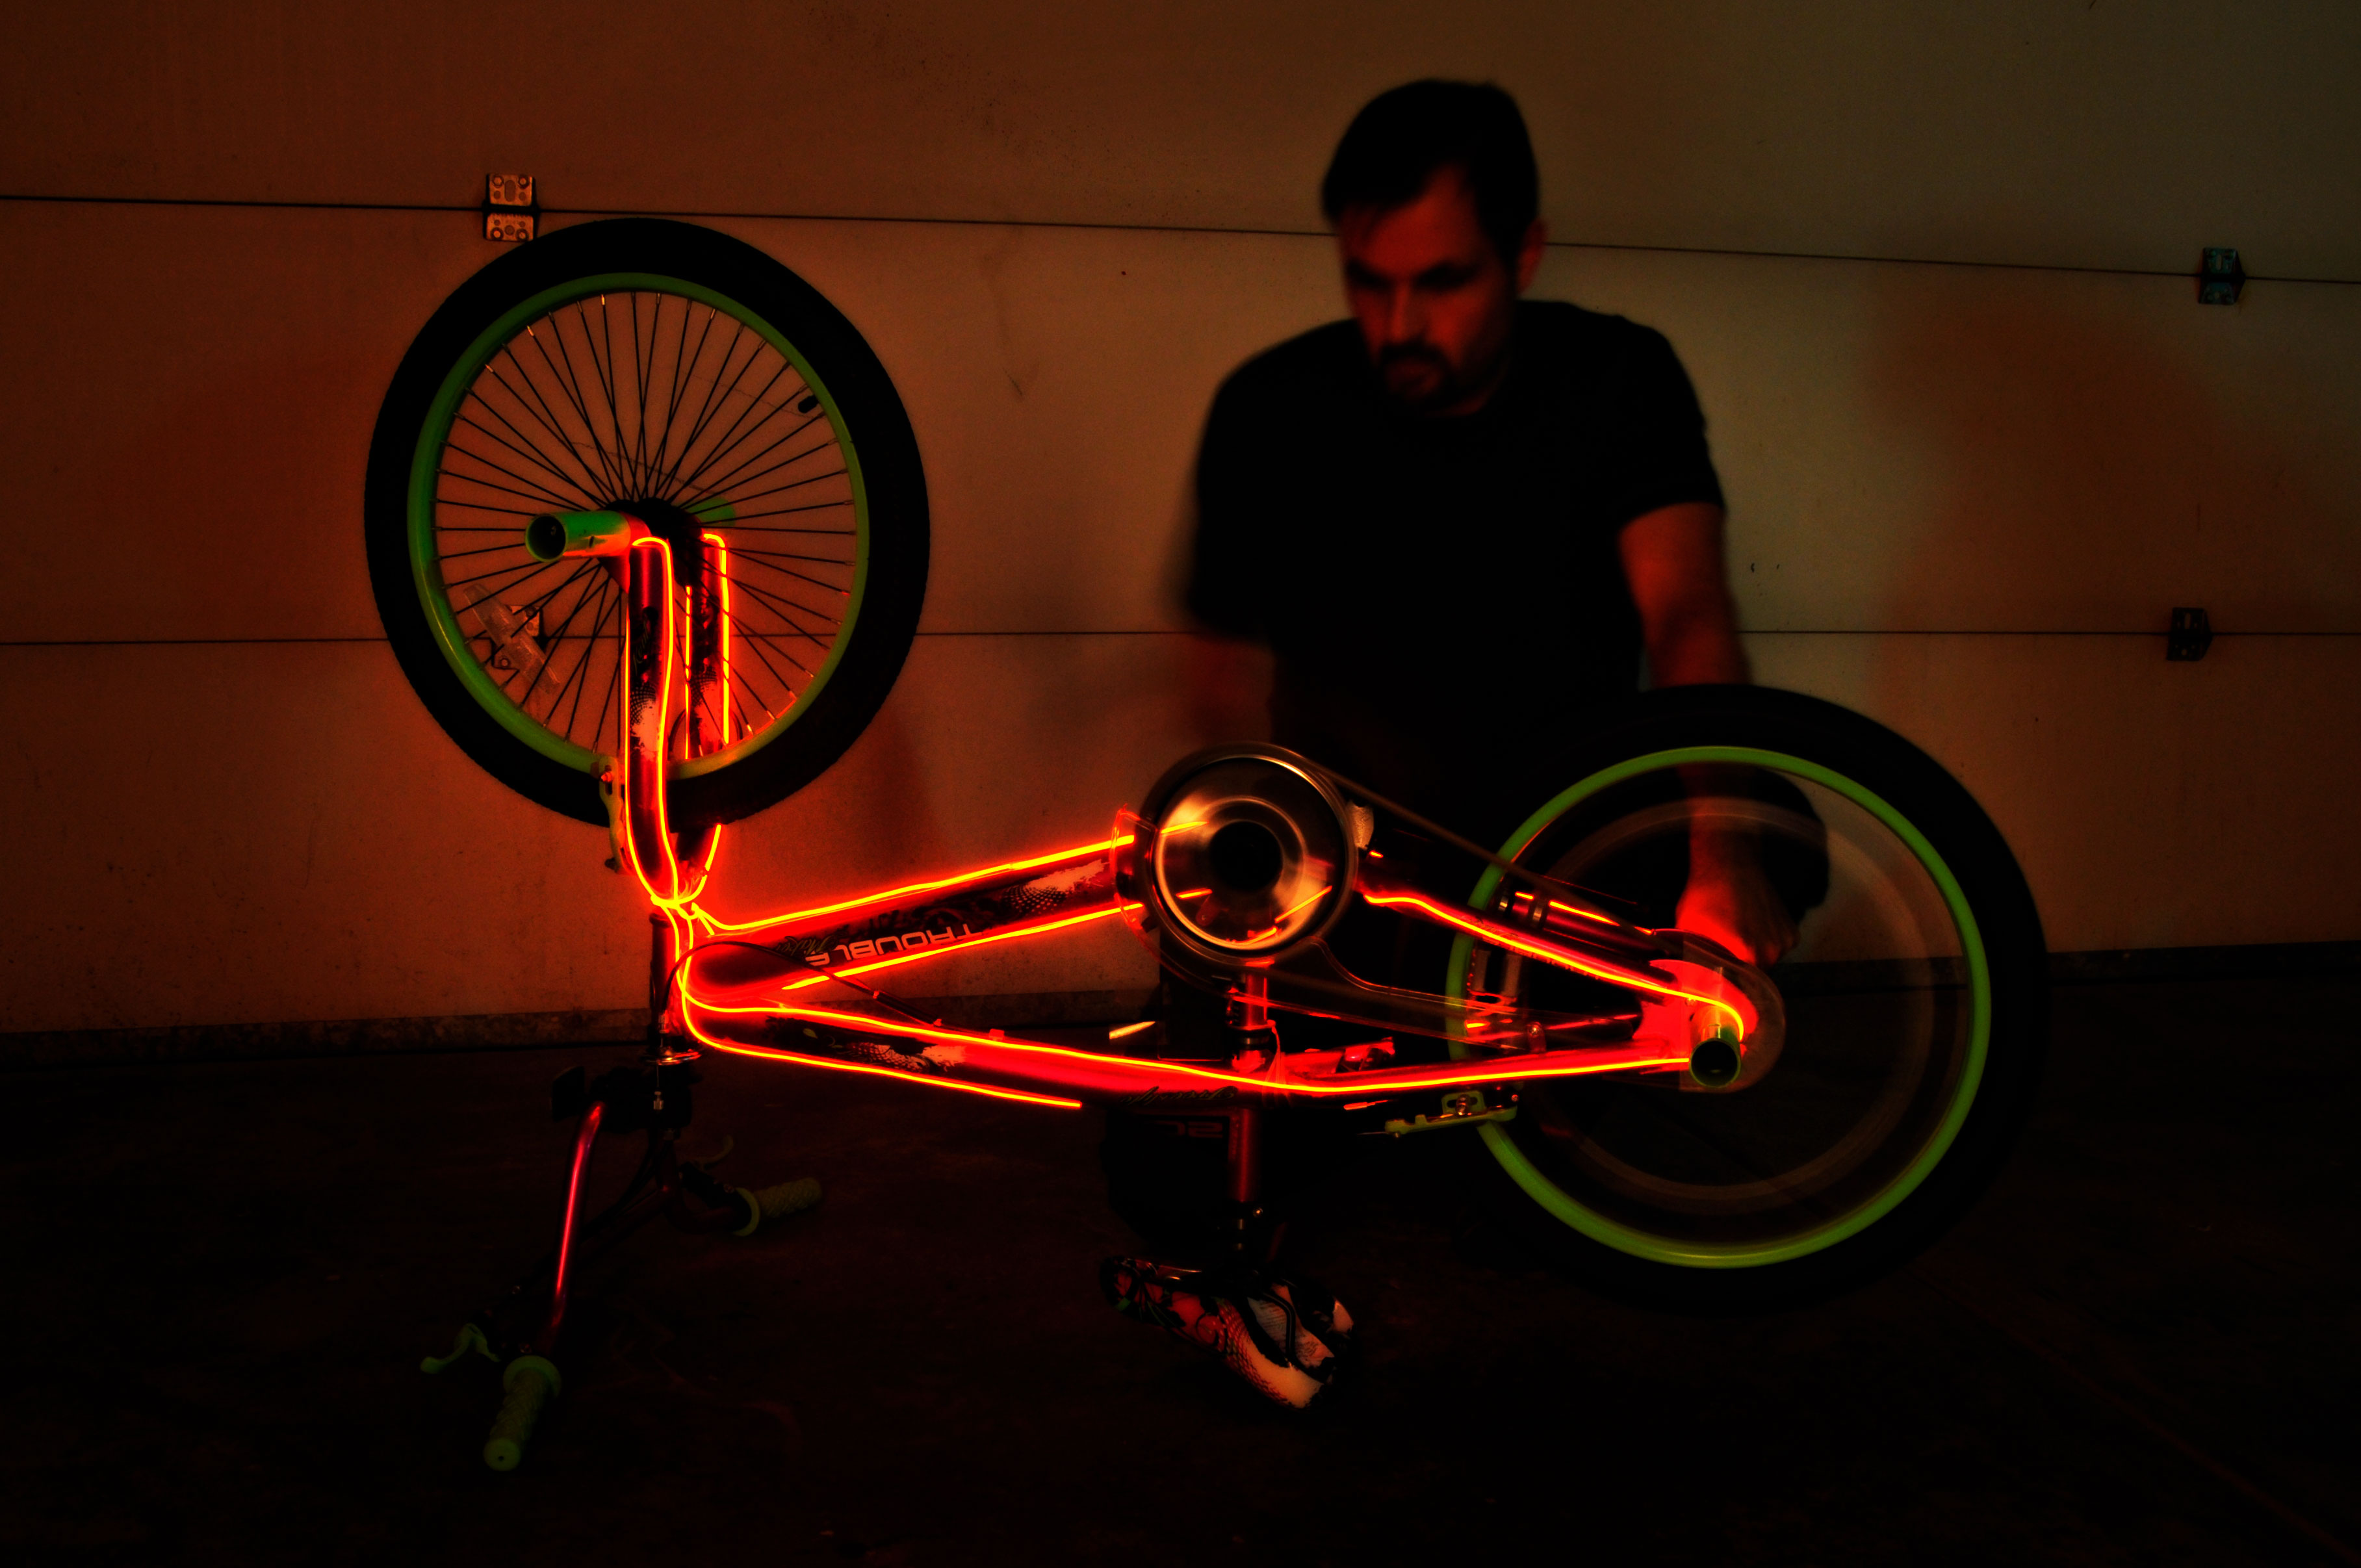
If you’re thinking, “‘EL Cycle’ sounds like a bicycle-powered EL wire project,” then you are correct! In this project we’ll be using a stepper motor as a generator to drive EL wire wrapped around the frame of a bike.

Instead of powering the EL wire with batteries — which would eventually deplete — we’ll generate power from pedaling. This will give you continuous power while moving, as long as all the parts stay attached correctly to your bike frame. This continuous power is achieved with an inline skate wheel that rotates by rubbing up against the rim of your rear wheel. This in turn will rotate a bipolar stepper motor, which generates DC voltage that will be transformed into 100+VAC needed to illuminate two sections of EL wire. I’ve selected red for both EL wires, but you can mix-and-match.


YouTube player


The schematic is really quite simple, so let’s take a look at it:

elbike_circuit

If that looks complicated, it’s not. I’ll walk you through the steps below, but keep in mind you will likely need to make some adjustments based on your bicycle frame and design. For instance I chose a smaller BMX bike to attach everything to, but because of where the wheel-and-motor unit is mounted on the rear wheel, there is only about 1″ clearance between the back of a foot pedaling and these components. You can always change the design of how everything mounts to your bicycle — the schematic will remain the same.

For this build you’ll also require access to some basic workshop tools (or you could order everything laser-cut), basic soldering equipment, and standard hardware for fitting everything together.

Project Steps

Choosing a stepper motor

First, a few words about stepper motors – they typically come with 4, 5, 6 or 8 wires. For this project we’ll be using a 4 wire motor, but any 4, 5, or 6 wire motor can be made to work ( … and yes even 8 wire motors will work too, but that’s a bit more complex).

For this project I pulled one of the steppers from my laser cutter. I don’t have the exact make or model information, but I can give you an idea of the electrical characteristics when you go looking for one yourself (see bullet point below for an ideal stepper motor supplier). In the schematic above you’ll notice the motor has two coils wired in 180 degree phase.

The first thing you should do with any candidate motor is spin it in your fingers. If there is no resistance and the motor turns freely then you probably have a reluctance stepper, which has an iron core (not magnetic) and therefore will not work as a generator. In the first image the large motor is a reluctance type (and thus no good for this project). The smallest motor was pulled from a laser printer, and is a bit too small for our needs. The motor with the yellow-and-red wires was extracted from a laser cutter and is just right for this build. Editor’s Note: for more on Reluctance Stepper Motors see the Encyclopedia of Electronic Components, Vol. 1, page 210.

UPDATE: Electronic Goldmine sell stepper motor type KP56KM2-018 that is ideal for this application (image 2). These motors are exactly the right size, and if they were available when I was sourcing parts I would not have cannibalized my laser cutter. I would be tempted to use at least the 9V (output) transformer with these — maybe even a 12V transformer, as they put out quite a punch (this in conjunction with 18V Zener diodes would be quite nice!).

Identify the coil ends

The next task is to find which wires are the coil ends. You can use a multimeter for this. Measure the resistance of the wires until you find the two wires that have the highest (not infinite!) resistance between them. These are the coils “ends” and will give us the most power output.

Once you have identified these two you need to switch the meter to AC voltage and spin the motor. A really good way to do this is to connect the spindle to a drill and engage the drill. You are looking for a motor that can output in the range of 10-20V when spun quickly.

Connecting a drive wheel

Once you’ve found a good motor, the next step is to find a wheel. Inline skate wheels are perfect for this project. Simply remove the bearing from an inline wheel by poking out the insert with a pen — it should come out pretty easily. Then we need to find a way of coupling the wheel to the motor spindle. I measured the bearing and the spindle and laser-cut some plywood to act as bushings.

NOTE: I would recommend plastic over plywood, as it maintains a good press fit for longer.

The six-hole guide you see in the first picture was how I determined a good size for press-fitting to the motor. I simply cut three slightly larger, and three smaller holes than what I measured.

Another alternative is using U Mold, a type of sculptable plastic, to bond the motor’s shaft with the wheel, as seen here. Depending on your motor’s shaft design, you may want to use other fixtures to help increase this bond.

Transformers and diodes

Having hooked up our wheel, the next task is to prepare the transformers. We’re going to use two transformers: one for each EL wire and each “phase” of the stepper motor’s output.

TIP: A good source for transformers are AC power adapters from RadioShack. You can buy a suitable value unit and extract the transformer. Make sure you get the AC version, as the DC version uses switching technology and has no useful transformer inside.

You can buy transformers as standalone parts, I found some Philmore units, but RadioShack stores also sell a range of transformers — search stores in your area to see if they’re in stock. I recommend a transformer with output ranging from 5V to 9V. Since EL wire requires more than 100V to drive it, we are going to wire up the transformers in reverse. That is: connect the output of our stepper motor to the LOW voltage side, and the EL wire to the HIGH voltage side. Wired like this, the transformer will take our motor output and step the voltage up to over 100V needed to illuminate the wire.

I also bought: a Euroconnector, an enclosure to hold the transformers, and a range of diodes. I eventually settled on 12V Zener diodes, which will act as protection for the EL wire, preventing the output voltage from going too high.

Mount the transformers

To mount the transformers inside the enclosure I used some 1/4″ plywood. I cut a piece on a table saw so that it would fit inside the lid of the enclosure. I used #6 wood screws (3/8″ long) to attach the transformers. I cut the Euroconnector into two 4-terminal blocks and wired the red (LOW voltage) and black (HIGH voltage) to these blocks. (Editor’s Note: See this image for a close-up.)

I also bought a couple of 1″ insulated electrical conduit mounting clips from a hardware store. These will be used to attach the enclosure to the bicycle frame. They were connected to the enclosure with a couple of 1/4″ nuts and bolts.

I used rubber bands to hold the Euroconnector block in place (image 3).

NOTE: The green “center-tap” wire is not used and can be cut down.

Solder and connect the Zener diodes

The 12V Zener diodes are connected with the cathodes connected — this will limit the AC waveform at the top and bottom of the cycle.

I soldered them, wrapped them in heat-shrink tubing, and connected them across the 2 red (LOW voltage) transformer leads.

Attach the inverter leads

I clipped the leads from two power inverters for EL wire and connected these to the black (HIGH voltage) side of the terminal blocks (see previous step, image 3). These connect nicely with the EL wire.

Each phase of the motor is able to drive a 10′ length of EL wire (possibly a little more than that too), providing power to a total of 20′ of EL wire which will be wrapped around the bike frame.

NOTE: Look at Step 11 to read how the stepper motor’s wires will eventually connect to the red (LOW voltage) side of the terminal blocks.

Mount the stepper motor — part 1

Next we have to couple the stepper to the bike frame, so that the rear wheel can drive the motor and light the wire. The metal plate that comes with the enclosure is perfect for creating a bracket to hold the motor. If you have a metal stamping drill bit, you should be able to create the holes with a drill press.

TIP: if you can’t get an accurate schematic of the positions of the holes, wrap some foil over the stepper and take an impression of the position. Then use this as a guide to mark out the holes — that’s what I did for the aluminum plate.

Mount the stepper motor — part 2

To hold the bracket to the bike frame, I used some more insulated conduit clips — this time the 3/4″ size.

Measure and drill out the holes, and mount the conduit clips to the bracket using 1/4″ nuts and bolts.

Mount everything to your bike frame

I then added the enclosure to the seat tube, and the stepper motor-wheel unit to the chain stay.

The first image shows the bike upside-down, resting on the seat and handlebars while everything is installed.

Since bicycle wheels are rarely “true” I needed to add a couple of lightweight extension springs. These are held on with zip ties to keep the skate wheel engaged with the bike wheel during a complete rotation.

Adding the EL wire

I had the idea to tape clear vinyl tubing to the bike frame. This will provide added protection for the EL wire, and also make it a bit easier to swap out the wire if needed (however, I ran out of tubing, so I ended up taping the wire in places).

When you add the wire, make sure you keep it clear of the drivetrain, steering, and brakes!

I extended the stepper motor’s wires using some speaker wire, and connected these to the red (LOW voltage) side of the transformers.

Cycle on!

Give it a test!

[protected-iframe id=”1f15e8e1cc845363a43f79c445a97392-30206320-299516″ info=”http://cdn.makezine.com/uploads/2014/11/bikeparts.mp4″ width=”600″ height=”338″]

It’s worth noting that the output of stepper motors is perfect for generating DC voltages too — just hook both phases to bridge rectifiers and smoothing capacitors and you can power LED lights, or other electronics.