20150717_141717

It has always been a dream of mine to play with the holograms from Star Wars. While that dream may still be a long ways down the line, there is some supplemental hope for my space fantasy. A company called Qualcomm has released a technology called Vuforia, which among many other applications, can help you play with a concept called augmented reality.

Augmented reality is different from entirely virtual reality, which is another type of digital experience that is often lumped together with augmented reality. The primary difference is that virtual reality, or VR, is immersive and places you inside an entirely new world trying its very best to remove you from the physical world. Augmented reality, or AR, does not do this. Instead AR meshes digital experiences and objects — if they can be called objects — together to create something entirely new. To me, this is as close as I can get to the holograms of Star Wars.

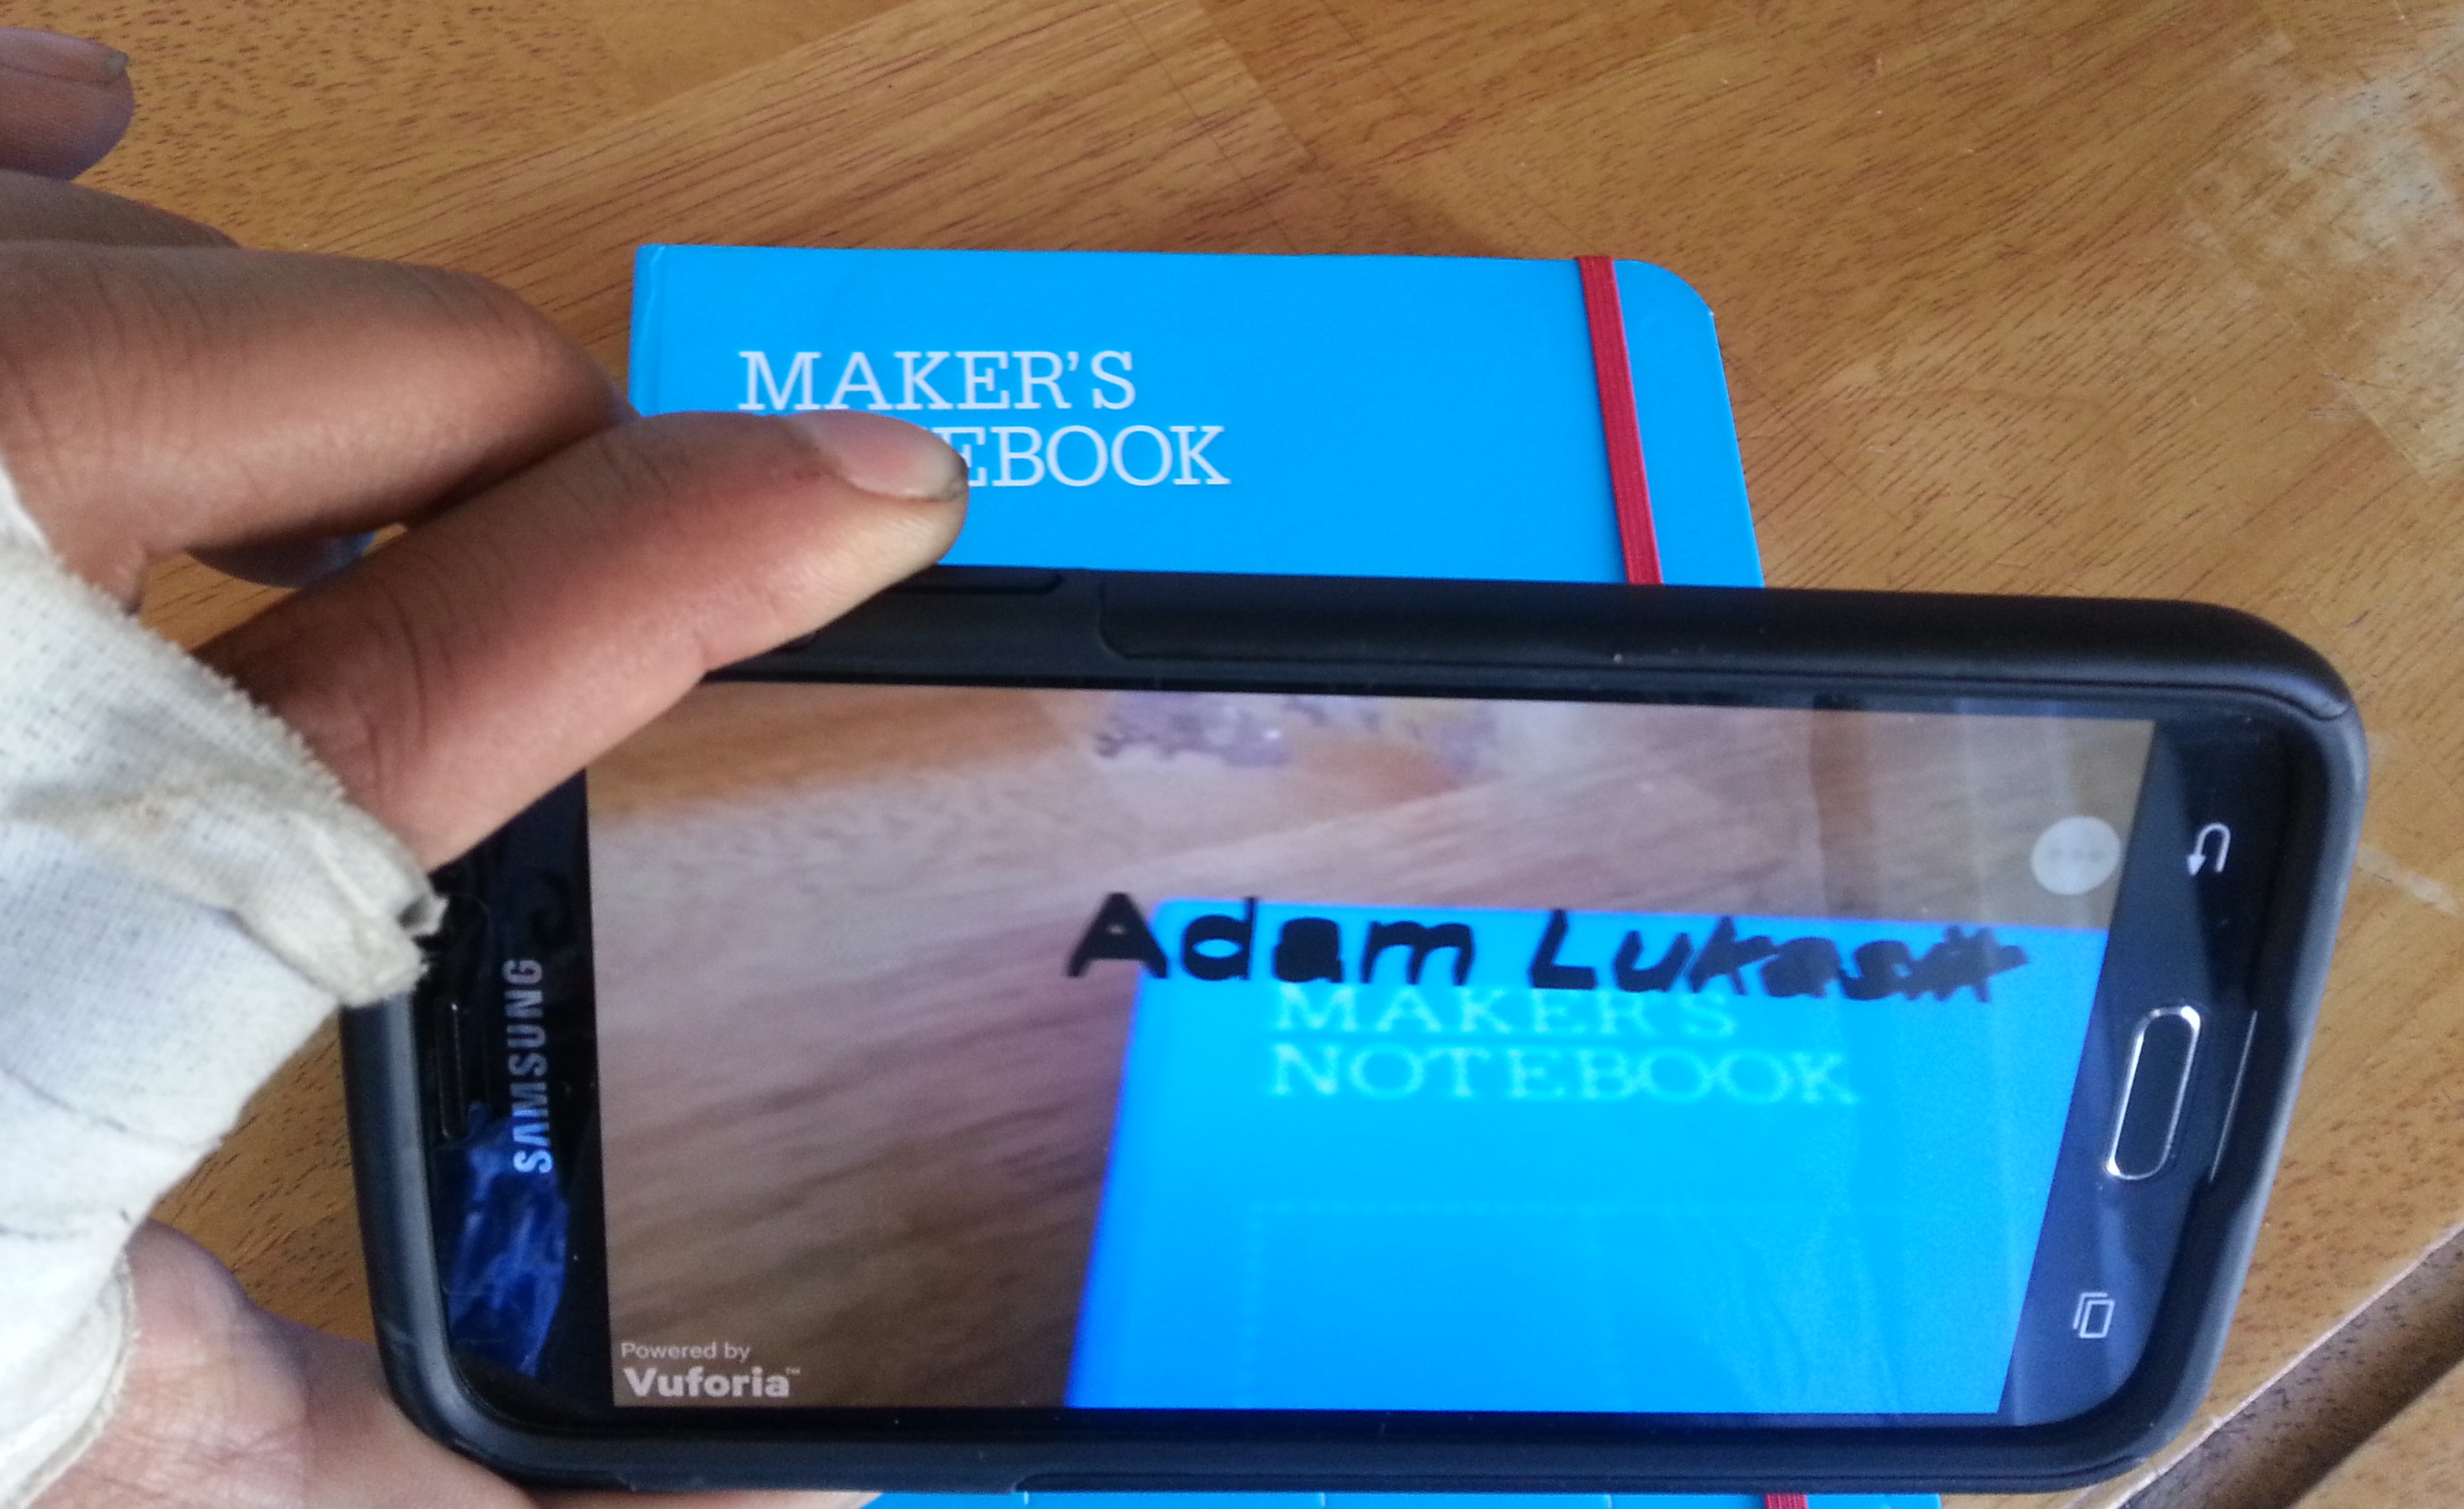
Vuforia enables AR through the use of some specific technology built for mobile phones, and a video game engine called Unity. Fundamentally it works by taking an image, say the “Maker’s Notebook” header on my Make: notebook, and mapping it inside the game engine to a 3D model of my name. Then, using Unity, I export the pictorial trigger and its related 3D model ‘Adam Lukasik’ as an Android game and install that game on my phone.

This game is actually just the view finder on my phone and lets me look at anything, the cool part though is that whenever it “sees” the title of my notebook, it displays my name. This is just the tip of the iceberg as far as what is possible with augmented reality, but setting all this up is complicated enough without getting lost in all the other possibilities. For now let’s just add our names to our notebooks and from there we can make some cool interactive holograms.

Project Steps

Vuforia and License Key

Go and set up a developer account, which is free if you choose the standard version. While you won’t be able to sell any apps on the app store, you can still play with the technology.

Now once you are in the account area of the developer site, click on ‘Develop’ and then click ‘Add License Key’. Go through the steps by entering a name for this license and selecting standard and mobile like I did.

Creating your mapping target

Now that we have a license, click on the ‘Target Manager’ and click the ‘Add Database’ button. Name your target.

As you can see there are a lot of interesting options to use as a target, but we will be using a single flat image. Make sure to upload a picture of what you want to trigger the 3D name, I took a picture of my notebook and then cropped the image to only have the title on it, to reduce any visual noise that might crop up.

When you hit ‘Add’ you will be brought to a view of the new image database. It will say ‘processing’ on it, this is good. It should take about 15 minutes to process the image and be ready for use.

Unity

Now we need to open Unity. Download it now if you haven’t already. Setup a new project.

It should look blank except for an object in the center called main camera. You can read the names of all the objects on the left column.

Download the trigger database

After 15 minutes go back to the Vuforia developer page. Your image should be processed. If it has less than 4 stars, you should probably use a different photo because the one you uploaded is not ideal for encoding into a trigger.

Now select ‘Download Dataset (All)’. This will open a dialogue box asking if you want an SDK or a Unity file. Select Unity.

Save this into the ‘Assets’ folder of your new project file. This file will be in your user file directory.

Download the Unity SDK

Go to the Unity downloads tab or this link https://developer.vuforia.com/downloads/sdk and download the Unity SDK. Again save it into your ‘Assets’ folder.

Both these files will be saved as Unity packages. Open both.

Each one will open a dialogue box that will ask you to import many files with little checkboxes next to them. Select ‘Import’.

Setup the viewfinder and camera

Now in the ‘Assets’ folder, which should be visible in the bottom left of Unity’s interface, under ‘Editor’ should be a file called ‘Prefabs’. In this file there will be an element called ARCamera. Drag this element into the main window, it doesn’t matter where.

Now right click on the main camera and delete it.

Finally in that same ‘Prefabs’ folder drag the element ImageTarget into the main window, again do not worry about placement.

Setting your target

Now select the ImageTarget on the left hand side of the interface, this will bring up a ton of details on the right. We are looking for something very specific on the right, something called ‘Image Target Behavior’. In this box, there are a few dropdown menus. One of them is called ‘Data Set’. If you imported your image target database, the name of that target should be the only option you have, select it.

Now the original image you took should be inside the main window replacing the large white plane that was there before.

Apply your License Key

Now go back to the developer site and navigate to your license key that you created, make sure to click on its name so you can see its details. In the detail page there should be a large box full of seemingly random numbers. Copy this huge block of text.

Now select the ARCamera the same way you selected the Image target and then look at the left of the interface. There you will see a large box that is labeled ‘App Licence Key’. Paste the Key into that box. Finally below that box in the ‘Data Set Load Behavior’ box you will see a small check box called ‘Load Data Set (the name of your trigger)’. Click the checkbox. When you check that box, another box immediately below will appear labeled ‘Activate’, check that box as well.

Create your name

Create your name using CAD software.

Make sure to export it as an OBJ into your Assets folder.

Import the OBJ by selecting ‘GameObject’ on the absolute top level menu bar, at the top of the page next to ‘File’ and ‘Edit’. Then in that dropdown menu select ‘Import Game Asset’.

Place the 3D model and export

Place the 3D model to scale over your trigger. Think carefully and pretend that you are placing it in real space of the surface of your notebook, that way when you export and view it on your phone it looks right.

Next click the ‘File’ menu and go to ‘Build Settings’.

Make sure to select Android and select the ‘Player Settings’ button. Now on the right you will see a lot of new options. Select ‘Other Settings’ below the ‘Splash Image’ box and look for the ‘Bundle Identifier’. You want this to match the variables Company Name and Product Name at the top right of the interface. In mine I have the Company Name be “DefaultCompany” and the Product Name be “Vuforia”. Using that I made the ‘Bundle Identifier’ read “com.DefaultCompany.Vuforia”. This is extremely important as your game will not export unless you do this. Now finally back in the ‘Build Settings’ box click the option ‘Build’.

Install and impress

Now take the .apk file and put it on your phone. You may need to download a file explorer from the app store to view the apk once you drag in onto or download it onto your phone.

Once you open the .apk it should ask for permission to install. Make sure to allow it and then open the app. Now when you point it at your trigger your 3D model should appear with you able to rotate around it like it was actually in front you.

Conclusion

I hope you enjoyed learning about Augmented Reality. I can’t wait to see what people will do with this technology. To me AR represents a sort of magical technological experience and I would be happy if more and more experiences and interfaces began to look like this.