Ed. note–
With the launch of Raspberry Pirate Radio some Windows users got stuck trying to modify the pirateradio.config file and transferring the music they wanted to transmit to their Pi. No doubt there are other methods to achieve this but this one is easy and straightforward for makers of all skill levels.

If you’re setting up a Raspberry Pi with Windows, you can do a lot of amazing things. Modifying files on a multi-partitioned SD card isn’t one of them.

But it can be.

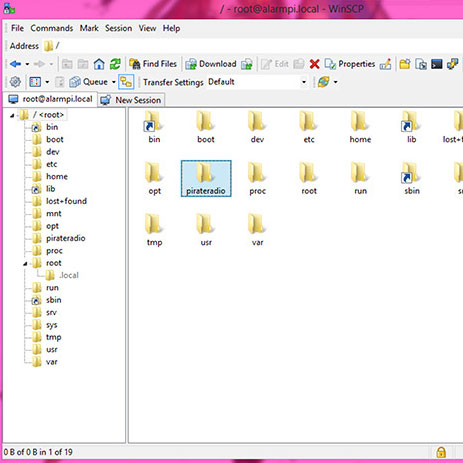
This tutorial will show you how to connect to your Raspberry Pi via SSH. It’s useful not only for transferring files, but also for sending terminal commands, making it a useful skill for tons of Pi projects.

Using SSH to send commands via SFTP with WinSCP is easier done than said, so let’s begin.

Project Steps

Download and set up WinSCP

First you’ll need to connect the Pi to the same network as your computer. That’s your route to Raspberry brain control.

Download and install WinSCP – it’s free and open-source. Use the Explorer-style rather than the Commander-style interface as it should be more familiar to those who are accustomed to using Windows. When you run WinSCP you should see the Login prompt (image 1, above).

Input the settings as in the screenshot above.

Host name: alarmpi.local

User name: root

Password: root

You should also save the session information so you don’t have to type it in every time you want to log in. Hit the Login button and give it a moment to connect. The first time you connect to the Pi you should see a warning window. Hit yes to add the Pi’s key (example, image 2) to your computer’s cache.

You're in! Now do stuff, like adding music

Note: your window may look slightly different based on which interface style you selected during install; this will not hinder you from continuing.

On the left side of the window, select “/ ” to be taken to the root directory of your Raspberry Pi’s linux partition. If you’re using the Commander-style window, this same step can be achieved by double clicking the folder icon named “..” on the right side of your window.

Now that you’re in the root, find and double-click the “pirateradio” folder.

This is where your config file and all of your music will live. You can now drag folders from your music collection directly into this folder and watch them copy over.

Now edit the config file and save your changes

You should also double-click “pirateradio.config” to open the config file for editing.

When you make any changes to smaller files (like the config file), note that the Linux operating system running on the Raspberry Pi doesn’t always write smaller files to the SD card immediately, and will instead prefer to cache it in memory. This poses a problem as you now have to force the Pi to write those changes to disc before unplugging the power.

To force the Pi to write the changes, click the Terminal icon (circled) and allow it a moment to reconnect to the Pi.

Once there, simply type “sync” and press Enter.

You are now safe to turn off your Pi, either by unplugging the Pi or typing in “poweroff” and pressing Enter.

Next time you turn on your pi, the OS will begin broadcast immediately after bootup. Enjoy.