This all started when my Mom was exposed to radiation and developed a super-power.

Seriously.

At 58, my mother was treated for cancer with injections of radioactive iodine. When it was over, her cancer was gone, but she’d developed an unnaturally acute sense of smell, which seems to be permanent. She soon became fascinated with perfumery and aromatherapy, and one day asked me, “How do you capture a natural fragrance?”

The trick is called steam distillation, and it’s little known today because the fragrance industry has replaced the independent perfumer, who used to sweat in solitude over a bubbling basement still. But in 18th-century France, the perfumer’s knowledge of steam distillation amounted to a kind of practical alchemy — the ability to capture a beautiful, ephemeral sensation and preserve it for sale.

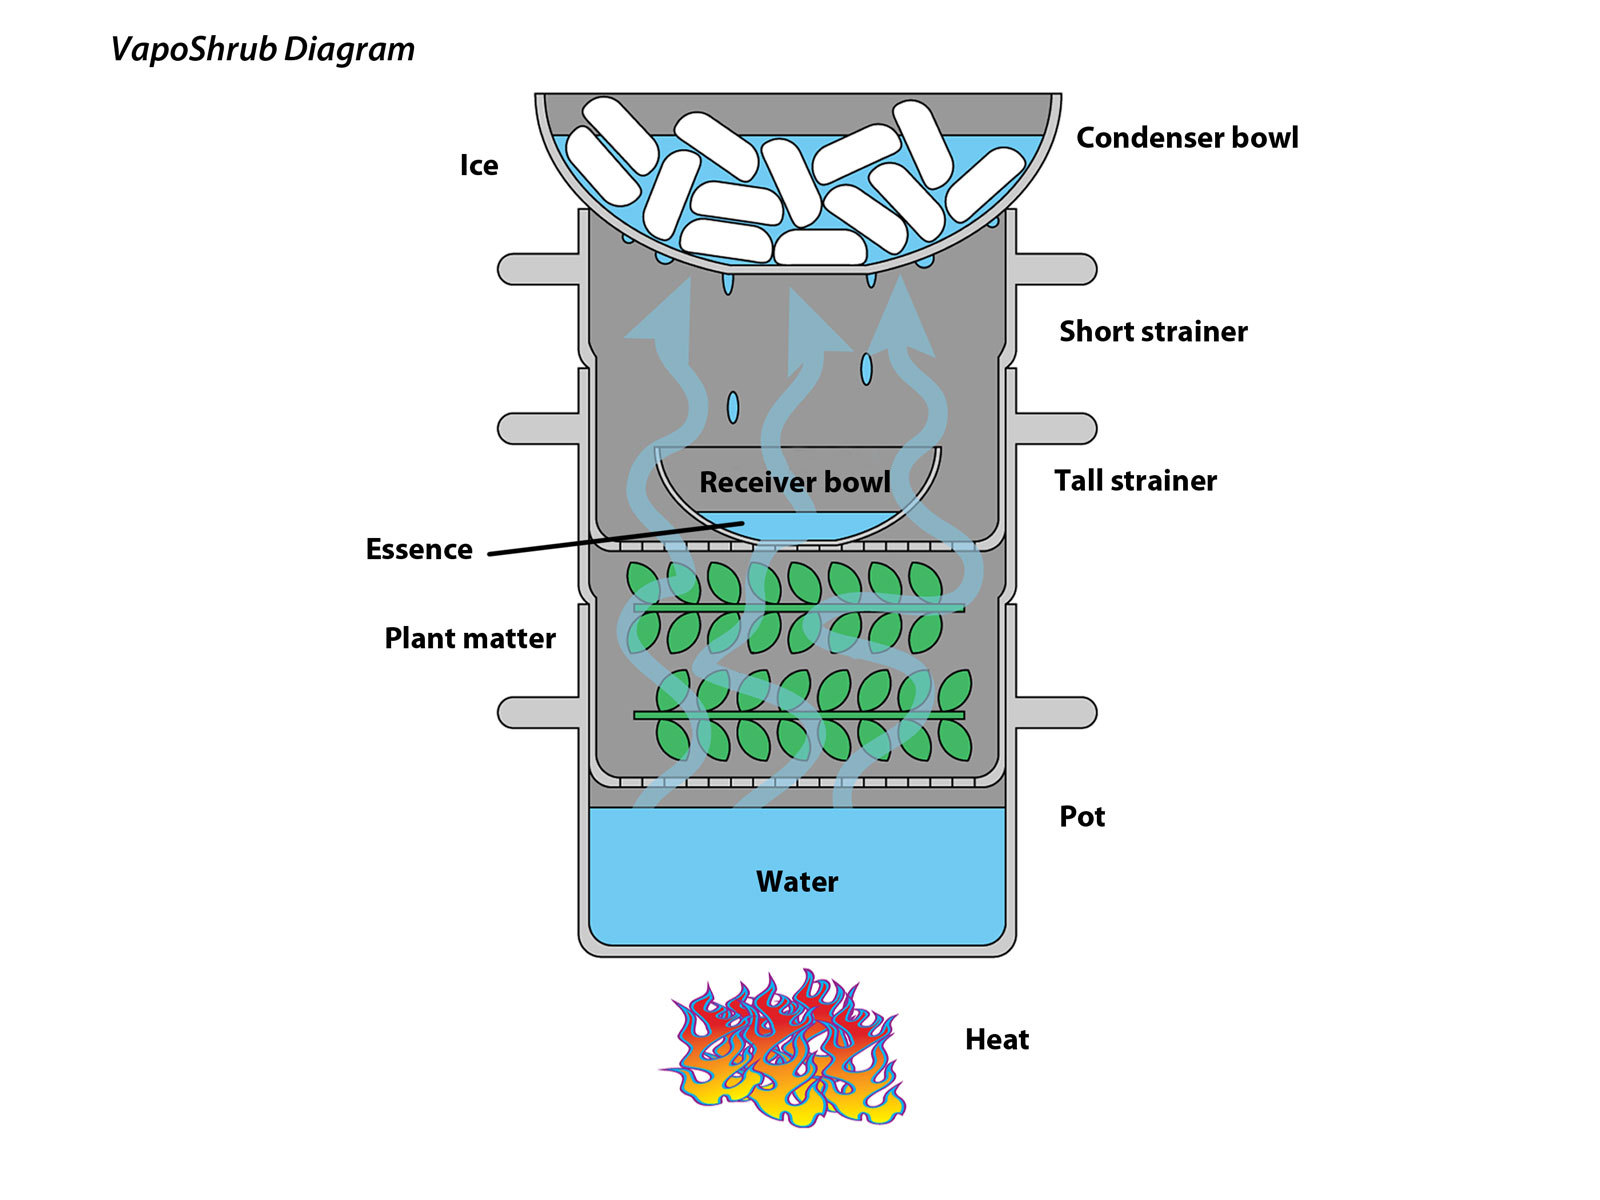
Here we extract the earthy scent of rosemary, but almost any fragrant plant should work well for this project. The technique is simple: steam rises through a strainer full of plant matter, vaporizing volatile oils and other fragrant compounds, which condense on an icy bowl and drip into a small receiving bowl. Start your essence!

CAUTION: Do not use glass cookware in this project unless you understand how to prevent breakage due to thermal shock. Even borosilicate glass can shatter explosively if heated or cooled too rapidly. Also, be very careful to avoid steam burns while inspecting the still and/or emptying the receiving bowl.

Project Steps

Choose your plants.

Decide what kind of fragrance(s) you would like to extract. Generally, the stronger your plant matter smells to begin with, the better. Rosemary, lemon verbena, vanilla, scented gardenia, lavender, and wild rose are just a few of the many possibilities.

Prepare your plants.

In preparing your plants, there is a tradeoff between the need to pack as many plants into the still as possible and the need to avoid any processing (such as drying or grinding) that releases the plant’s fragrances prematurely.

Fresh, whole plants are best if you have a large still with plenty of room. Dried whole plants are commonly used. Grinding is generally not recommended. We compromised by gently stripping the leaves off fresh rosemary sprigs with our fingers, as shown in the photo.

Assemble your still.

Set the pot on the stove and fill it with water to just below the bottom strainer when it’s in place. Tap water is fine. Then put the strainer in place.

Load the plants.

Fill the bottom strainer with an even, loose layer of your plant matter. You may compact the plants a bit, but be sure to leave them loose enough to allow steam to pass through from below.

Insert the upper strainer(s) (optional).

The upper strainer provides a level resting surface for the small receiving bowl, which makes it easy to insert and remove even while hot.

I think of a layer of plants as a “stage.” The diagram (in Step 3) shows only one stage, but in fact you can have as many stages as you can find strainers to fit your pot. The only limit is their structural stability — don’t pile them high enough to tip over!

Position your receiving bowl.

The small receiving bowl sits on the bottom of the uppermost strainer. If you have only 1 strainer, you can just set the bowl on top of the plants, or you can clear a space in the plant layer for the bowl to rest. Just make sure that it’s centered in the pot, and as level as possible.

Drop in the condenser.

Fill the large condensing bowl generously with ice and position it in the opening of the top strainer, as shown. Make sure that it’s level and centered over the receiving bowl. Your still is complete. I named mine the VapoShrub.

Extract the fragrance.

Set the burner to medium-high heat and bring the water in the pot to an even simmer. I find that I can judge by the sound of the simmering water. But if you need to lift off the bowls and strainer(s) to check visually, it won’t hurt anything as long as you remember to protect your hands with oven mitts against possible burns from escaping steam.

The boiling water produces steam, which passes through your plant material, where it collects volatile fragrance compounds before rising to the top of the pot. There, it encounters the cold outer surface of the large bowl and condenses, with its extracted volatiles. Condensate flows down the surface of the bowl and accumulates at its lowest point, from which it drips into the receiving bowl.

Depending on how much material you extract and the particular distillation conditions, the contents of the receiving bowl may form a clear floral water, a cloudy emulsion, or separate layers of water and oils.

Collect the fragrance.

Check on the distillation periodically to empty the small receiving bowl. Be wary of steam burns when you remove the condensing bowl, and don’t try to handle the receiving bowl with bare hands. Use pliers or kitchen tongs to grasp the receiving bowl by its rim, lift it out of the still, and pour off into a jar.

Each time you empty the bowl, use a different container so that you can compare the smell and appearance of each fraction. This will help you decide when the distillation is complete, and will prevent diluting the more potent, earlier fractions with the later ones, which will be weaker.

If your distillate has a layer of oil floating on top, congratulate yourself: this is the essential oil of your plant material. Skim it off with an eyedropper or turkey baster. It will keep indefinitely.

If there’s no oil, or not enough to separate, don’t despair. The watery herbal distillate that you’ve produced, also known as a hydrosol or floral water, is also a valuable commodity. It should keep for a long time in the refrigerator, or you can dilute it with 1 part in 10 of strong rubbing or grain alcohol and store it in a cool, dark place.

Conclusion

Fragrance Uses

Essential oils can be used to scent homemade soaps, lotions, or candles. Drop a cup of floral water into your bathwater for a scented bath, or heat some in a vaporizer for aromatherapy. Mom adds some to her humidifier, or to a dishcloth that she tosses in the drier to scent the laundry. Experiment!

This project first appeared in MAKE Volume 22, page 135.