laser cut enclosures

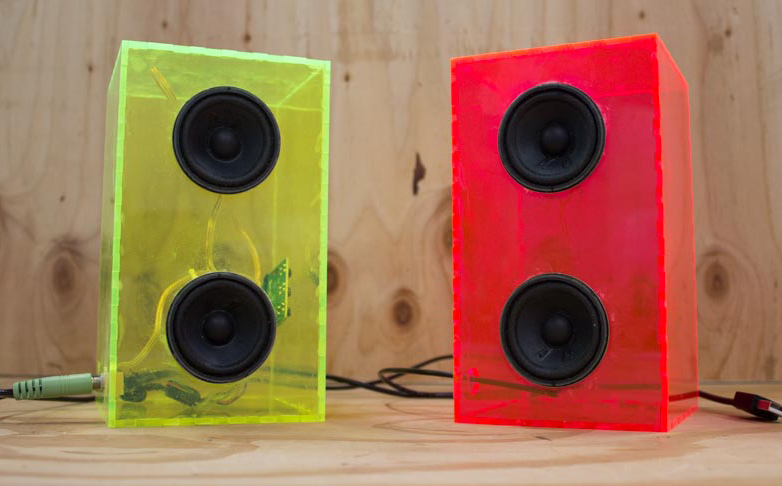
As someone who has minimal experience with electronics, I can wholeheartedly say that this project is not only useful but also very beginner friendly. I really enjoyed making these speakers and their enclosures because they were a great way to combine soldering and laser cutting. For this specific project, I took apart an old set of speakers to use the existing amplifier and then hooked up the new individual speakers to the board. I chose to use neon acrylic for the enclosures because I thought the colors would be a nice way to brighten up my study space, but it may be easier to use an opaque acrylic since the acrylic cement used to glue the speaker enclosures together can leave marks on the plastic. Each speaker is 4″×4″×7″, making them a substantial size but still useable on a desk.

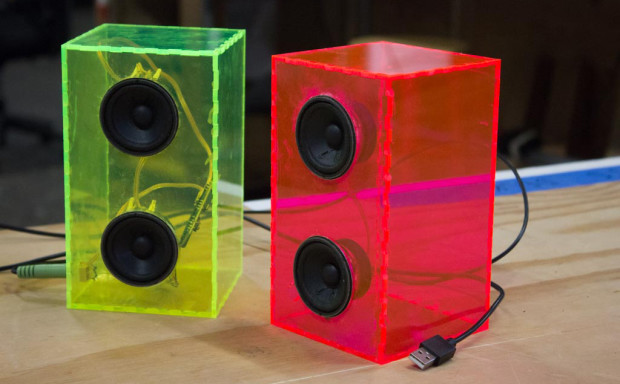
Another great thing about this project is that it is easily customizable. Depending on the materials you have on hand, you can make the speakers with a USB or auxiliary connection and can easily change the size of the enclosures to fit into your own desk space. In addition if you wanted to use larger speakers or build a subwoofer, you can still follow the same general steps of this project.

To make the steps easier to follow, I broke the project down into two main parts. First, I wired the speakers together and tested them to make sure that everything worked. Once I finished the wiring process, I cut the acrylic using a laser cutter. Just to ensure that I had designed my vector files correctly, I first cut the enclosures out of cardboard for a model that would not waste any of my material. Lastly, I glued the enclosures and speakers together and tested them once more before I finally put on the tops.

Project Steps

Gather materials and tools

Gather all the materials listed on the side.

To keep the materials organized, I sorted them out separately for each section of the project (the wiring process and the box construction).

Take apart old speakers

Use a screwdriver to remove the screws and disassemble the old speakers.

In order to completely detach the circuit board, desolder the spots where the existing speakers are connected to the board. One way to do this is by using the soldering iron. Once it’s hot, touch it gently to where the wire is attached to the board and when the solder begins to melt, pull the wires off.

Make sure to keep the cable (in this case, a USB cable) attached to the board so you can plug the speakers into your computer later.

NOTE: You only need the circuit board and the cable so the rest of the speaker parts can be discarded or kept for another project.

Split and strip the speaker wire

You will need 4 wires, 3 around 4″ and 1 around 10″. You don’t need to be exact, but you can always leave yourself a little extra room for error just in case you strip the wires incorrectly.

Pull the wire apart with your hands until it’s separated for about a ½” and then use the wire strippers to cut and pull the plastic off.

NOTE: Make sure to check which wire is positive and which is negative. In this case, the positive one is indicated by a white strip along the wire (which, unfortunately, can’t be seen in the photo).

Tin the speaker wire

To make the soldering process easier, you will want to coat the wires with solder.

Prop the wire up with a helping hand (if you want) and then using the soldering iron, warm the wire and the solder so that it melts and coats the wire.

Connect the four speakers together

Although some of the wires will need to be desoldered later to fit the speakers properly into the acrylic enclosure, it is a good idea to connect all the speakers first just to make sure that everything is working correctly.

Check the speakers to make sure which side is positive and which side is negative (conveniently indicated by a+ and a-) and then solder the positive half of the speaker wire to the positive side of the speaker and the negative half of the wire to the negative side.

Connect them in sets of two as shown in the second image with a 4″ wire between the two speakers. Attach the 10″ wire to one of the sets.

Attach the jack to the board

Use the third 4″ wire to attach the jack to the circuit board. Solder one end to the board and the other to the jack. Again, make sure that the positive and negative sides are placed correctly.

Strip the auxiliary cable

Cut the auxiliary cable in half, you will only need one end of it.

Carefully strip it, making sure not to cut through any of the wires inside.

Strip the green and white wires again and solder the two wires together (this is a stereo cable and we need to connect these two wires to make it mono).

NOTE: the green and white wires together are positive, while the third wire is the negative.

Attach auxiliary cable

Attach the auxiliary cable to the set of two speakers that does not have the 10″ piece connected.

Connect the board to the speakers and test sound

Attach the board using the 10″ wire on the second set of speakers (the board is attached to the speakers and the auxiliary cable is attached to the board).

Once the board is connected, plug the USB into a computer and plug the auxiliary cable into the jack to connect all 4 speakers. Play music on your computer to test if they work!

Prepare vector file for laser cutter

For the speaker enclosures, I started with a file for a finger jointed provided by Makercase and then modified it slightly to cut holes for the wires and speakers. The dimensions for my enclosures are 4″×4″×7″.

Cut on laser cutter

Cut out your pieces on a laser cutter. Make sure you leave the protective cover on the acrylic.

NOTE: To protect the plastic from the glue, which is very messy, it may be a good idea to leave some of the paper on until the last minute.

Sand edges

Laser cut edges can be too smooth for the acrylic cement to work effectively so it is a good idea to sand the parts that will be glued.

Glue speakers to acrylic

Use the superglue to glue the speakers into the holes cut into the acrylic.

NOTE: At this point, some of the 3″ wires will have to be desoldered and reattached in order to fit the wires into the enclosures.

Use heat shrink

To prevent the speakers from creating a short circuit when they touch the circuit board, cut a small piece of heat sink and place it on the metal ends of the speaker. Turn a heat gun on low and heat it until it shrinks and covers the metal.

Glue enclosures together

Pour the acrylic cement into the bottle. Make sure to only pour in as much as you will use at one time as it will dry up fairly quickly.

Once you have tested everything to make sure they work and have cleaned the inside, attach the top pieces.

Use them!

Pump up the jams!