Flame tube opener

Fiery devices have always fascinated me. From Jam Jar Jets (MAKE Volume 05) to Fire Pistons (Volume 19) to Faux Flames (Volume 25), I’ve built all sorts of fire-related projects. So when a friend told me about a device that lets you visualize sounds using fire, I knew I had to make one. I found it described in several old physics demonstration manuals, then I adapted those directions to make it less expensive and easier to build.

When you play a constant-frequency tone into the Flame Tube, it displays a perfect sine wave of fire. Play music, and the flames make a wild display caused by big, air-moving bass beats, standing waves from resonant frequencies, and other acoustic phenomena. It’s inspiring, fun to watch, and good for heating up your garage or workshop on a cold day.

YouTube player

In 1860, Dutch physics professor Pieter Rijke was investigating the relationship between sounds, gases, and fire. He stuffed a piece of iron mesh inside a large glass tube, then held it over a gas flame until the mesh was red-hot. Suddenly, the contraption emitted a sustained musical tone so loud that workers several rooms away complained.

Intrigued, Rijke’s colleagues set out to discover the reason for “the singing flames.” Some thought it was the periodic evaporation and condensation of water, but later scientists showed that the sound was caused by waves of air, set in recurring motion by the fire’s heat. Hot air, being less dense, moved upward while cool air sank. This vibrating air resonated at the natural frequency of the tube.

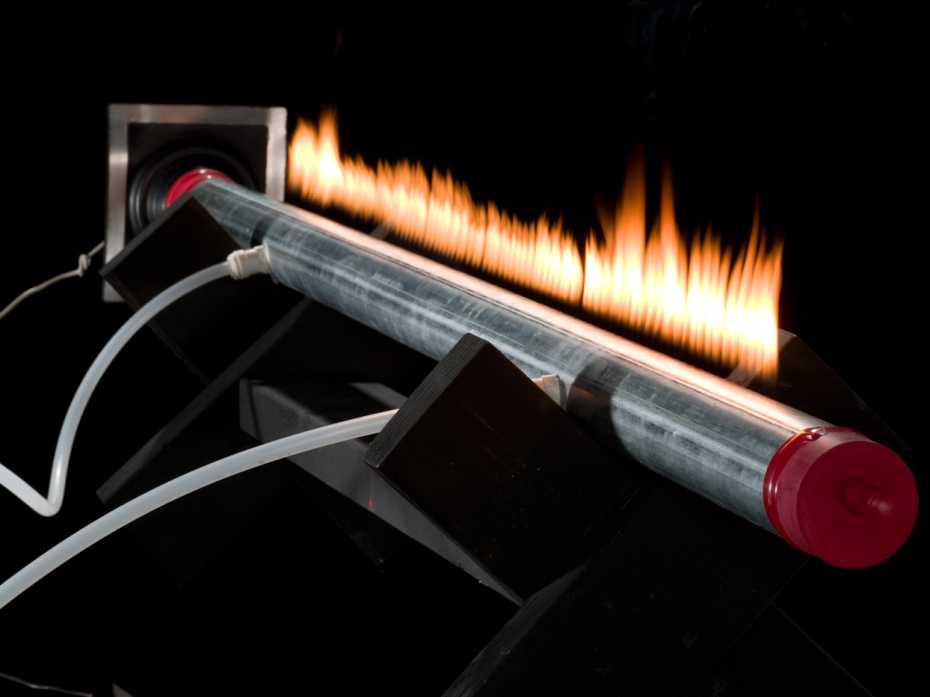
Years after Rijke’s work, German scientist Heinrich Rubens turned the idea on its head. He knew fire could produce resonating sound waves. Was it possible to use fire to make sound waves visible for the first time? In his laboratory at the University of Berlin he developed the standing wave flame tube, also called the Rubens tube in his honor.

YouTube player

The flame tube (aka Rubens tube) is a waveform visualizer. It works because sound is a pressure wave. As sound moves through a gas like propane, the wave alternately compresses and expands the gas in different regions. When you use a frequency generator to produce a constant tone of, say, 440Hz (the musical note A), the speaker pushes this sound through the gas, and a stationary wave is set up.

The stationary wave causes areas of high pressure to appear at fixed points along the pipe, spaced half-wavelengths apart. Where the pressure is high, the propane is driven more strongly out of the pipe, resulting in a tall flame. Between these high-pressure points will be low pressure points that create lower flames.

When music is played instead of the frequency generator output, the clean curves of the sine wave are replaced by much more chaotic and perhaps even more intriguing patterns. Strong vibration from drums and low-frequency sounds from bass guitars, tubas, and string basses cause the flame tube to send fire pulses out of the holes nearest the loudspeaker. Overlaying that are sine waves that are visible whenever the musical pitches being played coincide with the tube’s resonant frequencies. This layering of resonant frequencies and bass beats produces a dazzling display of musical pyrotechnics.

Project Steps

Mark and drill the flame holes

Beginning 6″ from the end of the conduit, make a series of marks with the marking pen, ½” apart in a straight line extending across the top of the conduit. Stop marking 6″ from the other end.

Drill 1/16″ holes on the marks, taking care to make the holes as perpendicular to the surface of the conduit as possible (aim toward the center of the conduit). This will take a while, as there are nearly 100 holes to drill. To reduce drill wobble, move the drill bit up into the chuck to shorten the exposed length of the bit.

Drill and tap steel conduit

Rotate the conduit 120° and drill two 9/16″ holes, 15″ from each end. Again, take care to make the holes as perpendicular to the surface of the conduit as possible. Tap the holes with the 3/8-18 NPT tap.

Turn the pipe tap clockwise ¾ turn, then turn it counterclockwise ½ turn. Continue this process until you’re able to thread the entire hole with the pipe tap.

TIP: To tap a hole in metal, place a drop of oil on the threads of the tap and then insert the tap into the hole.

Attach the gas fittings

Smear pipe thread compound on the threads of the 2″ push-to-connect (PTC) to 3/8″ male pipe thread adapter fittings, and screw them into the 2 tapped holes until they bottom.

Plumb the gas assembly

Cut two 30″ lengths of plastic tubing and insert one into the PTC side of each plastic fitting on the conduit. Insert their opposite ends into a PTC tee fitting. Insert a 12″ length of plastic tubing into the remaining open port of the tee fitting.

Insert the other end of the 12″ tube into the PTC side of the flare fitting (or your own combination of fittings that begins with PTC and ends in the 3/8″ flare).

Attach the balloons

Cut off the narrow end of 2 balloons and discard. Attach the remaining pieces of the balloons to each end of the conduit. Stretch them tight, and secure each with a rubber band or tape. We used red electrical tape here, for looks.

Build the wooden stand

Begin by placing 2 of the 12″ wood pieces into an X shape. Secure with two 2½” deck screws. Repeat to make a second X with the remaining pieces. Connect the X brackets to one another with the remaining 2×4, using the deck screws.

Place the conduit on the stand with the holes pointing up. Make certain the area around the conduit is at least 5′ — that’s 5 feet — away from any combustible materials on all sides, as well as above it.

Connect speaker to tube

Place the loudspeaker firmly against one of the balloons and affix the speaker to the end of the conduit. The quality of this connection has a large impact on how well the Rubens tube works; you may need to use duct tape or hot glue, or form a flexible rubber gasket to affix the speaker securely.

Wire the speaker to the amplifier and frequency generator.

TIP: Using the optional pipe flashing boot (the “witch hat”) is an easy way to get a good connection. Use a knife to cut appropriately sized holes, then couple the conduit to the loudspeaker. Hot glue might help to secure the speaker in the boot.

Connect the propane

Attach the flare fitting to the propane regulator and propane tank. The flame tube is now ready to use!

SAFETY NOTES

This project involves open flame and uses propane. It should be attempted only by adults, or under the close supervision of adults. The metal surfaces get very hot; do not touch them until they are cool.

Operate this device on a nonflammable surface and keep combustible objects well away from the flames.

Use the flame tube only in a well-ventilated space. Gas leaks are a possibility.

Keep a fire extinguisher handy.

Testing

Open the gas valve, slowly. Using the longhandled lighter, ignite the gas jetting out of the exhaust ports (the holes at the top of the tube). Adjust the gas pressure so each flame is about ¾” high.

The height of all flames should be equal. If they’re unequal, turn off the gas and clean any clogged holes by reaming them with music wire or redrilling. Turn on the frequency generator and amplifier and set it to 440Hz.

The frequency of the sound wave should be visible as a pattern of repeating high and low flames jetting from the holes on the pipe. Experiment with different frequencies to see different patterns and wave shapes.

Play Some Music

Replace the frequency generator with a music source and experiment with different types of music to understand how they affect the pulse and shape of the flames. If you have trouble keeping all exhaust ports lit during loud musical passages, try covering the last 6″ of holes on both ends with aluminum tape.

Conclusion

This project first appeared in MAKE Volume 26, page 72.