


For as long as I can remember, I have wanted to make music when I dance, and even generate music from my dancing. From marching band performances to dance club sets, playing music and movement have always been inextricably linked for me.
As a saxophone and general woodwind player, I discovered the Yamaha WX7 MIDI wind controller in 1993, went electronic, and never looked back. Over years of busking, touring, and recording, I condensed my setup down to the controller and a laptop, and developed a methodology for live-looped, soft-synth-based improv that I call Beatjazz.
But I got tired of standing and pushing buttons. I knew that gestural sensors and wireless devices could let me create music freestyle, the way a beatboxer or breakdancer might do — to be a part of the party instead of just standing on the side playing for it.
I began experimenting with gestural control last year by strapping an iPhone running TouchOSC to my arm, and using it to send motion data to Pure Data (Pd) on my laptop. This whet my appetite, and so I decided to build the performance interface that I had always wanted.
Introducing the Beatjazz Controller, a wearable, wireless, 3-node network interface for live performance. At its core, it’s a MIDI wind controller that you wear, not hold. It lets you move your hands and head independently. But it uses standard woodwind fingering, so if you know how to play a sax, clarinet, flute, or recorder, you can play any digital synth and sound like or “be” anything.

In addition to its 8 regular finger sensors, the system has an accelerometer on each hand for gestural input, and 4-position “joy-toggle” mini joysticks at the index fingers and thumbs. The controls feed wirelessly into Pd running on a nearby laptop, and Pd translates their readings into MIDI notes, volume levels, and any other events and control parameters.
Pd lets you link the inputs to anything you want, so that, for example, you can change the sound you make by moving and tilting your hands in midair, and even switch the entire interface into a different mode by flicking a finger against a joystick.
To add more control options, the 8 regular finger buttons are force-sensing resistors (FSRs) that read variable pressure. Press one normally, and it keys just like a regular woodwind, but press it hard, and you can trigger any other action you assign in Pd.
Each network node (left hand, right hand, and mouth unit) has an Arduino microcontroller and an XBee wireless transceiver that communicates with corresponding modules on the base station laptop. I chose the Arduino Fio, which is designed for wireless applications. It’s small and has a built-in “shoe” for plugging in an XBee. For its power (which also supplies the XBee), you connect its BAT pins to a 3.3V LiPo (lithium polymer) rechargeable battery, and you can charge it up by connecting 5V to the CHG pins.
The Fios and laptop all run Firmata, a system that lets Arduinos work as I/O devices for a base station computer. On the computer, Firmata converts all the signals it receives wirelessly from the Fios into OSC-formatted streams of numbers for output to Pd.
The Beatjazz Controller uses all open-source software and hardware. It works as one cohesive instrument, but every aspect of the design can be modified and shared.
Code and Configuration
- XBee Profiles
- Arduino test patch
- Beatjazz controller patches – multiple patches modularized
- MIDI continuous controller assignments for configuring Pure Data – PDF
- Fingering chart – PDF
Schematic Diagrams
All schematic files are in .fz format, created and viewable in the free Fritzing application.
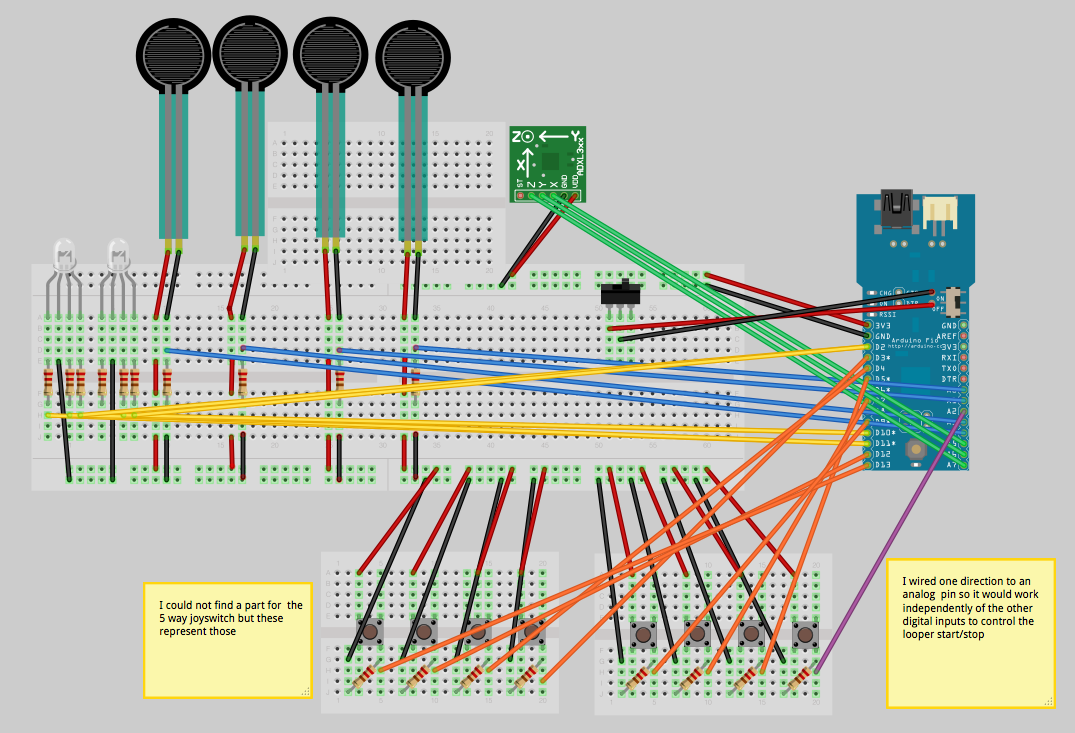
- Left hand unit – Fritzing file (save and open in Fritzing application)
- Left hand unit – Fritzing breadboard view (PNG)
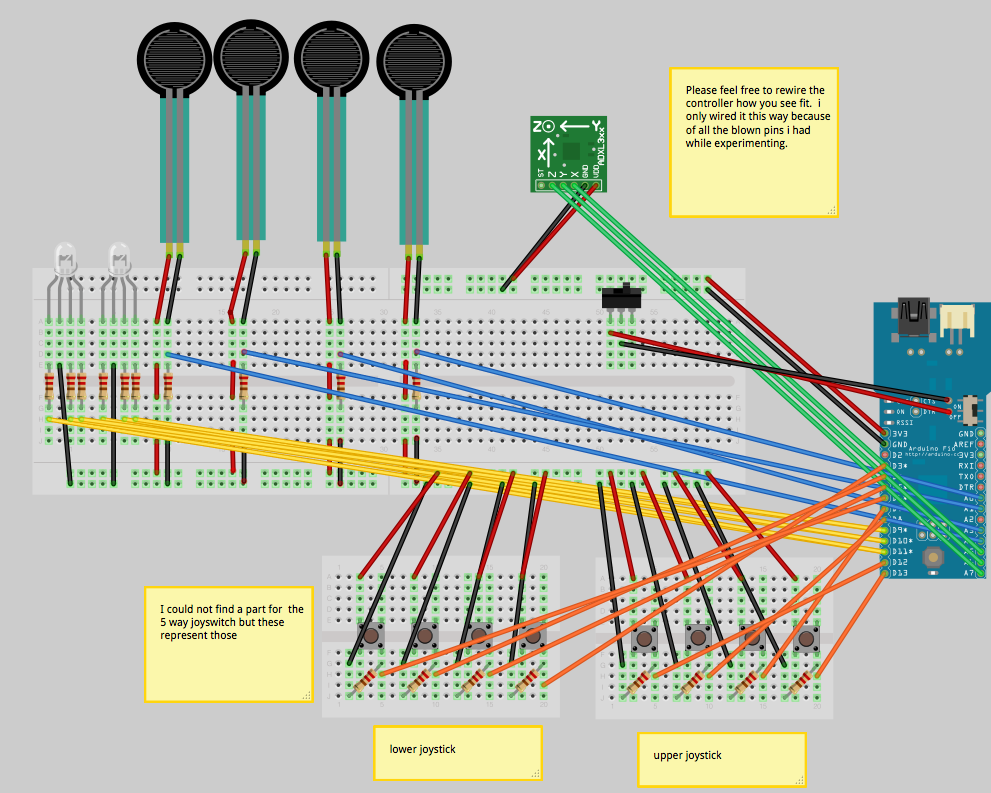
- Right hand unit – Fritzing file (save and open in Fritzing application)
- Right hand unit – Fritzing breadboard view (PNG)
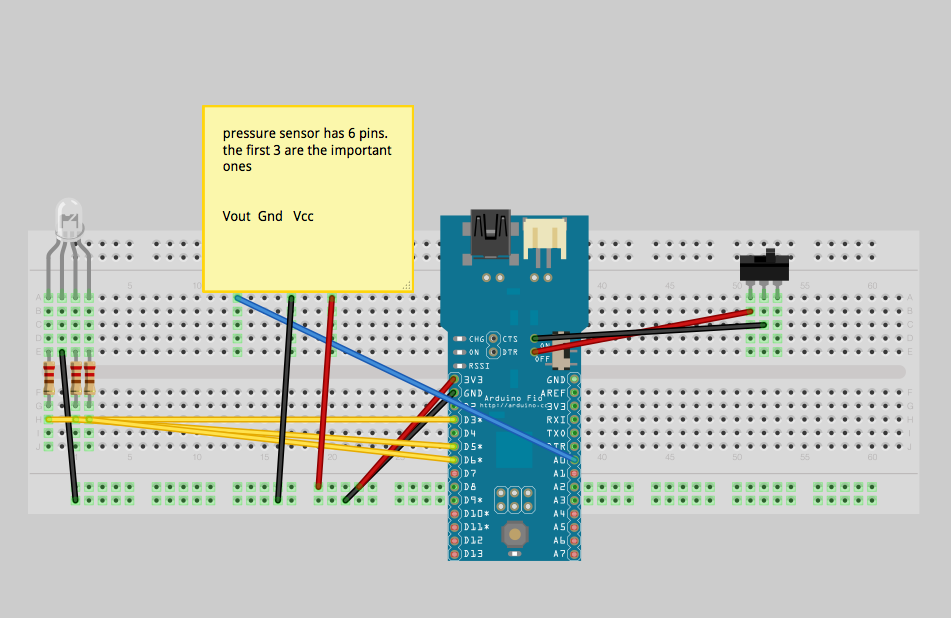
- Mouthpiece unit – Fritzing file (save and open in Fritzing application)
- Mouthpiece unit unit – Fritzing breadboard view (PNG)
Templates for Hand Cases
Resources
- Onyx Ashanti’s website
- Firmata
- FTDI drivers for Arduino
- Digi X-CTU XBee programmer (Windows only)
- Arduino Fio Programming
This article appeared in MAKE Volume 28, page 116.


