12-1

Shortly after I moved into my home, my automatic garage door opener broke. For years after, I was content opening my garage manually, but last summer my contentment was interrupted by a door spring failure. When the repairman came to fix the spring, he noted that the automatic lift was also not working and offered to fix that too.

Before the repair I would simply open the door by hand, grab my bike, and ride away. After the repair I found myself needing to remember where I left the garage door remote. I fumbled in my pockets for my keys, but instead found my mobile phone. It has a radio, it can communicate with the world, and it’s always with me. Why do I need a second device? I don’t, and neither do you. In this project you’ll learn how to connect a mobile phone, via the internet, to actuate your garage door button using a wireless mesh network.

YouTube player

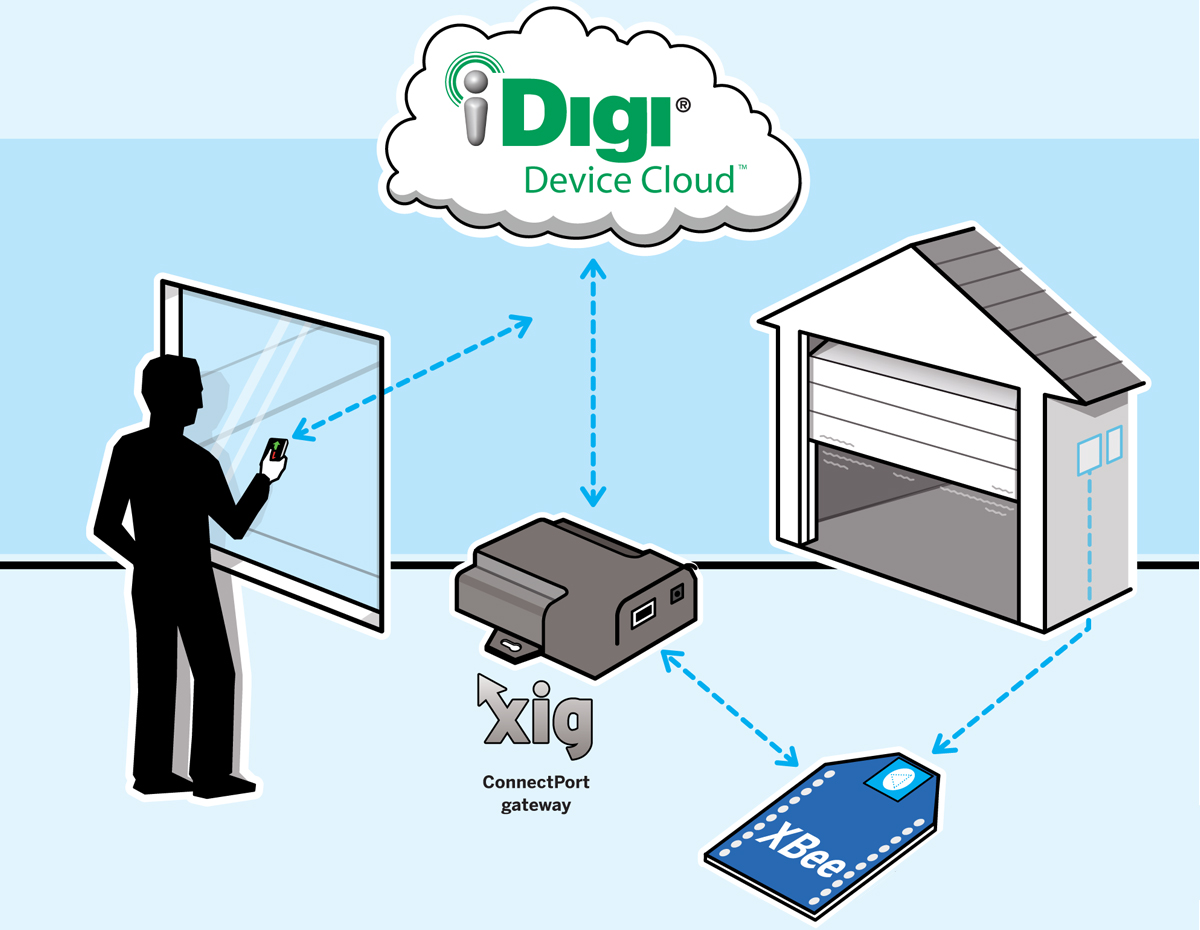
The project has 3 parts: controlling the garage door, connecting it to the internet, and configuring the smartphone. The basic pattern you’ll learn here for making your own wireless home automation devices — using Digi International’s XBee radio module, ConnectPort Ethernet device, XBee Internet Gateway software, and iDigi Device Cloud service — can be used to automate countless other devices in your home. (Full disclosure: I work for Digi.)

Perhaps you’d like to know when Tiger’s water bowl is empty? Detect freezing pipes or a leak in the basement? Know when the washing machine has finished its cycle? You can easily add another XBee to your network and reuse your entire wireless home automation infrastructure — the ConnectPort, XIG, and connection to iDigi. Everybody can share!

HOW IT WORKS

Almost all automatic garage door openers have a hard-wired button that when pressed opens the door. To remotely control the door, all that’s needed is a simple circuit that can simulate this button press. Since you’ll be able to control the door from anywhere, you’ll also want to detect and communicate whether the door is open or closed. For this, you’ll add a simple magnetic reed switch sensor that will tell you when the door is fully closed. Then you’ll connect this circuit to an XBee radio that will allow you to wirelessly communicate with a network inside your home.

The XBee ZB radio module (aka Series 2) speaks the ZigBee protocol. ZigBee is great for home automation projects. It’s secure and inexpensive but most importantly it’s a mesh network — a network that can extend its range using other radios intelligently and automatically. For example, if your garage is too far away from your gateway you can simply add another radio in the middle to facilitate the wireless connection.

To connect to your garage door circuit from the internet, you’ll use Digi’s ConnectPort X2 ZigBee-to-Ethernet gateway. The ConnectPort X2 can be programmed using the Python language. We used an open source Python application called the XBee Internet Gateway (XIG) to create the link between our garage door and the internet. You could also connect an XBee to a PC in order to make this link, but the ConnectPort X2 uses a lot less electricity and is always ready, so you won’t have to worry about forgetting to start a PC application in order to connect to your garage door. (If you wish to explore using the PC version, visit code.google.com/p/xig.)

Finally, you’ll set up your mobile phone to communicate with your garage door from anywhere in the world. Scott Kilau created a beautiful open source Android mobile application, and Margaret McKenna created a web version that people can use to turn any smartphone into a garage door remote.

Project Steps

Build the XBee Pulse I/O device.

For this project my collaborator Andy Warner and I created a simple electronic device you can use for all kinds of automation and monitoring tasks. It simulates pressing and releasing a button, and it also routes inputs and outputs to an XBee radio. We call it the XBee Pulse I/O. It’s open source hardware: use our design, improve it, sell it to your friends, or give it away to win over your enemies.

For a weekend project, you can build the device on a solderless breadboard, using a small XBee breakout board to adapt the XBee pins to the breadboard’s 0.1″ spacing. Just follow the breadboard instructions and schematics online and check the materials list at goo.gl/Lue81. This is a simplified design that’s intended for prototyping, not permanence.

For permanent installation, we recommend using our custom printed circuit board (PCB), the XBee Pulse I/O Board, which is described at jordan.husney.com/xbpio. It’s open source too — feel free to make your own. For security it adds static protection on the sensor inputs, and a circuit that stops the garage door from being toggled in the event of a power outage.

Assembly is simple: find an empty spot on the PCB and note its silkscreen label (e.g. capacitor C6). Locate each item in the materials list online and solder it in place, taking care to orient it correctly. Don’t solder down the XBee module — use the 10-pin headers, so you can remove it if you wish.

Connect the XBee Pulse I/O to the door lift.

At least 2 wires will connect your door opener button to the lift. Use a ladder to see where these wires attach to the lift. If you’re lucky they’ll attach to screw terminals. If you’re unlucky they’ll go directly inside the lift, and you’ll need to tap into their connections inside, or else strip a little insulation away from each wire leading into the lift in order to tap into them. Take care not to sever the wires as you strip them, and patch them up with electrical tape when you’re finished.

Cut a 6″ length of wire and strip both ends. Connect this wire between the 2 screw terminals or internal contacts, if you have to tap into the wires, between the 2 wires themselves. Only hold the connection for a half second or so. When you release it, the door lift should activate.

If the door doesn’t activate, you’ll need to work your way through each possible pair of connections until you find the one that works. You may find a multimeter useful in your search: set it to measure AC voltage (up to 24V) and probe between each pair. You should be able to find a wire that always registers a voltage when compared against any other wire: this is the ground wire. Test by shorting between the ground wire and the other wires until you find the one that activates the door.

Now connect your XBee Pulse I/O circuit to the door lift by connecting the common wire and the normally open wire from the relay output to the 2 garage door lift wires. It doesn’t matter which goes to which. When the relay activates, it will momentarily short the 2 lift wires together, simulating a button press.

CAUTION: Take care not to tap the 110V wiring that powers the door; it’s dangerous!

Connect the internet gateway.

Now that we’ve got our XBee Pulse I/O installed we’ve got to be able to reach out and talk to it remotely. This is a harder problem than it appears. For one, our mesh devices don’t have IP addresses. For that, we need to connect them to an IP-to-ZigBee gateway. We also need to make the gateway accessible to the world. Before, we’d have to create a special rule on our home router to allow incoming traffic and then remember our home IP address — and worry about it changing. Fortunately there’s a better way.

The Digi ConnectPort X2 gateway creates a connection from our house to a special free service called iDigi. This connection acts like a secure tunnel back to the gateway in our home. Using the proper credentials, remote applications can talk to iDigi and pass information all the way to devices on our mesh network. So why use a dedicated gateway and not a PC? For the same reasons we use wi-fi routers instead of PCs set up for internet sharing: simplicity, reliability, cost, and efficient power consumption.

Open a web browser and navigate to idigi.com. Click the Get Started Now button and create an account on the iDigi Developer Cloud (a free version of iDigi Device Cloud that allows up to 5 devices). Once logged into iDigi Manager Pro, navigate to the Devices page and click the Add (+) button to add your ConnectPort device. The application will look for the ConnectPort X2 on your local network. Once it’s found, click on it to select it, and then click the Add button.

After a minute or two, click the Refresh button and you’ll see your ConnectPort X2 gateway listed as “Connected” in iDigi Manager Pro. This means the gateway can talk to the world, and the world (if it has the proper credentials) can speak to your gateway and devices.

To control how the gateway speaks to the world, you need to load some extension software onto it. The XBee Internet Gateway (XIG) is a Python program that allows our mobile phone app to send remote commands to open and close the garage door. It also streams SSL-encrypted sensor information from the XBee Pulse I/O to the iDigi service, which allows our mobile app to know whether the door is open or shut. That’s neat!

Download XIG version 1.4.0 or newer from code.google.com/p/xig, and unpack the archive into a folder on your desktop.

Log into the iDigi Developer Cloud, go to the Devices page, double-click on your gateway, and select Python from the list of configuration sections. Click the Upload icon, browse to your unpacked XIG files, and upload all files except the software license and README file. Once the upload completes, type xig.py into the Auto-start Command Line field and check the Enable checkbox. Close the configuration pane, right-click on the gateway, and select Administration → Reboot. Your gateway is all configured!

Configure your mobile phone.

Now for the easy part. If you have Android, install the XBee Garage Door application from the Android Market (market.android.com). Start the app and enter your iDigi Developer Cloud username and password. If you have more than one gateway device attached to your iDigi account you’ll next be prompted to select the correct gateway and XBee node.

If you’ve got a different web-enabled phone, then use the browser interface at xbee-garage-door.herokuapp.com.

Now test the door closure sensor. If you place the magnet next to the sensor, the contact will close. After a few seconds the state change will be transmitted all the way from the XBee, through the gateway, to the phone app or web interface, via iDigi.

Mount the door sensor.

Carefully disconnect the magnetic door sensor from the XBee Pulse I/O. Close your garage door — hey, use your phone! — and choose a location to mount the sensor on the wall alongside the door, 4″–6″ from the ground. Mount the magnet on the door itself, opposite the sensor and close enough that the sensor can detect the magnet.

Now just by pressing the button in the Xbee Garage Door app on your phone you’ll be able to open and close your garage door … like a boss!

Take it further: You can easily adapt this system to press any button in your house, from anywhere. Start your mixer to terrify your cat. Turn on your yard lights to welcome your kids home. Ring your own doorbell!

After you build something cool, please tell us about it on the XIG project website

(code.google.com/p/xig).

Conclusion

This project first appeared in MAKE Volume 30, page 66.