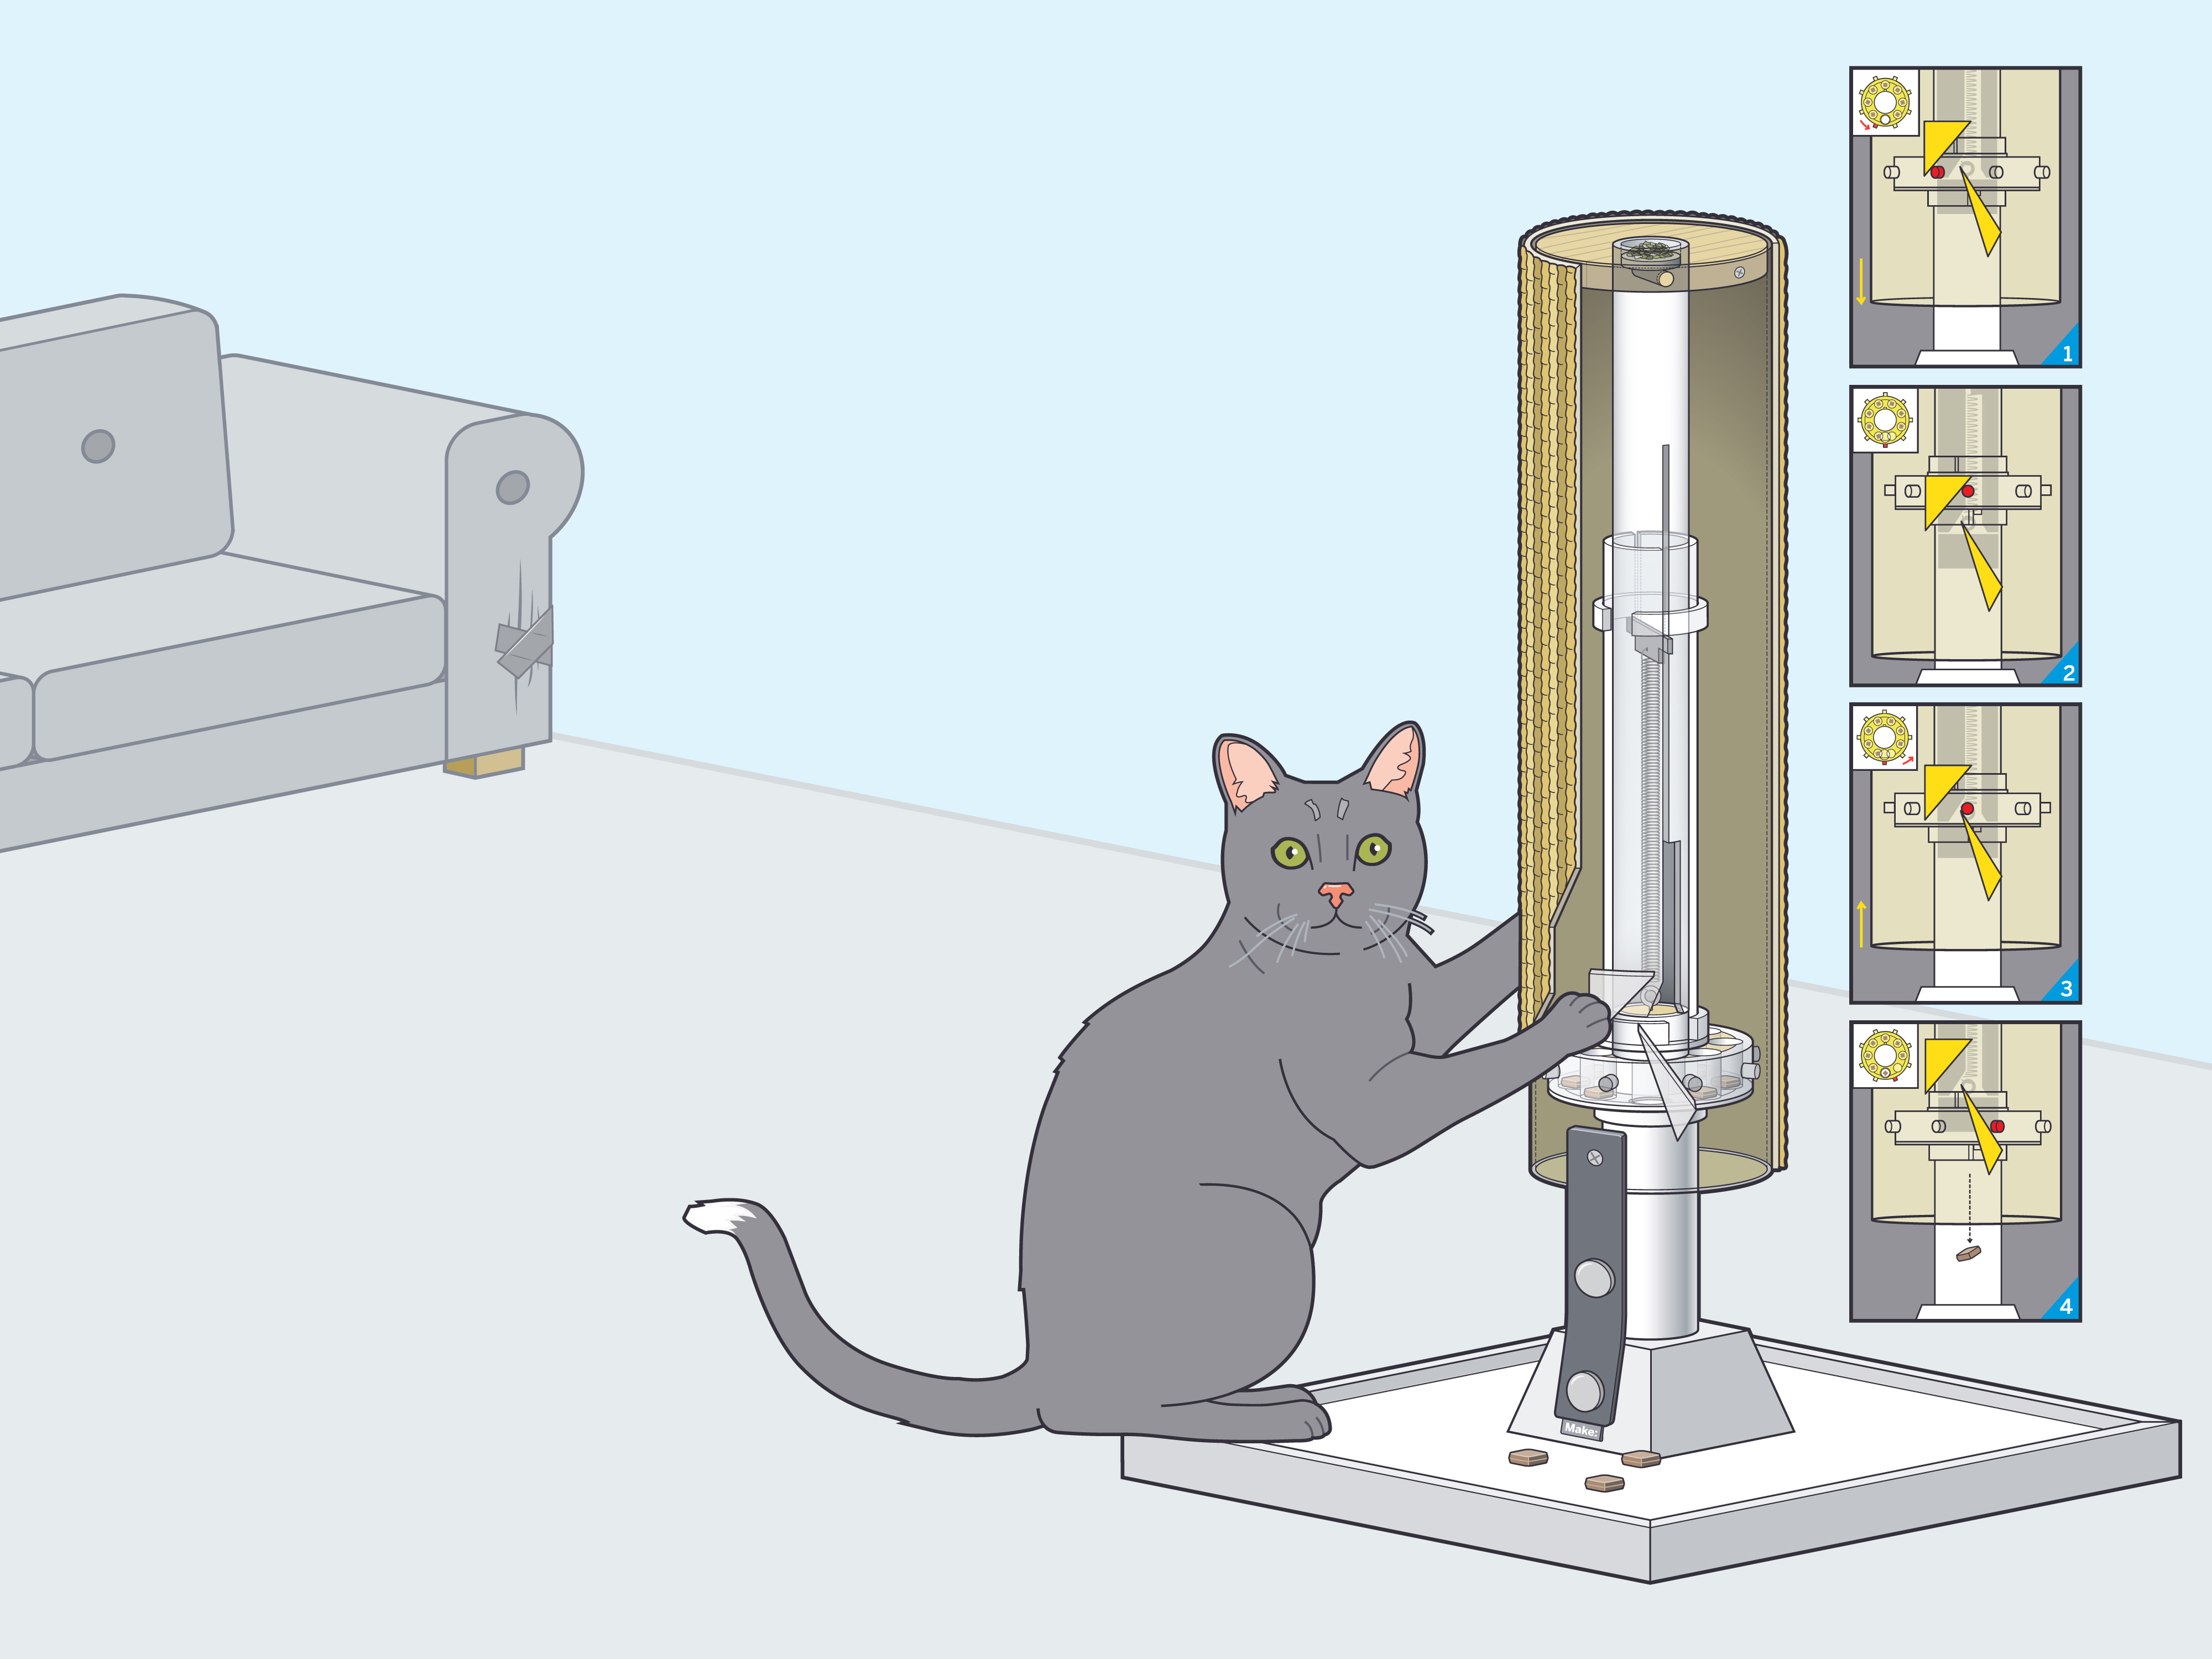
Has your cat left scratch marks on everything from grandmother’s kneecaps to your grandfather clock? It’s time to train Kitty to use this scratching post instead of everything else in your home.

A catnip cup in the top will attract your cat and place her in natural scratching position. Each time the cat claws downward on the spring-loaded carpeted cylinder, this device will deliver up to 4 special treats. Because you control the number of treats, you can keep your cat lean and gradually wean her off the treats altogether as she becomes accustomed to using the post, if you wish.

Download the full-size turntable template and cylinder inner wedges template.

MAKE Volume 33 features our special Software for Makers section covering apps for circuit board design, 3D design and printing, microcontrollers, and programming for kids. Also, meet our new Arduino-powered Rovera robot and get started with Raspberry Pi. As usual, you’ll also find fascinating makers inside, like the maniacs on our cover, the hackers behind the popular Power Racing Series events at Maker Faire.

Try your hand at 22 great DIY projects, like the Optical Tremolo guitar effects box, "Panjolele" cake-pan ukelele, Wii Nunchuk Mouse, CNC joinery tricks, treat-dispensing cat scratching post, laser-cut flexing wooden books, sake brewing, growing incredibly hot “ghost chili” peppers, and much more.

On newsstands now, by subscription, or available in the Maker Shed

Buy now!

Project Steps

Make the base.

Cut the base square, mitering 1/4″ wood strips so they form a lip all around to help retain the dispensed treats. Fasten with brads and a bit of wood glue.

Follow the support tube holder diagram to build the holder. For safety, drill the hole with a fly cutter before cutting the wood to size. The hole is nominally 1-5/8″, but drill it slightly undersize to ensure a press fit between the holder and the support tube. Chamfer the holder’s edges on a table saw or band saw.

Keep your adjustable bit set at 1-5/8″ diameter for drilling other parts later.

Fasten the support tube holder to the center of the base with wood screws.

Insert a stub of 1-1/4″ PVC pipe (1-5/8″-OD) into the hole as a mask, then sand, prime, and paint the base a light color so the cat treats will show up on it.

Attach a male fabric snap to the center of any face of the holder with a wood screw.

Make the support tube components.

Cut the support tube from 1-1/4″ PVC pipe, using a table saw, following the diagram. To cut the slot in the center of one end, hold the pipe vertically and use wooden pushers at the bottom and side as shown (ask a friend to help).

Make the plunger from 1″ PVC pipe, following the plunger diagram. Cut the 1″-diameter wood disk on a band saw, sand it to fit tightly in the ring, and glue it in place. Sand the top and bottom of the plunger flat and square, then insert a small screw eye in the center of one face.

Make the top spring retainer from the aluminum bar, following the diagram, using a band saw. For safety, drill the hole and notch the corners before cutting the part to final size.

Cut the extension spring down to 5-1/4″ over the closed coils, per the spring diagram. Use needlenose pliers to bend out new hook coils on the ends, then cut them with side-cutting pliers. Insert the hook coils into the top spring retainer and the plunger screw eye. Then insert that assembly into the support tube.

Make 3 split rings from 1-1/4″ PVC pipe per the split ring diagram.

Note that one has a notch in its outside surface near the split, which can be roughcut with a band saw, and the inside corners filed square.

Put the top spring retainer in place. Then, expand one of the rings without the notch (it’s not easy) and push it over the top end of the support tube to hold the top spring retainer in place.

Make the treat turntable.

Follow the diagram to make the turntable and rotation pegs. When cutting the 3/4″ wood and 3″ PVC pipe, ensure that the cuts are straight, parallel, and square to the sides. The wood disk should fit tightly into the PVC ring. Glue it in place and sand both faces smooth.

Download the full-sized turntable template. Peg specs are in red.

The turntable is just 3/4″ deep, but start with at least a 12″ length of pipe for safe cutting on a power saw.

The positioning of the rotation pegs and the locations of the treat holes are critical. The red lines indicate peg locations; extend them onto the sides of the PVC pipe. Draw a line around the outside, centered between the 2 faces.

IMPORTANT: Center-punch all hole locations before drilling.

Drill the center hole with a fly cutter bit. This hole should initially fit snugly over the support tube. Drill the 8 treat holes using a spade bit.

Make a drill press jig for the peg holes. Using a length of the 1-1/4″ pipe (1-5/8″ OD) resting in a wood V-block, with the bit set to stop at a depth of 1/4″, drill the 8 peg holes.

Cut eight 1/2″ rotation pegs from 1/4″ acrylic dowel, ensuring the ends are square and smooth. Tap them lightly into the peg holes with a hammer and glue them in place. The ends of the pegs should just clear the ID of the 4″ PVC drain pipe.

You can radius the ends slightly on a sander to help achieve a close fit.

After the turntable is completed, sand the large center hole so it rotates freely on the support tube.

Cut the treat disk and bearing washer from 2mm HPDE plastic, following the diagram. (If you bought 90mm disks, they’re almost exactly the size of the treat disk.) Lay out the 2 parts on the plastic and drill both large holes with the fly cutter bit. Use a 3/4″ spade bit for the smaller hole in the treat disk. Then cut out all the parts with shears.

Use side-cutting pliers to snip the tab on the inside diameter of the treat disk, and carefully bend it down 90°.

Assemble the Support Tube

Following the assembly diagram, spread and slip the second notchless split ring onto the support tube from the bottom. Follow with the bearing washer, the turntable, and the treat disk.

Press the notched split ring on last, so that the bent-down tab on the treat disk will be trapped by the notch to keep it from turning.

Position the bottom surface of the treat disk 5-1/2″ from the bottom of the support tube.

Press the support tube assembly into its holder on the base without fastening it. Don’t fasten the split rings either, to allow for adjustment.

Make the scratch cylinder parts.

Cut the scratch cylinder, following the diagram.

Cut the 2 sets of wedges using the full-sized template (included in the .zip file from Step 6). These will rotate the turntable one-half position on the downward stroke of the scratch cylinder, and then one-half position on the upstroke, releasing the treat.

Split lengthwise an 8″ piece of 4″ PVC pipe. Temporarily spray-glue the template to the inside of one of the pieces, and cut 2 sets of wedges with a band saw. Super-glue the duplicate wedges together, doubling their thickness.

On another copy of the template, cut out the wedge holes. Temporarily spray-glue this template to the inside wall of the scratch cylinder 1-1/4″ from the bottom end, anywhere on the circumference. Hot-glue the wedges in place, using the negative template to position them accurately.

Using a band saw, make the top disk and sand it to fit tightly into the top end of the scratch cylinder. Use the fly cutter bit (reset to just under 1-5/16″) to drill its center hole.

Fasten the top disk to the cylinder using 3 small flathead wood screws.

Wrap the scratch cylinder with Berber carpet hot-glued in place.

Make the inner tube.

Following the diagram, drill the 1/4″ holes in the 1″ PVC pipe (1-5/16″ OD). Then make a wood jig and screw the pipe to it through the holes.

On a table saw, cut the top slot 1/8″ wide. Allow for the radius of the blade and the thickness of the jig itself to determine where to stop cutting. Finish extending the top slot on a band saw to its full 9-7/8″ length.

On both sides of the tube, widen 3″ of the slot to 3/8″ with a band saw as shown. Use a wood wedge to hold the slot apart for easier blade access. File the slot if necessary to make sure it clears the top spring retainer during the plunge stroke.

Assemble the scratch cylinder.

Follow the diagram to make the catnip disk and disk pin.

Insert the catnip disk pin through the end of the inner tube, and glue the catnip disk into place using the pin as a stop and gluing surface.

Press and glue the inner tube into the cylinder top disk. It must be centered within the scratch cylinder.

Test and troubleshoot.

Load the turntable with treats, and drop the scratch cylinder assembly over the support tube assembly. The inner tube must slide easily into the support tube.

Pull down on the scratch cylinder to cycle your Scratch-a-Treat, testing for smooth operation and ensuring that treats are dispensed. If you feel friction, there could be several sources:

Between the slot in the inner tube and the top spring retainer. Try removing the scratch cylinder, turning it 180°, and replacing it. Or widen the slot slightly, especially at the top.

Between the inner tube and support tube. Remember that the inner tube must be centered in the scratch cylinder.

Between the turntable and support tube. Sand the center turntable hole as necessary.

Between the rotation pegs and the wedges inside the scratch cylinder. Smooth these parts as necessary to reduce friction.

If treats aren’t dispensed, adjust the height of the turntable on the support tube and/or turn the treat disk (and its split ring) so it releases all the treats reliably.

Finish the assembly.

Remove the scratch cylinder and fasten the 2 lower split rings to the support tube with short screws. These must not protrude inside the support tube.

Make the fabric strap per the strap diagram and screw it to the inside bottom wall of the scratch cylinder. Turn the support tube in its holder to align the snaps.

Tame that kitty.

When you first set up your Scratch-a-Treat, use the strap’s end snap to limit the spring’s bounce when Kitty releases the scratch cylinder. Use the shorter snap position to disable the plunge action altogether when Kitty becomes accustomed to using Scratch-a-Treat as a proper scratching post.

You don’t need to remove the scratch cylinder to load treats. Simply unsnap the strap, lift the scratch cylinder about 4″, rotate it clockwise, and let go. Load the treats into the turntable, then reverse the process to drop the scratch cylinder back into scratching position.

A variety of treats can be used. We favor the crunchy, catnip-flavored Temptations brand.

Rubbing a bit of catnip onto the carpet will help attract your cat initially and encourage scratching.

As with all pet training, praise Kitty generously when she uses the Scratch-a-Treat, and administer a stern scolding when she does not. Grandma’s knees will be happy.

Conclusion

This project first appeared in MAKE Volume 33, page 108.