Finished-Mobile-4

This article appeared in Make: Vol. 40.

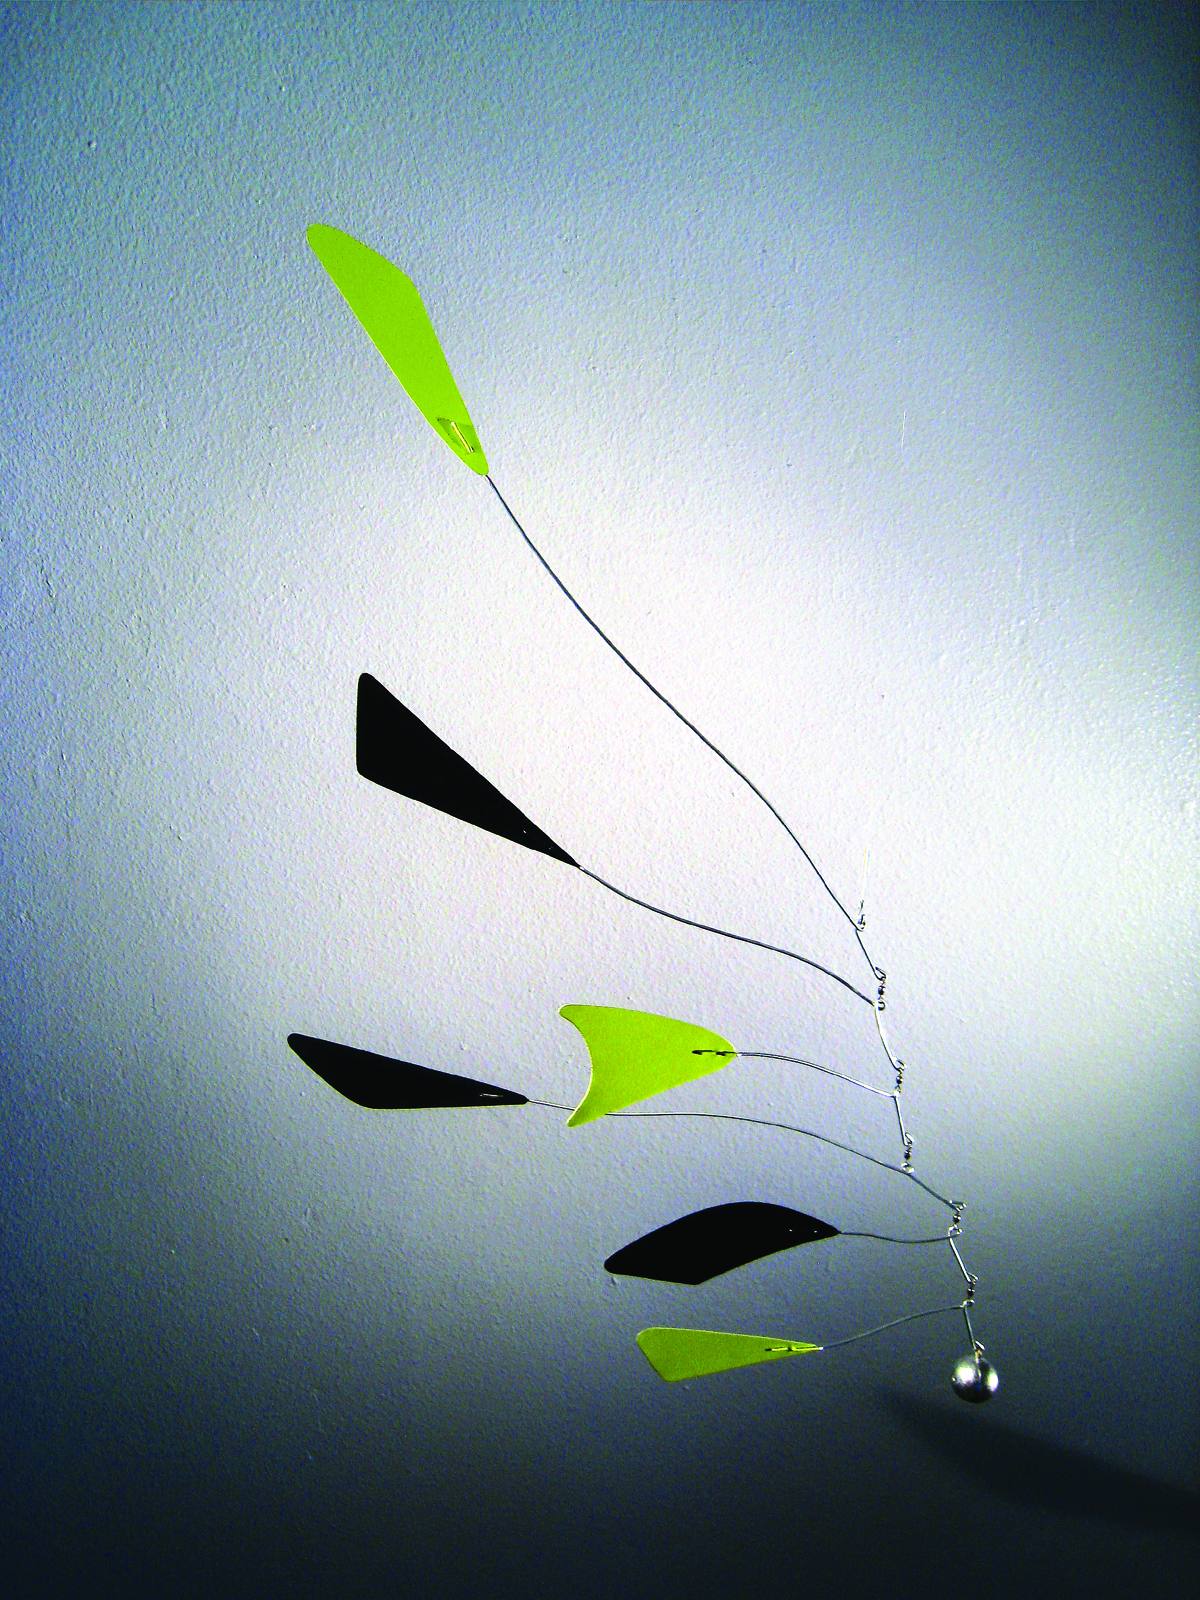
Alexander Calder, inventor of modern mobiles, constructed his classic models from wire and sheet metal. This mobile is based on Calder’s mid-century modern mobiles, yet I’d like to think it has a contemporary design element to it.

Conventional mobiles are mostly made with hook-into-loop connections, which restrict movement to some extent. My mobile uses swivels, which allow the parts to rotate full circle, independent from each other.

It also has a weight attached, which gives the balance points more flexibility and makes the mobile a little easier to build. The weight also gives the mobile more stability, making it better equipped to hang in a windy spot or outdoors.

Finished, it will measure approximately 30″ (75cm) in both height and diameter, which fits an average-sized room nicely.

Mobiles are constructed from the bottom up, meaning you start with the lowest part because the balance of the higher parts depends on the weight of the lower ones. A mobile with a weight attached like this one gives you quite a bit of flexibility on the balance points. You can increase or decrease the angle of the arms going out from the loop to point more upward or downward.

Project Steps

Create the shapes

Download and print the template PDF, and trim out the shapes.

Trace the shapes onto the sheet metal with a dry- or wet-erase pen, making sure to mark the drill holes. Cut them out with tinsnips.

Using the 5/64″ bit, drill the 2 holes traced into each shape.

Flatten and smooth

Hammer the edges of the shapes flat, then sand off any jagged edges either by hand or using a powered sanding tool.

TIP: A cheap alternative is to get a Sanding drill bit. With one hand you can hold the drill flat on a tabletop while you move the sheet metal shape along the rotating sanding bit.

Prepare the ceiling hook

Clip off a 2″ length of wire with the needlenose pliers and bend it into a hook — nothing fancy, a simple S-shape will do.

Find or install a hook, screw, or nail in the ceiling, tie fishing line to it, and attach the wire hook to the line at an easy-to-reach height.

Make an arm

Clip off a 12″ length of wire and straighten it. I do this by holding one end of the wire with one hand, and with my other hand, extend my thumb and press down while pulling toward the other end. You don’t have to get the whole piece perfectly straight, as you’ll bend it again, but you’ll want one straight end to hook into the sheet metal shape.

Bent wire ends can be hard to straighten out; you can clip them off.

Attach a shape

Next, make a hook that’ll loop into the 2 holes of the first sheet metal shape. Hold the straightened wire up to the holes and, using your pliers, give the wire 90° bends at each hole. It can take a little practice to get the size right.

Attach a shape (cont'd)

Loop the wire into the sheet metal shape and use pliers to bend both the shorter and the longer end of the wire down flush with the shape, as shown here. Be careful not to squeeze the wire so much that you end up bending the sheet metal. It doesn’t have to be perfectly flat, as long as the wire maintains a decent grip on the shape. Now you have one arm of the mobile with a shape attached to it.

Add a swivel

Measure about 4″ down the wire from where the shape ends. Grip the wire with your pliers, thread a swivel onto it, and enclose the swivel in a loop by bending the wire until it reaches a little over 270° of a circle.

From the loop, measure about 2″ and clip off the excess wire.

Hang the weight

Thread the wire through the eye of the 6oz fishing weight and enclose it in another loop. Now you have the first part of the mobile. You can hang it on the hook you created in Step 3. If needed, adjust the angle of the bend in the wire so that the arm with the shape attached sticks out horizontally.

Repeat and assemble

For the rest of the 5 shapes, simply repeat steps 4–6: Straighten a wire arm, attach it to the sheet metal shape, make a loop with a swivel, and leave about a 2″ length of wire. Then bend the second loop through the other eye of the swivel on the previous piece. The length of the arms, measured from the sheet metal shape to the balance point loop, can be varied. The arms in my mobile, from the lowest to the highest piece, measure 4″, 3″, 10″, 5-1/2″, 8-1/2″, and 13″. All the connecting arms are about 2″ long.

You can choose to come up with your own variation of lengths for the arms going out to the shape, however, the other arm going from the loop to the next lower piece needs to be at least 1-3/4″–2″ long. If you leave it shorter than that, you won’t be getting enough gravitational pull to hold up the end with the shape.

Once you’re done making and attaching all 6 parts, bend the arms a little, this way and that, until you like the way it looks — or, if you choose, until it looks like the finished mobile in the photos.

Paint (optional)

I paint my mobiles with either a brush or spray paint, or have them powder coated, although the last option will cost you at least $75 per color, no matter how small the shapes are. That’s just the least that most powder coating companies charge for the basic setup per color.

I recommend first roughing up the surface of the shapes with sandpaper to give the paint something to adhere to. If you want to be thorough, apply a primer — my favorite for sheet metal shapes is Insl-X Stix Waterborne Bonding Primer, which costs about $20 a quart.

When applying paint with a brush, I usually have the mobiles hanging on a hook. I recommend applying 2 or 3 thin coats of paint rather than 1 or 2 thick ones. If you apply too much paint in one coat, it will end up collecting on the lower end of the shape, which can look messy.

To spray paint, I lay the mobiles onto cardboard or newspaper, wrap pieces of painter’s tape around the wires where they meet the shapes, then prop up the arms with cardboard or other objects in a horizontal position. Spray paint one side of the shapes, wait until it dries, then flip the whole mobile over, prop up the arms again, and paint the other side. Remove the painter’s tape when both sides are dry. That’s it!

Going further

Now that you understand the basics of mobile making, you can experiment with other designs. Take a look at the structures of other mobiles and give them a try. Maybe you’ll even invent a completely new type of mobile structure or style. This is still a very young art form, basically less than 100 years old — so there are a lot of new mobile styles and possibilities to be explored!

A cheap alternative is to get a Sanding drill bit. With one hand you can hold the drill flat on a tabletop while you move the sheet metal shape along the rotating sanding bit.