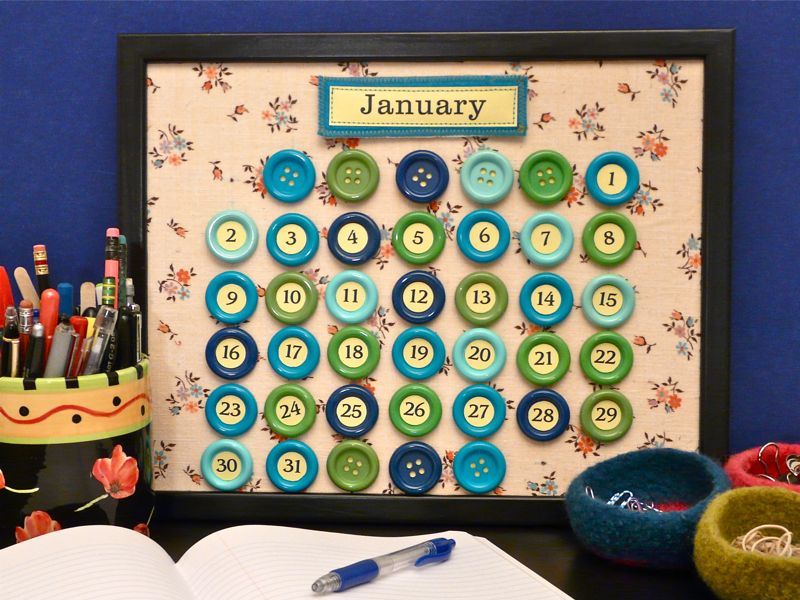
I know calendars (and clocks and address books) are quickly becoming computer-centric tools, but I like the old-school charm of this desk calendar. Make it once, and you can use it forever – just move the numbers to their correct location each month, and change the nameplate!

Materials

  • Picture frame, 11″x14″ or 16″x20″, see below
  • Sheet of foam board or 1/2″-thick cork
  • Ruler
  • Craft knife
  • Piece of woven fabric, about 24″x30″
  • Spray adhesive
  • Masking tape
  • Scissors
  • 42 large buttons, 3/4″ to 1″ in diameter
  • 42 flat-head thumb tacks
  • 5 sheets card stock, for numbers and nameplates
  • Downloadable name/number template
  • 3/4″ circle punch, optional
  • E-6000, or similarly strong glue
  • Water-soluble fabric marker
  • Fine-point Sharpie
  • 2 squares of wool or acrylic felt
  • 1 sheet of Friendly Felt, or lightweight chipboard
  • Sewing machine and thread
  • 2 sets Velcro dots plus 22 “loop” style dots (the softer half of a Velcro pair)
  • Greeting card envelope

Note: All dimensions given here are approximate, so you have some flexibility with the button size you use. Here’s how I recommend choosing your picture frame: lay your buttons out in six rows, with seven buttons in each row. Leave a small amount of space between them. Now, measure now much space this arrangement takes up, and then choose a frame that fits.

Project Steps

Step 1: First, prepare the background. Cut a piece of foam board (or cork) to fit your frame. Press the fabric and then spread it out face down on your work surface. Spray on a little spray adhesive on the back of the fabric. Then, place the foam board over the center of the fabric. You should have about 4″ of fabric on all sides of the foam board, so trim away any excess. Then, begin pulling the edges of the fabric over to the back of the foam board, taping them down firmly with masking tape. At the corners, pull the corner of the fabric in first and tape it.

Step 2: Pull the two sides over, making them as smooth as possible. Tape the fabric down wherever needed until it’s smoothly wrapped over the board. Pop this into the frame.

Step 3: Print the handy PDF template onto card stock and cut out all the numbers. A 3/4″ circle punch makes this job faster, but you can also use scissors. (I did!) Use a tiny dab of E6000 to attach a number to each button. You’ll have 11 buttons left over. These will be left blank and used as place holders. You might want to glue a small piece of card stock to the backs of these buttons so you can’t see through their holes.

Step 4: While the glue is drying, lay out your buttons again in six rows of seven buttons each, this time on the frame. Move them around until you have them centered side to side and there’s about 2″ of space at the top for the month name. When you have both rows of buttons placed as you like them, use a water-soluble marker to make small marks on the fabric: Along the bottom row of buttons, make a mark at the center bottom of each button. Along the right-hand column of buttons, make a mark at the center right of each button.

Step 5: Set the buttons aside. Now use the marks you made along the bottom of the fabric in Step 4 to make seven straight, vertical lines on the fabric. (Use a light touch with the marker.) As you can see here, if you have a wide ruler, you can brace one end against the bottom of the frame and use this to keep your line straight.

Step 6: Now, take a break from measuring and use E6000 to glue a thumb tack to the back of each button. Let the glue dry for several hours before you handle the buttons again.

Step 7: Meanwhile, draw horizontal lines on your calendar using the marks you made along the right side of the frame in Step 4. With a ruler, draw six straight horizontal lines across the calendar. (Again, use a light touch with the marker.)

Step 8: Use a fine-point Sharpie to draw a noticeable dot at the each point where these lines intersect. These dots will be your guide for sticking the thumb tacks into your calendar.

Step 9: With the guide dots drawn, you can use a moistened cotton swab or paper towel to wipe away the water-soluble marker lines.

Step 10: Now, make some nameplates for the months on your calendar. Begin by cutting out the month names from the PDF template you printed to card stock. Cut 12 strips of felt, each 1 1/2″ tall. Spray some adhesive onto the backs of the card stock pieces, and then press them into the felt strips, centering them top to bottom. Trim away the excess felt.

Step 11: Cut a piece of Friendly Felt the same size as each name plate. This stiffened felt adds a little thickness and stability. (If you can’t find Friendly Felt locally, you can use lightweight chipboard instead.)

Step 12: On a sewing machine, join the felt to the Friendly Felt by zig zag stitching around all four edges. Then, make a straight stitch around all four sides of the card stock. Repeat this process with the other 11 nameplates.

Step 13: To assemble your calendar, just press the thumbtack buttons into the base at the guide dots you marked, arranging the numbers according to the month.

Step 14: To attach the nameplates, I used Velcro dots. Glue two “hook” dots to the base with E6000. Then glue two “loop” dots to the back of each nameplate, being careful to position everything so that the nameplates are centered side to side on the calendar, and the dots on the nameplate are spaced to match up with the dots on the calendar.

Step 15: I glued some extra foam board to the back of my finished calendar, so I’d have a place to store extra button tacks. You can also glue an envelope back there to hold your extra nameplates. You can add a wall hanger if you like, or simply lean your calendar against a wall on your desktop.