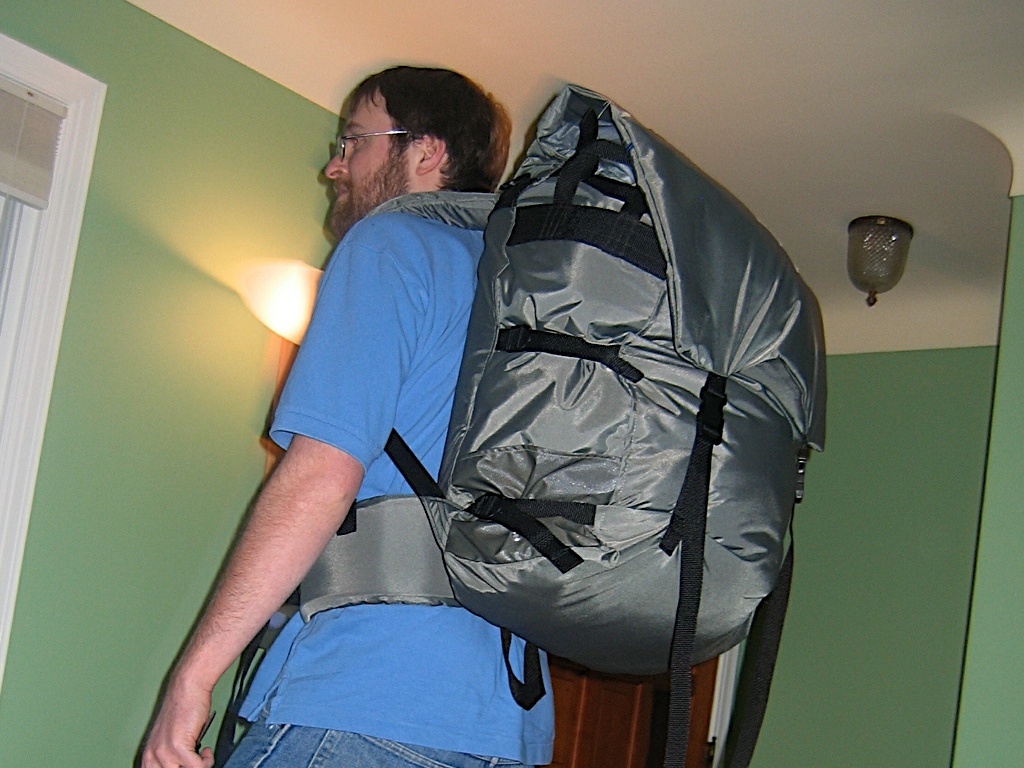
When tackling this project I had sewn some outdoor gear before but nothing this complicated. Shoulder/Hip straps were the most intimidating part, but once I got underway they went fine. Why did I decided to make a portage pack? Because I am often too cheap to buy a commercial or custom made item. The pack I made is about 4500 cubic inches.

This is not an ultralight pack, but I did lighten it up by using 400 Denier material instead of the usual 1000D stuff. I really wanted to see how it was to work with. I like it but will need to see how it holds up. My guess is that the fabric will last a long time. Also there are a few things I did that could be omitted to make a lighter and simpler pack. The first would be to make to top flap a single layer. That would cut the fabric weight of the flap in half and then also the weight of two zippers. The easiest way is to make something that is simple first, and use lighter materials second.

Traditional portage packs don’t have any frame, though some are now made that are more like regular internal frame packs. I didn’t want the time/hassle/expense of molding a sheet frame or doing composite or metal rods. Instead I used a folding camp chair and connected it into the pack. That way it protects my back from the pack’s contents and the foam and rods in it give the pack some semblance of a frame. Plus it saves weight since I usually carry the chair. Similar arrangements could be worked in to use tent poles, sleeping pads, etc. I used two straps to hold it in place, but in hindsight a sleeve would have been easier and probably worked better.

I decided to have a tumpline, some people like them, some don’t. It is removable too. I also included 4 grab handles to make it easier to pull out of a canoe or hang as a bear bag.

These instructions assume some sewing knowledge. If you don’t know how to sew the best way to learn is from someone who has experience. Most of the tips I will cover are going to be related to the unique materials and needs of outdoor gear.

Project Steps

Design

Look at packs you have or packs you like for how to do things. If you like the way something works or fits incorporate it into your design. The same goes if you hate something.

Seam Allowances and Assembly

Those not used to sewing need to think about seam allowances. They are the extra bit of fabric that gets tucked under after sewing. Because of the size of this project and the bulk of the fabric I used ½” seam allowances for everything. That means that if you want a pack that is 20” wide you have to add a ½” to either side or 1” to the total size. Also when possible (most of the time) consider doing a double row of stitching or rolled/french seams.

Assembly- For this project I tried using a cool melt glue gun (a cooler hot glue gun and safe for plastics) and it worked great for pinning pieces together without poking holes in my fabric. Glue can also be sewn through if thin and sparring enough. Sometimes holes don’t matter (when using webbing for example. Whenever I say pin you can decide whether to use glue or pins.

Seams

There are only a few types of seams used on this bag. You can use whatever you like, but I will recommend some. I won’t go over how they are done, you can google that. Some seams may also change your seam allowance, so be wary of that.

Plain seams will work for most everything, but they aren’t as pretty or strong. They are low bulk, so are good for parts that need to be really flat. If you use this you might want to add a second row as backup in case it blows out.

French seams are a nice option for attaching the body of the pack together. They make a nice finished edge on the inside and out.

Flat Felled Seams take the french seam on step further and lay it flat. It is what is likely on the outside of your jeans pantleg.

Once things are cut out you need to singe the edges of the fabric just like you would webbing. You can use a flame for the fabric, but a soldering iron works better. On the heavy packcloth you can just run it along the edge.

To cut the nylon for the expansion collar you can use the soldering iron to cut the fabric. I used Silicone Impregnated nylon that I had left over from a tarp. The problem with it is that it is slippery. I used a long piece of cardboard as a cutting board and used a gluestick to glue the fabric to the cardboard to keep it in place. Then I ran the soldering iron along a straight edge to cut and singe all on one step.

Once all the fabric is cut out you can start cutting webbing. A flame works best to singe the edge.

Cutting and Sealing

The fabrics for this project are usually 60” wide. You will need a large are to work with. The best option is a roller mat designed for sewing with a grid on it. It is just short of wide enough, but you can use a cutting roller on it. The floor will also work, but you will have to use scissors.

Coated fabrics take a long time to start to fray, but they do eventually. It is much easier to prevent this then to deal with it later on. A soldering iron makes it a quick job to seal the edges off all the pieces of fabric. just let it heat up and run it along the edge of the fabric. For lighter synthetics like ripstop and silicone impregnated nylon you can use the soldering iron to cut the fabric. To cut with a soldering iron do it on some cardboard. Also melting plastic creates fumes, so do it in a ventilated space.

Once you have your plans figured out it’s time to start cutting. Generally it is best to cut everything out at once. When developing a new item I tend to work it out in my head then on paper (sometimes back and forth) and make each part as I go. I have included a layout for how to cut the pieces out of 60” wide fabric (Appendix A). It is helpful to visualize how everything will go together. This is key during the placement of hardware and accessories. Most of the webbing and any hardware that is attached to it will need to be placed before the bag is sewn together. Some are sewn into the sea

Shoulder Straps

The only part that is not in my pattern is the shoulder straps.

I just copied one from a backpack I have. I traced it onto paper and then added 1” to all sides. That accommodates a 1/2” seam allowance, plus the thickness of the foam that will go inside them. Cut out the pattern you just made and label and A and B sides. Add a few inches of length to accommodate them being sewn into the pack.

Then trace the strap again. That will be the template for the foam. Cut out all the other pieces

Cordura has a right and wrong side. You will have to make two out of side A, and two out of side B.

More Shoulder Straps

These are the trickiest component and require some fussing and planning. The most bare bones option would be to use 1 ½” or 2” webbing and rely on a PFD for padding, but I hate portaging in my PFD. The simplest option for padded straps would be a rectangle made of one piece sewn into a tube and close off one end.

I chose to go the contoured fancy way. Make sure you have the correct parts (you might want to label them) by placing them “wrong” side together and put them on your shoulders. They should resemble the straps you are working toward! Each shoulder should have on A and one B side. If not you may have them on the wrong shoulder or cut out all A or B sides.

Now it is time to add webbing, tab buckles, and D rings. If you are going lightweight leave out what you don’t anticipate needing. Also a smaller bag will require less reinforcement and stuff.

Sew the two halves together, “right” sides facing. Turn it right side out. Cut the foam with the smaller pattern you made and then slip (and when I say slip I mean fight) it into the strap. If it is loose you can flit the strap wrong side out and sew it a bit smaller. If too big you can trim the foam down.

Top Flap

Next we will assemble the top lid pieces. You could make it one single thickness piece (if you do this make sure to double the seam allowance and fold the seam over twice for a more finished edge), or make it double thick and divide it into two pockets like I did.

I made the area on top of the body of the pack on pocket that was accessible from the outside and the second pocket was over the front and accessible from the underside of the flap. You will need zippers that are the entire length across the flap. The zipper can be longer and cut short. Split a panel in two where the zipper(s) will go remembering to include seam allowances. The inside zipper will be easier (no rain flap) so lets do that one first.

Start with one stitch with the front of the zipper facing the good side of the fabric. A zipper foot will help you follow closely to the zipper. Then unfold them and run a second line of stitching to keep them unfolded and give it a nice finished look.

The zipper on the outside will need a flap to protect it from the elements. The process is similar. The first line of stitching is the same, but to make the top flap you will need to fold extra fabric over and then put the second line of stitching down.

Depending on how you make the top part you will need to attach the female part of a side release buckle in either the seam or the body of the flap.

Sides

Can be as simple as the bottom, but I added pockets (with drainage grommets) at the bottom for water/fuel bottles or tent poles. They were sewn on inside the seam allowance to keep the panels together before assembly. At the top I added reinforced handles for lifting or hanging.

Waistbelt

For simplicity I made a removable belt that just slid through two webbing loops on the body. It was made in two halves and then sewn together. My next pack I will make it built in.

Back panel

This is the most complex part. Attached to the back panel are the shoulder straps, waistbelt, tabs for the compression straps and tumpline, Top Flap, and grab handle(s). Using glue helps here to keep everything in place.

I used a piece of 2” webbing across the width to attach a grab handle and the straps to. It will help distribute force across the width of the panel. Placement of everything is up to you. If you have a pack that fits well note the locations and copy them.

To hold my camp chair I put in straps. I recommend just using a rectangle of fabric and sewing it to the back panel at the sides.

Get everything attached. Once the pack is assembled getting inside to sew things down will be a pain.

Front/Bottom Panel

This could be split into two panels. It might seem more logical, but I prefer to leave out a seam.

I left this blank, but you could easily add a pocket or two. Based on the placement of the tab buckles for the compression straps pin lengths of webbing to match them. Also attach the webbing that will attach to the top flap buckles.

Expansion Collar

This part basically makes your pack into a big stuff sack. It is a rectangle of lighter material. Hem one long edge for a drawstring. If you want to omit this you should hem the top edge of the sides, and front. If doing this I recommend that you fold the material twice to tuck the cut edge away.

Putting it Together

Now you have a bunch of parts and now we need to sew them together. I like to start by assembling the smaller parts to the larger ones.

I recommend starting by attaching the sides to the bottom/front panel. Start at where the opening is and and attach the long edge of the sides to front and when you reach the bottom of the sides continue to the bottom edge. I often reinforce the corners with an extra stitch diagonally, especially with a plain seam.

If you are using a separate bottom attach the front and sides to it and then attach the front to the sides.

Now attach the back panel to the other parts on the three edges. You will now have an almost complete pack. You are really going to want to so ahead and flip it right side out and try it on.

Double check the circumference of the pack opening and make any changes to the length of the expansion collar. Sew the collar piece into a ring and then attach it to the bag.

The last step for the bag assembly is to attach the top panel to the back panel face below where the expansion ring is assembled. If you aren’t doing an expansion collar just I would join the back and top before attaching the back to the rest of the pack.

Sternum strap

Some people like them some don’t. I attached mine to around the entire strap so it could slide up and down along the strap.

Chest Pack

To add a chest pack make sure you include D-Rings on the shoulder straps, or quick release buckles if you are really serious about them. I don’t usually carry a chest pack, but one could be made by making a small pack and leaving off the shoulder straps in favor of straps or buckles to attach it to the shoulder straps.