


Any stepper motor is great, but the big ones are amazingly impressive. There are numerous stepper drivers dedicated for use with Arduino, but they are generally limited to Nema 17 and Nema 23. Luckily, using larger steppers (Nema 34 in this instance) with Arduino is still easy. Large steppers give you an amazing combination of precision, control and torque that can be useful for anything from home automation to DIY CNC machines. In these two videos, we walk through the setup of the motor, driver, and Arduino.
Part 1: Test Code, Increase the Load
In this video we test code from three different Arduino programs to drive the large NEMA 34 stepper, then increase the load on the shaft to see how the stepper handles the additional weight.

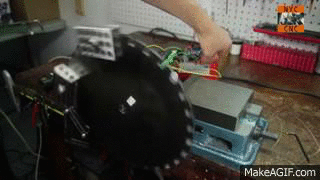
Part 2: Fabricate a Steel Plate
In the next video, we fabricate a test plate in the machine shop to test the motor speed and responsiveness, experimenting with what works and doesn’t. We machine a 0.75″ hole in a ~7LB, 15″ 1/4 inch steel plate, then turn a bushing which will let us secure the plate to the stepper D-shaft.

Circuit, BOM and Code
How to Wire the Circuit
- microstepping driver ST-M5045
- Pul+ goes to +5V
- Pul- goes to Arduino Pin 9
- Dir+ goes to +5V
- Dir- goes to to Arduino Pin 8
- Enable+ to nothing
- Enable- to nothing
Bill of Materials
- Arduino
- 24V power supply
- ST-M5045 microstepping driver
- breadboard
- jumpers
- Nema 34 motor (but really any stepper that’s correctly sized for the driver)
Code Examples
Download the Arduino Sketches
The Nema34_Arduino code examples include using a potentiometer to control the speed as well as a program to test how quickly the motor can stop. Both programs use the AccelStepper Arduino library.
I’m no expert on this subject matter and am anticipating (hoping!) others may have comments with even better hardware or software tips and tricks — but in the meantime there doesn’t seem to be much content on YouTube on driving large steppers with Arduinos, and I’ve had quite a few email inquiries about it, so here it is!
5 thoughts on “Driving Big Stepper Motors with Arduino”
Comments are closed.
ADVERTISEMENT
Join Make: Community Today


Hi, I have seen your videos for the NEMA 34 motors and they are really good!. I have the same Nema 34, same controller, same Arduino, but I can not make the motor run more than 200 RPM. I am not sure if I have wired in the right way the motor, hence it have 8 wires and I have connected 4 to the microstepp driver. Also I have connected the Arduino to the microstepper using your instructions, but I am not clear where to connect the potentiometer to Arduino. Your videos and tutorials have helped me to move my motor, but I would like to get your RPMS and also to controll it with a potentiometer
i got the same problem here, have you solved it ?
Stepper drives seems like use PFM (Pulse freq modulation). Each pulse you send moves the motor 1 step. The freq of the pulses determines the speed of the motor. The code given in the example is rather inefficient. It keeps the arduino busy in the main loop. In order to avoid this you can use hardware PWM on the arduino. set the duty cycle around 128 to send a square wave. However, the pwm pins of the arduino are being set with timer bits at the startup (around 490Hz or so and some of them are higher around 900). If you want to set your freqs to higher like 30kHz you need to change these timer bits. There are some documents on how to do that around. Beware some function timers of the arduino code like delay will change after you play with those timer bits.After that its simple.
analogwrite(PwmPin, 128);
digitalWrite(DirectionPin, HIGH/LOW);
that moves motor at higher constant speed.
inorder to stop the motor,
analogWrite(PWMPin, 0);
PS: You might damage the arduino board and the motor if you dont know what you are doing.
Using PWM to pulse a stepper motor is a really ugly hack. It should be done with interrupts instead.
http://playground.arduino.cc/Code/Timer1
The attachInterrupt(function, period) is used to define which function gets called every time the timer overflows. In this function, you’ll add a short code to toggle a pin either by DigitalWrite (slow) or by writing to the register directly (fast).
If you try to output a frequency faster than the arduino can change the state of the pin, the interrupt function gets called again before it finishes and the device locks up because it will never return to the main function. That’s why the interrupt function must remain short and quick.
UPDATE: Just tested some Pwm Freq Libs with Uno and Mega,
https://code.google.com/p/arduino-pwm-frequency-library/
with this library i can able to change the motor speed of 3 different big stepers with external drivers by adjusting the freq of the PWM. it also works with AVI controls of AC Motor Inverter. (Need to amplify the signal to 10 V).