


Inspiration Provides a Push
Sometimes inspiration provides a gentle push towards acquiring new maker skills. I planned to attend the PotterVerse Harry Potter convention in Baltimore. I decided I would use my maker skills and create a magic wand for a friend of mine who was coming with me to the con. This wand is the second item I have ever turned on my wood lathe, and I captured pictures and videos of my progress and the finished result.
Let’s see how acquiring some new skills can be fun, and yield very satisfying results.
Adding a Few New Skills

While I’m not a woodworking expert, I’ve done some fairly good work. I already knew how to use most of the basic tools, as well as how to sand and finish a nice piece of wood. However, working with a wood lathe was a whole other level, so I was a bit intimidated by the massive lathe I had bought (which can handle 40 inch work pieces).
You can watch YouTube videos or read up on how to use a lathe. Step by step instructions are not the purpose of this post. Instead, I want to demonstrate that it is possible to get started with something as challenging as wood-turning and still get very good results right away.
I’m sure I’ll continue making wands and other things on my lathe, and grow my skill set. For now, let me show you how this early effort to make a magic wand worked out.
Making the Wand
In addition to using the lathe, I needed to use a saw, sand paper, oil-based wood conditioner and stain, paint, and shellac. Here’s how I make a magic wand.
Mounting and Centering the Dowel

I started from a dowel that was already rounded. Often a dowel starts with a square cross-section, and you slowly shave off the corners until it is round. Regardless of whether you start with a round dowel or a square one, it must be bigger than the final diameter of your desired piece.
It is nearly impossible to mount the piece exactly centered on each end. So you end up needing to make several passes with a flat chisel to get the wood down to a uniform diameter. If you shaved off everything that was not centered relative to the mounting points around which the dowel rotates, you’ll eventually get a centered dowel.

You can see in the picture below, that after several passes with the flat chisel, some of the finish on the dowel was still there. This demonstrates that the dowel was not centered. As explained, this is normal. I just kept making passes until the dowel was shaved down to the desired diameter.
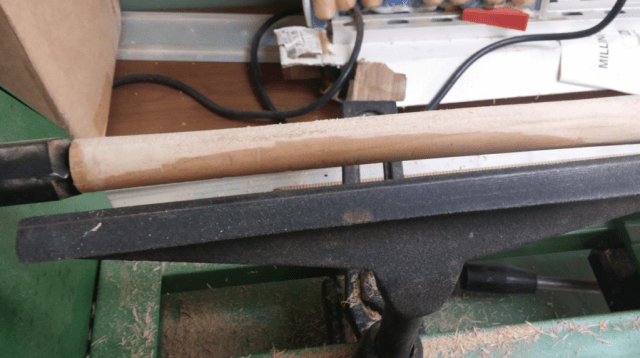
Also note that you need the wood to be a little bit longer than you want your finished piece. I wanted a wand 9 1/2 inches long, so I started with a dowel about an inch longer than that. Approximately 1/2 an inch gets cut off each end after it is removed from the lathe.
The next step is shaping the wand.
Shaping the Wand
Turning tools have chisel-like edges that are flat, pointed, or curved to let you carve various shapes into the wood. I used a pointed tool to mark off where I wanted to place the various shapes. Next I used curved tools of different diameters to form the rounded curves. Lastly, I tapered the end of the wand and reduced the diameter of the middle.
You can see some of the work in the video below. Note that my technique is far from perfect, and I was holding the camera in one hand while recording. The point is that I still managed a very nice result despite my lack of experience and needing to multitask.

After shaping, the wand’s basic appearance, though rough, can be seen.

Now we can use the lathe to make sanding a breeze.
Sanding it Smooth
Sanding on the lathe is easy and fun, as you can just hold the sandpaper and the rotating piece does most of the work. I started with 120 grit paper, and then moved on to 220 grit and finally 400 grit for the finish.

I used a thin dowel to help reach into the smaller curves with the sandpaper, as seen below.

After removing the wand from the lathe, I could see where my inexperience resulted in some defects. There are some dark burn marks where I must have let the wood get too hot, and some gouges where I formed the curves imperfectly. I’m still pretty happy with the result, but I’ll use those mistakes to improve my technique next time.

Next, I cut the unwanted ends off the wand. I used a dovetail saw, because it has a minimal kerf (the width of wood consumed in the cutting). I hand sanded the cut off ends with 200 grit paper, and finished with 400 grit.

With the ends cut off, it is time for the finishing touches!
Finishing
After wiping the wand down to remove sawdust, I used a coat of pre-stain conditioner. This helps the wood take the stain evenly. I wanted to make a magic wand styled after Professor McGonagall’s, with a two-tone finish. So I stained the handle with a lighter color, and then applied a darker stain to the end. I painted the base of the wand with a gold metallic paint, and then finished the whole thing with shellac. In the picture below, you can still see some of the burn marks, which had the unintentional effect of making the wand look a bit aged.

So, how did everything turn out?
Excellent Results
The finished wand looks great, as you can see in the picture below. I had a lot of fun at PotterVerse talking to vendors about their own wands and getting inspiration for future projects. My friend was really happy with the results as well.

I was able to make a magic wand in less than a day, and most of that time was spent dying the finishing coats. This project definitely demonstrated that good results don’t necessarily require years of experience, and you should never be afraid to try new things.
ADVERTISEMENT
Join Make: Community Today


