This project appears in Make: Volume 75. Subscribe today for more great projects delivered right to your mailbox!

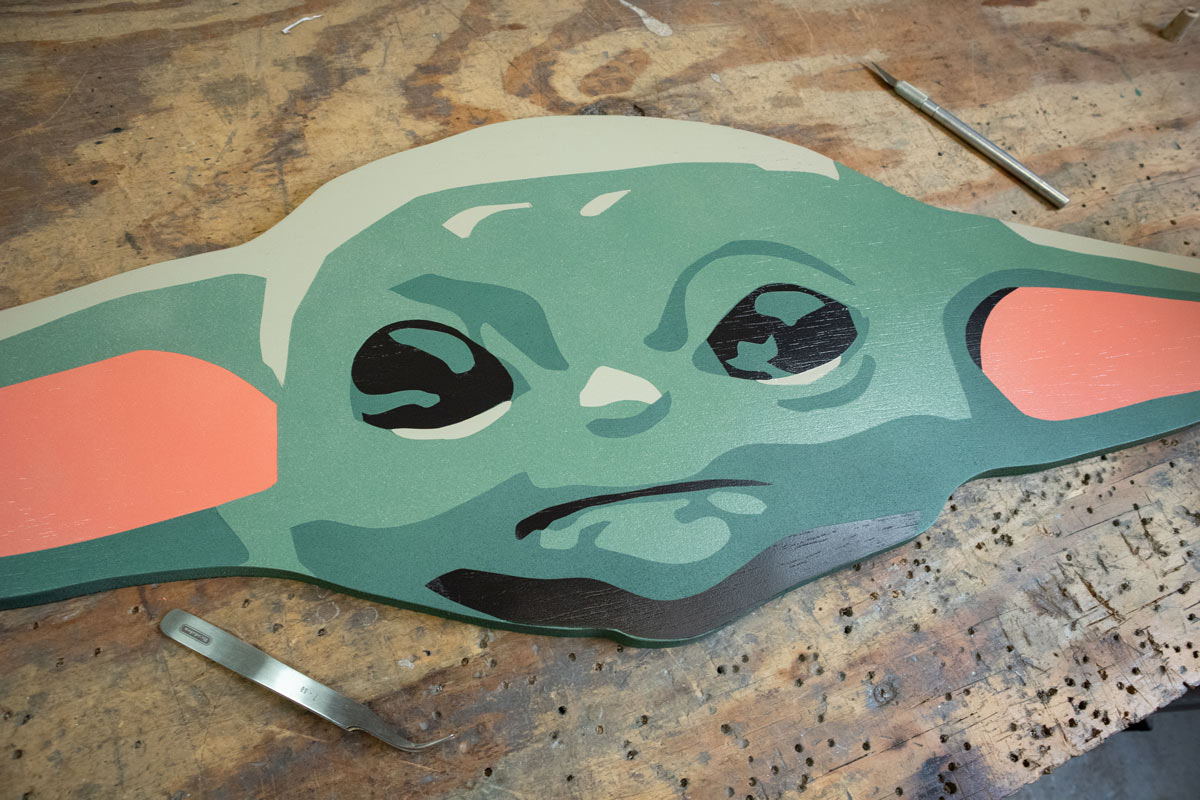
SKILL BUILDER: PAINT MASKING

A number of low-cost vinyl-cutting machines have entered the market in recent years, enabling hobbyists to make their own adhesive-vinyl stickers, stencils, and paint masks at home. It’s entirely possible, though, to create even a complex, multi-layer paint mask with little more than a roll of vinyl and a fresh X-Acto blade.

Project Steps

Choose an image to paint

This can be nearly anything you want, as long as it can be broken down into a handful of colors and isolated shapes, much like a “paint by numbers” image. Clip art works well, or if you have more skill than I do, you can draw something by hand.

Figure A

Figure B

Figure C

For this demonstration I’ve chosen everyone’s favorite macrotous character from The Mandalorian. I downloaded an image online, isolated his head in Adobe Photoshop (Figure A) and used Adobe Illustrator’s “Image Trace” feature to convert it to vectors (Figure B). After some experimentation with the settings, and a bit of manual editing, I was able to simplify the image into five distinct colors (Figure C). In the end, his innocent expression ended up looking more like stern disapproval, but I thought having that face hanging above my workbench might do well to keep me on task.

If you don’t have access to Adobe’s software, there are free options available for download, like GIMP and Inkscape. Just search online for “how to vectorize an image.”

Create your template

our template

Figure D. You can download my template here.

Draw your image at the actual size you intend to paint it; simple outlines are ideal. In my case, I converted my shapes’ colors to black outlines (Figure D), saved the image as a PDF, and took it to my local copy shop to print it out on their large-format printer for a couple of bucks. Either way, make your template on paper no thicker than common printer paper. If you like, you can download my template.

Prepare your canvas

nvas

Figure E

You can use just about anything you want as your canvas, as long as it’s flat. For Baby Yoda — or the Child if you want to get all “actually” about it — I used my template to cut out a piece of birch plywood in the shape of his head (Figure E). For best results, I recommend priming the surface to be painted, especially if the substrate is porous, like wood. A couple of coats of something like Bulls Eye 1-2-3 should work great, followed by a light sanding with a fine-grit sandpaper to make it nice and smooth.

Plan your order of operations

There are two basic types of paint mask. The first is a negative mask, in which the shape to be painted is left uncovered and the mask protects everything else. For example, if you wanted to paint a number on a door, the shape of the number would be left as a window in the middle of the mask, and the mask would protect the surrounding area from the fresh paint. It’s what you’d traditionally think of as a stencil.

The second is a positive mask. This is where you apply the paint first, then adhere the mask in the shape you want to preserve before applying the next paint color. This is the method we’ll be using here, so we need to plan the order of our paint colors accordingly. I find it’s easiest to start with the inner, isolated shapes, then move on to the larger, surrounding areas. In the case of Baby Yoda, I began with the black that made up his eyes and other small spots. The light green of his skin — the largest area — was saved till the end.

Apply the first paint color

You can use just about any type of paint. I’ve done vinyl masking with both oil-based and latex paints, and applied them with a spray gun, a brush, and a roller. Just be sure to follow the application instructions for the paint you choose. For this project, I went with rattle cans.

Figure F

Apply a nice, even coat wherever the first color appears in the final image. Baby Yoda has black spots in multiple areas, so I sprayed the whole board to make sure I got thorough coverage everywhere I was going to need it (Figure F).

Cut the first masks

For most types of paint masking, I recommend Oramask 813 adhesive vinyl. It’s semi-transparent, which makes it easy to line up with other elements. It comes in rolls of different widths and can be purchased from multiple vendors online.

Figure G

Figure H

With a cutting mat underneath, simply lay your paper template on top of the vinyl and hold it down with a couple of weights. A coffee mug or a tape dispenser will work — anything to keep the template from moving. Then, using a sharp, new blade, cut out your initial shapes using moderate pressure (Figure G). As you cut through the template, you want to perforate the vinyl without cutting the paper backing underneath. It shouldn’t take much practice to get it right. In fact, you’ll probably find that applying enough pressure just to cut through the paper template is about all you need to properly score the vinyl (Figure H).

Discard unneeded vinyl

yl

Figure I

Figure J

Once you’ve cut all the shapes for the first mask, you’ll want to remove the superfluous material. This process is called weeding. The unneeded areas can be removed by picking up an edge with the point of your knife and peeling them away (Figure I). Tweezers, and sometimes a dental pick, can be helpful here, but aren’t strictly necessary. With larger areas, I often find it easier to divide them up by scoring around my shapes and removing smaller sections at a time (Figure J), rather than wrangling wide sheets all at once. Just remember to think in reverse. You want to preserve the parts that protect your last painted color, and remove everything else.

Transfer your mask

ask

Figure K

For small, simple shapes, you can just peel up the mask and apply it to your canvas. To move unwieldy shapes, or multiple shapes at once, it’s best to use what’s called transfer tape. It comes in opaque and clear versions, and in rolls of varying widths, with either low or high tack (the amount of stickiness). For general use, I recommend a clear, high-tack selection like RTape Clear Choice AT65 (Figure K). There are similar, generic versions available as well.

Figure L

Figure M

Lay the transfer tape sticky side up and, starting at one end, carefully lay the sheet of weeded masking facedown onto the tape (Figure L). Then, flip it over and use a plastic squeegee tool to rub the transfer tape down and ensure adhesion (Figure M). You can also use something like a credit card or a plastic scraper. Start in the center and rub outward in all directions.

Figure N

Finally, carefully peel up the transfer tape, lifting the vinyl mask away from the paper backing (Figure N).

Apply the mask

Before applying your mask, be sure the previous layer of paint has set completely. Typically, I allow at least 24 hours before applying any mask. Otherwise, even if the paint is dry to the touch, you may have problems with paint peeling up when you remove the mask.

Figure O

Figure P

To apply the mask, simply lay it onto your canvas, starting along one edge of the transfer tape and rubbing it down as you go. Again, use the squeegee to ensure adhesion (Figure O). Then peel up the transfer tape slowly, leaving the vinyl masking in place. If some of the masking doesn’t want to stay down, simply back up, rub it again with the squeegee, and try again. It helps to peel the transfer tape parallel to the canvas, rather than straight up (Figure P).

Figure Q

TIP: Here’s a painter’s tip to help prevent paint from bleeding under the edge of your mask: Before spraying the next color, apply a light coat of the previous color — the one underneath the mask (Figure Q). This helps to seal the edges, and any bleeding that occurs at this stage will be the same color as what’s underneath. This isn’t always necessary, but it can be helpful if your surface isn’t super smooth.

Apply the next paint color

paint color

Figure R

Following the recoat times specified by your brand of paint, apply the next color. In Baby Yoda’s case, I went with the pink of his ears (Figure R).

Maintain your bearings

gs

Figure S

Figure T

With the first mask, I was able to use Baby Yoda’s adorable chin as a reference edge to align things. When dealing with isolated shapes, however, like the inside of the little guy’s ears, you may not have anything to align to. This is where your paper template can serve another purpose. Place it directly on your canvas and use it to make a couple of tick marks with a pencil (Figure S). Use these marks to place your mask (Figure T).

Figure U

To stay oriented, keep a copy of the final, color image nearby, so you can identify which shapes are which. It may also help to label your masks with a marker as you cut them (Figure U). Especially large or long shapes can be split in two to make them easier to handle and to make the most of your material.

Continue with subsequent layers

ith subsequent layers

Figure V

Figure W

Figure X

Once you’ve completed the isolated shapes, move on to the wider areas. After I painted Baby Yoda’s ears and the highlights on his head and nose, I addressed the dark green shapes. Since these areas encompassed regions I had already painted, I cut these masks to include the previous shapes and stacked them over the existing masks. On his right ear, for example, I cut a single, large piece that covered the pink, the black, and the dark green, and simply layered that on top. With his eyes, however, I opted to remove the previous mask first so I could see where to align things (Figure V). I just made sure to cut the new mask both to protect the existing black and to mask the new, dark green areas (Figure W). I finished with a final, even layer of light green paint (Figure X). There’s no one, correct way to approach this! Just try to think ahead and visualize how you want the final image to look.

Reveal your image

13. Reveal your image

Figure Y

Figure Z

Now comes the fun part! Once your last layer of paint has dried, you can remove the masks. Just like before, use the tip of your knife to pick up the vinyl’s edge and carefully peel it away (Figures Y and Z). Layer by layer, your image will start to appear before your eyes. To me, it feels like a magic trick every time. I never get tired of it.

Keeping It Positive

You might be asking why we didn’t use negative masks instead. That’s certainly an option, but it consumes a lot more material. To spray-paint even one small shape, you have to cover the entire canvas except for that area. Then, to paint subsequent shapes, you have to remove the entire mask and apply a new, full-size mask for each color. You’d save a little paint, but use a lot more vinyl. However, if you’re brushing paint rather than spraying, you wouldn’t have to worry about overspray. So, you could just apply negative masks using smaller rectangles of vinyl. Again, there’s no one, correct way to do it. Choose the option that works best for you.

Now that you’ve completed your first image, try taking it a step further. Attempt a design with more shapes and colors. You can even add some visual texture or shading by lightly misting one color over another. Just plan ahead, be willing to make mistakes, and most important, have fun!

I have spoken.