


This article was originally published in the German online edition of Make:. Translation by Niq Oltman.
If you’d like to experiment with ultrasonic levitation — making objects hover in mid-air using just the energy in sound waves! — you don’t need any scientific equipment, complicated control loop setups, or expensive kits. An Arduino, a stepper motor driver, and a repurposed distance sensor will do.


Yeah, we admit it, our Micro Ultrasonic Levitator won’t levitate any heavy items. But it’s fascinating enough to watch tiny styrofoam balls hover like magic.
In contrast to magnetic levitation, the ultrasound method does not require a control loop to stabilize the hovering object. Using acoustic levitation, the object simply lodges itself into one of the nodes of a standing acoustic wave. And you can make multiple items hover on top of one another simultaneously, evenly spaced apart!
In our 2/18 issue of Make: German edition, we published two alternative approaches to ultrasonic levitation devices, one of them based on a transducer taken from a gutted ultrasonic cleaner.
But a third approach, the one we’ll show you here, based on an inexpensive distance sensor, is by far the easiest.
1. DISASSEMBLE THE ULTRASONIC SENSOR

This project is based on ultrasonic transducers of the kind used in distance sensors such as the HC-SR04 module, which can be sourced from eBay for less than $2
These modules contain one transducer operating as a transmitter (T), and another serving as a receiver (R). In principle, the T transducer is the better pick for use as an actual transmitter, so we bought two sensors and pulled the T transducers off each of them. (In a pinch, you could buy just one sensor — the R transducer also transmits well enough for your first experiments.)

Desolder both transmitter transducers. While you’re at it, disassemble one of the receiver transducers. Please don’t throw away the small, wire screen from the receiver— it turns out to be unexpectedly useful.
The transducers are designed to operate at 40kHz, the frequency at which they work most efficiently. That signal will be generated by your Arduino Nano.
2. UPLOAD THE ARDUINO CODE
The Arduino sketch below performs most of its work in the setup() stage. First, it sets all analog ports to be outputs. Then, Timer1 is configured to trigger a compare interrupt clocked at 80kHz. Each interrupt simply inverts the state of the analog ports. This turns an 80kHz square signal into a full wave cycling at 40kHz. There’s nothing left to do for the loop() part of the code!
byte TP = 0b10101010; // Every other port receives the inverted signal

void setup() {

DDRC = 0b11111111; // Set all analog ports to be outputs

// Initialize Timer1

noInterrupts(); // Disable interrupts

TCCR1A = 0;

TCCR1B = 0;

TCNT1 = 0;

OCR1A = 200; // Set compare register (16MHz / 200 = 80kHz square wave -> 40kHz full wave)

TCCR1B |= (1 << WGM12); // CTC mode

TCCR1B |= (1 << CS10); // Set prescaler to 1 ==> no prescaling

TIMSK1 |= (1 << OCIE1A); // Enable compare timer interrupt

interrupts(); // Enable interrupts

}

ISR(TIMER1_COMPA_vect) {

PORTC = TP; // Send the value of TP to the outputs

TP = ~TP; // Invert TP for the next run

}

void loop() {

// Nothing left to do here :)

}
The full code and schematics are available for free download as a ZIP archive at makezine.com/go/micro-ultrasonic-levitator.
3. BUILD THE CIRCUIT

In theory, you could hook up both transmitters directly to the analog ports on the Arduino Nano, as they require very little current. However, this would limit you to the 5 volts supplied by the Arduino, greatly reducing the power to levitate. To boost the signal, you’ll use an L293D type H-bridge chip, the kind used in some stepper motor drivers.
If you’re anxious about working with the bare L293D IC directly, you can substitute an L298N-type stepper driver board. Just connect two of the four inputs with the Arduino’s ports A0 and A1, and wire up GND and 5V as shown in the schematic.

If you’re constructing the circuit using the bare IC on a perf board, make sure to include the two capacitors. These will filter out the line noise caused by the transducers, which is likely to “blow out” the Arduino, forcing it to keep rebooting.
4. MAKE THINGS LEVITATE!

Start by positioning the transmitters about 20mm (0.8″) apart, using a helping-hand tool or something similar. You’ll find the exact distance by trial and error. The image above shows our completed prototype setup, with the stepper module, breadboard, and helping hand.
The distance must be exactly right to create a standing wave with sufficiently strong regions of high and low air pressure. You can estimate the distance using the following formula, based on the speed of sound at room temperature, 343m/sec (1,125ft/sec):
343,000mm/sec / 40,000Hz = 8.575mm
So, you’d expect to find standing waves at 8.575mm (0.338”) or a multiple of that value. But the distance between the transmitter screens is not the same as the area enclosed by the sound wave, so the result won’t be quite right. You’ll end up moving things around slightly until you get it working.
A two-channel oscilloscope, if available, can help you find the right distance. Connect one channel to the Arduino, and the other to one of the two transmitters (be sure to disconnect it from the board for this measurement). When the distance is just right, the sine wave from the ultrasound receiver should be exactly in phase with the square wave signal from the Arduino.


Remember that wire screen you saved from the ultrasound receiver? Glued to a toothpick, it will help you put those little styrofoam balls in place because it’s acoustically transparent. (You’ll probably struggle if you try to use your hands, or tweezers, instead. They’ll deflect or perturb the sound from the transducers such that a standing wave may not form at all, or will be too unstable.)

Until you get your first objects to hover, you’ll need a bit of patience:
- If it appears as though the balls want to start hovering, but then fall down, try using smaller pieces of styrofoam. They don’t need to be round, either. In fact, we found that irregular-shaped pieces appeared to hover more easily.
- Are your hovering objects dancing around wildly? Try reducing the supply voltage. You can use additional 1N4007 diodes wired in series to do this. Each diode will reduce the voltage by around 0.7 volts. With our 12V supply, we got the best results at somewhere between 9V and 11V. (It’s probably easiest to just use a variable-voltage bench supply if you can.)
- Once the first polystyrene object is hovering, you can try placing additional objects into the other nodes of the standing wave . You’ll be impressed!

5. MAKE IT PRETTY (OPTIONAL)
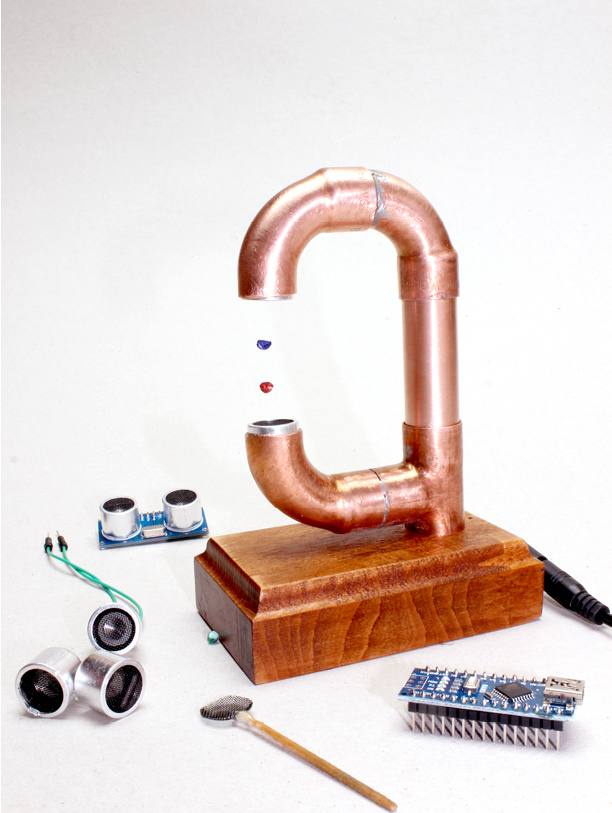
When you’re ready to mount your ultrasonic levitator permanently, you can put it in a nice-looking housing to create a coveted desktop toy.

Our final version is made from 18mm (0.7″) copper pipe bought at a hardware store. We designed the distance between the two transmitters to be exactly 37mm (about 1½”) from screen to screen, a number that we worked out experimentally. Your millimeters may vary.

The control board fits easily into the socket in the base, provided that you build the final circuit using the L293D IC. On the right, you can see the jack for our 12V power supply.
Happy levitating!

SCALING UP:
The Ultraino open source project takes a similar approach to ultrasonic levitation but it’s more powerful. Led by Dr. Asier Marzo at Bristol University, this project uses an Arduino Mega and custom amplifier shield to control phased arrays of 64 transducers packed into a 3D-printed case. It’s capable of levitating liquids, computer chips, and insects, among other things. You can find a detailed how-to on instructables.
A scientific paper on the Ultraino project describes other fascinating uses for ultrasonic phased arrays, including steerable mid-air haptic feedback, wireless power transfer, parametric audio loudspeakers, and even acoustic tractor beams. Read it free online.

Another interesting levitation paper describes “TinyLev: A multi-emitter single-axis acoustic levitator”, Marzo’s earlier project using 72 transducers. That build is online; at the end, a “MiniLev” variant using only two transducers is described, much like the project shown here. You’ll also find a great demonstration video and interview with Marzo, by Dianna Cowern aka Physics Girl.


