Open Book E-Reader set down on a grassy lawn

This project appears in Make: Vol. 75. Subscribe today for more great projects delivered right to your mailbox.

Handheld gadgets surround us, but often these slabs of glass and silicon feel like they arrive fully formed in our lives. We don’t often get the chance to understand how, say, a Kindle works — or even better, how we might make one ourselves! The Open Book Project aims to create a simple, comprehensible device for reading texts in all the languages of the world — an e-reader that can be built by hand with the tools in the average maker’s workshop.

The E-Book FeatherWing is the simplest version of the build. Functionally it’s a “wing” — an accessory board that pairs with an Adafruit Feather M4 Express, which provides the microcontroller and the battery charging circuitry. Almost all of the E-Book wing’s surface-mount parts are reasonably large and easy to solder by hand, which makes it a great project for getting started with surface-mount soldering.

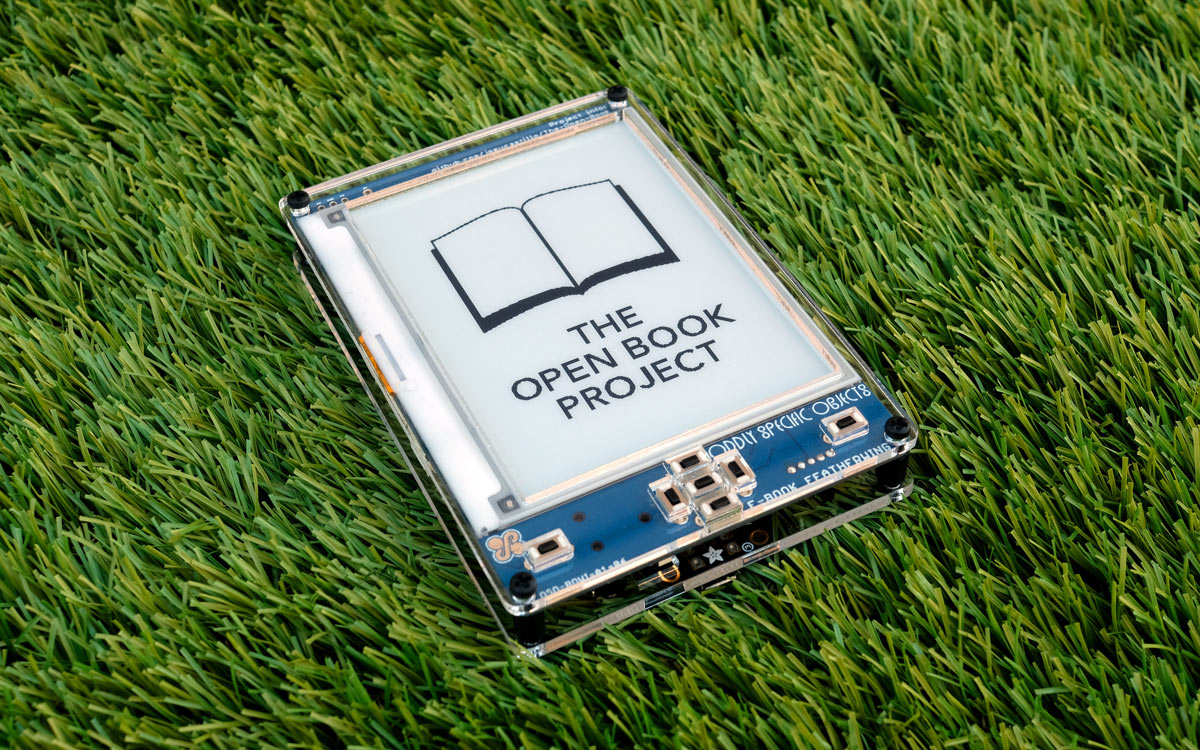
In this guide, you’ll build your own E-Book FeatherWing. With its 4.2″ e-paper screen and seven clicky buttons on the front, it’s a great device for reading, but it’s also a highly capable platform for doing more! You can use it to play sound from the headphone jack, display sensor data from the trio of STEMMA ports, or even stack an AirLift FeatherWing to connect to the internet.

Project Steps

Prepare for the build

You’ll need the E-Book FeatherWing printed circuit board. You can order one on Tindie, or send the board design files to a PCB fabrication house like OSH Park.

You’ll also need to order the parts that go on the board. Almost all of these parts are available at Digi-Key; you can use the one-click bill of materials, or BOM, at Kitspace to order almost all of them in one fell swoop. The screen will come direct from the manufacturer, Good Display.

Make sure you have the Arduino IDE installed on your computer, along with Adafruit’s SAM Board support package, which will support the Feather M4 Express. In addition, make sure you have installed the following Arduino libraries:

  • Adafruit GFX
  • Adafruit BusIO
  • Adafruit MCP23008
  • Adafruit EPD
  • Adafruit SPIFlash
  • SDFat — Adafruit Fork
  • arduino-menusystem
  • The Open Book
  • Babel

When you have your development environment set up and all your parts on hand, set up your work area. Print a copy of the BOM so you can cross out parts as you solder them to the board. It also helps to have a printout of the backside of the board, in case you can’t read a part number on the silkscreen. Make sure to have your solder wick and flux handy, in case you need to do any rework. Finally, before you build, watch my E-Book FeatherWing assembly video at github.com/joeycastillo/The-Open-Book.

Solder the passive components

If you’ve never soldered tiny surface-mount components before, don’t worry! It’s more straightforward than you might think. Let’s start with the resistors and capacitors: all of these parts are 0805 sized, which is small but still big enough to solder by hand with just your eyes or some reading glasses.

Figure A

Find the first part you want to solder on the board. Let’s say it’s R1. First, put down a blob of solder on one of the two pads (Figure A).

Figure B

Next, using your tweezers, position the part near that blob of solder. Heat up the solder, and then move the part into that spot. This will tack it into place (Figure B).

Figure C

Finally, apply solder to the other side of the part (Figure C).

Figure D

That’s it! R1 is placed (Figure D).

Repeat these steps for each of the resistors and capacitors in the BOM, as well as inductor L1.

Figure E

You can use a very similar strategy for the diodes D1–D5, but note that the diodes need to be mounted in a specific direction. Each diode has a small gray line on its plastic body that should face the same direction as the line in the diode symbol on the silkscreen (Figure E).

There are also two different kinds of diodes; the two Zener diodes need to go in the Extra Ports block, while the three Schottky diodes need to go in the E-Paper Display block.

Figure F

While we’re here, we can also solder the surface mount buttons! It’s identical to the way you soldered the resistors and capacitors: put a blob of solder on one side, set the button in place, then secure the other side (Figure F).

You can use this same technique to solder MOSFET Q1 into place. That part has three pins, so just make sure each pin matches with a pad.

Solder the integrated circuits

3. Solder the integrated circuits

Figure G

There are three ICs on this board: a flash chip, an SRAM chip and a GPIO expander. Like the diodes, when soldering these parts you’ll need to be aware of the orientation. Each part has a small dot on its plastic body that should match with the dot on the board’s silkscreen (Figure G).

Figure H

The strategy is similar to what we did for the diodes: first, put a blob of solder on one of the pins at the corner (Figure H).

Figure I

Then, place the IC while heating up that bit of solder (Figure I).

Before you solder any other pins, look at the alignment of the chip: all the pins should be aligned with all the pads. If they’re not, reheat the pin you soldered, and move the chip around until it is aligned. Then solder the pin at the opposite corner to lock the IC into place.

Figure J

If the placement looks good, you can solder the rest of the pins (Figure J).

Figure K

Figure L

Figure M

Figure N

If you notice solder connecting some neighboring pins, don’t worry! This is called bridging, and it’s easy to fix. If it’s not a lot of solder, you might be able to fix it by simply adding some flux and reheating the pins (Figures K, L, M, and N). The flux helps the solder flow to the metal pins and nowhere else.

Figure O

Figure P

If that doesn’t work, you can place your solder wick on the bridged pins and heat it to soak up the excess solder (Figures O and P).

Solder the SD card slot

D card slot

Figure Q

This part might look tricky, but it’s not so bad! First, like last time, we’re going to apply a blob of solder to one of the mounting pads, and heat it up while we maneuver the microSD slot into place (Figure Q).

Figure R

This microSD socket has a nice big window on top, which should make it easy to see if all the pins are aligned (Figure R). If not, heat up that mounting pad, and move the slot around until the socket is aligned. Then solder the remaining mounting pads.

Figure S

The trick with this card slot is to feed your thin solder in from the top (Figure S), and insert your soldering iron from the side. It helps to use a PCB holder, or to simply place the board at the edge of a table while you work, so that you can insert the tip of your soldering iron straight in.

Figure T

Use your magnifying loupe to look inside the slot and make sure all the pads are soldered in place (Figure T).

Solder surface-mount connectors

There are seven surface-mount connectors to solder on this board: the headphone jack, three STEMMA ports, two Feather headers, and the 24-pin flex connector.

The headphone jack is easiest: it has two plastic board guides that match the two holes on the PCB. When you set it on its footprint, it will fall into place. Just apply solder to all four pads.

The STEMMA ports are similar to the ICs: you can place some solder on one of the mounting points, move the port around until it matches the outline on the silkscreen, and then solder the remaining pads. Make sure the 4-pin port goes in the middle, with the 3-pin ports on either side!

Same with the Feather headers: tack one corner into place, then the other corner, and check the placement of both headers before you solder the rest of the pins. (It helps to gently rest your Feather M4 on top to make sure it’s going to fit).

Figure U

Finally, the 24-pin connector. This is the trickiest part on the board, no doubt. But with your solder wick and flux, you’ll have it placed in no time! First, place a blob of solder on one of the two large mounting pads on either end of the connector. Then heat it up, and maneuver the connector into place (Figure U).

Figure V

Using your magnification loupe, make sure all 24 pins are aligned. It’s pretty easy to see when they are: you should see the blue silkscreen visible between each set of pins. Then, drag your soldering iron and solder across the pins, and solder those pins into place! It can help to put some extra flux down, just to make sure the solder goes where you want it to go (Figure V).

Figure W

Figure X

You’re almost inevitably going to have some bridged pins here. That’s okay! Clean your soldering iron, apply some flux (Figure W), and drag the bridged spot away from the connector (Figure X). If you have a larger bridge, it can help to use your solder wick here too.

It may take a few tries, but once you see that there are no solder bridges and all the pins are soldered to pads, you’re almost done!

Test the board

Just to be extra safe, use your multimeter to check for shorts between the 3V and GND nets. Put your multimeter in continuity mode, and touch the two probes to the 3V and GND pads in the Feather header. If it beeps, inspect the board for any solder bridges that may be connecting power and ground nets. If it doesn’t beep, you’re good to plug in your Feather M4!

Figure Y

Carefully take the fragile e-paper display out of any protective packaging it’s in. Thread the screen’s flex cable through the hole up top, and secure it in the flex connector (Figure Y).

Taking care to avoid damaging the screen, turn the device over so you can see the screen, and power up the Feather.

Load the Open_Book_Screen_Test sketch from the Open Book examples. Make sure that your Feather M4 is selected, and then run the sketch! You should see the screen flash to life, and display the Open Book Project logo.

Solder the final parts

Unplug the Feather from power, disconnect the screen’s flex cable from the 24-pin connector and set the screen aside.

There’s one solder jumper we need to close to make the flash chip work. Locate the BCS solder jumper, near the top of the long Feather header, and connect both sides with a blob of solder.

Next up: buttons! Insert each of the through-hole buttons so they face the front of the device, and solder them in place from the back.

Then insert the through-hole slide switch from the back of the device, and solder it in place from the front.

Figure Z

Finally, thread the screen’s flex cable through the hole one last time. Insert it into the 24-pin connector, and secure it in place. Using double-sided tape, secure the screen to the front of the PCB. Congratulations, your board is assembled (Figure Z)!

Burn the Babel flash chip

The secondary flash chip on the E-Book FeatherWing is dedicated to font and language support, but it currently doesn’t have any data on it. When you downloaded the Babel library, you also downloaded a two-megabyte BLOB file containing information about how to display all the world’s languages. We’re going to copy that blob to the microSD card, and then run a sketch to burn that image to the flash chip.

Figure Aa

Figure Bb

Locate the babel.bin file; it’s in the babelconvert folder inside the Babel library you downloaded (Figure Aa). Copy babel.bin to your microSD card, and eject the drive. Then plug the microSD card into the socket on the E-Book FeatherWing. Run the BurnBabelBurn sketch from the Babel examples, open the Serial Monitor, and follow the instructions to burn the font data to the chip (Figure Bb).

If the image verifies, you’re done! You can delete the babel.bin file from the SD card; the Babel chip will retain this data indefinitely.

Read a book!

Finally! The book reading software, so far, is pretty basic: We’re using MVBook to read text files that have been converted to the MVBook format (although we hope to have plain .txt files be the format in the future).

In the MVBook example folder, you should find a file called books.zip, which is a small selection of public domain works. Copy the contents of this zip file to an SD card, and insert it in the E-Book FeatherWing.

Figure Cc

Go to File –> Examples –> Open Book and run the Open_Book_MVBook sketch! You should see a list of titles and authors, and a selection indicator on the left (Figure Cc). Use the up and down arrows to select an item, and the center Select button to pick one. In book reading mode (Figure Dd below), use the far left and right Previous Page and Next Page buttons to flip through pages. Use the Select button to return to the main menu.

Figure Dd

Expand Your E-Book FeatherWing

The E-Book FeatherWing is useful for reading books, but it can do quite a lot more!

  • The screen supports 2-bit grayscale mode, which is great for displaying photographs, and the Feather M4’s SAMD51 is powerful enough to decode JPEG images on the fly!
  • The E-Book FeatherWing can stack with several other FeatherWings, meaning you can add a Wi-Fi connection (AirLift wing), real-time clock (DS3231 wing), or even GPS capabilities (Adafruit Ultimate GPS wing)!
  • The STEMMA ports on the side open up many possibilities for everything from sensors to speakers to NeoPixels.
  • You can also add a 400mAh battery, Adafruit #3898, to take your book on the go.

Level Up to Open Book Feather

If you’re up for a more advanced build, The Open Book Feather board brings the SAMD51 onto the main board, and adds features like stereo audio output, microphone input, and more free pins for supporting other wings.

Both boards support CircuitPython, Adafruit’s awesome branch of MicroPython that’s great for education and experimentation.

For more information about the Open Book, including how to make a 3D-printed or laser-cut enclosure, check out the Open Book’s GitHub repository at github.com/joeycastillo/The-Open-Book.