So your Aunt Harriet brought you a big sack of pecans from her farm — awesome! Only one small catch: you get to shell them. No way are we going to do this manually with a “pliers” style nutcracker, right?

One alternative is to buy the legendary Texas Native nutcracker from Amazon or eBay for about $50. While this rubber band-powered relic from about 40 years ago does work, ask anyone who’s cracked more than a dozen pecans with it how long it took for their left thumb to heal.

There are several semi-automatic, one-pecan-at-a-time crackers on the market. All work using the same principle as the Texas Native: by bashing the pecan from one end, causing a weight at the other end to move a bit, with considerable resisting inertia. They can be bought for a paltry $200–$400 from vendors like Red Hill General Store. And you still have considerable follow-up picking to do.

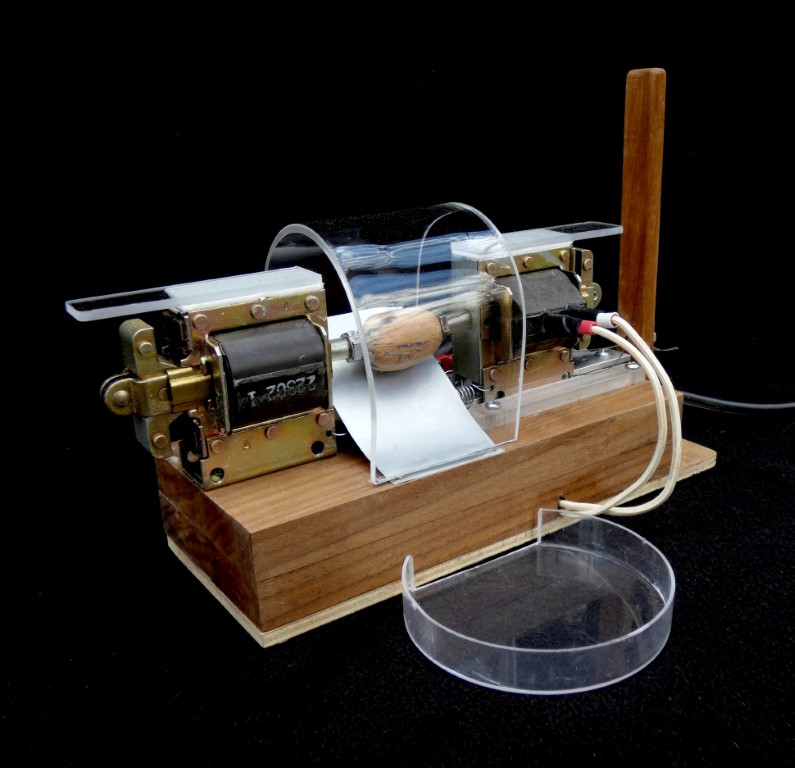
The Pecan Blaster uses the same basic principle, but with two heavy-duty 115-volt appliance solenoids facing each other. Just load a pecan between the solenoids and close the clear protective shield to fire both solenoids simultaneously. The pecans don’t stand a chance when bashed from both ends. The left solenoid is fixed, but the right one slides to accommodate various size nuts* and kicks back somewhat, using the inertial weight principle of the old-style crackers. Both halves of the nut usually survive unscathed and separated from most of the shell; the rest of the time I get quarters and smaller pieces, which are fine for most baking or snacking purposes. Most cracks need no further shelling.

Here’s how you can build one like mine, but feel free to use alternate materials and slightly different measurements than what I chose.

Project Steps

BUILD THE BASHERS, 1.

Buy your solenoids from Electronic Goldmine, item #G20264B, the cheapest I could find that would do the job. Two of these babies cost under $10. EG’s got a $10 minimum, so look around for something else to add to your order.

Or, if you really want them in two days, Amazon has them for around $25 each (plus shipping), item #B01MQ4H6OP.

2.

Make a base from an 8″ length of 2×4. I happened to have some walnut, and of course it would be slick to use pecan! (Ask Aunt Harriet if you can cut a limb off one of her trees.) With a band saw or circular saw, cut a wiring slot about 1/8″ wide across the bottom, about 2¾” from one end.

3.

Prepare the solenoids. They’re designed to pull, but they must push. So carefully drill, with a drill press, a 1/8″ hole in the center of each solenoid in the plain side.

The hole is 1″ down from the top, all the way through the approximately 1/4″ wall. Use a center punch for accuracy! Each hole must be in line with its respective internal plunger. Carefully widen the hole to ¼” using several bits from 1/8″ to 1/4″.

After drilling, carefully blow, brush, and/or wash out with solvent (such as paint thinner; not water) any chips that fell into the solenoid. A magnetized screwdriver tip can help as well. Slide a ¼”-20 or ¼”-28 bolt back and forth through the solenoids’ holes until they offer no resistance.

While you’re at it, also drill two 3/32″ holes in the end of each solenoid to hold the ends of springs as shown in Step 8.

4.

Mount one solenoid on the base’s top, at the opposite end from the wire slot. It will be on your left as you use the Blaster and should be on the centerline, flush with the end of the 2×4. Keep it parallel to the long sides, with the solenoid’s plunger hanging off the end of the base.


Mount it by drilling slightly oversize holes through the base to match the hole pattern in the solenoid. I used two 1¾” 8-32 machine screws, nuts, and toothed washers; tighten that sucker down.

5.

Mount the other solenoid at the right end. It will slide back and forth, from about 2″ away from the left solenoid to about 3½” away. Its plunger must be to the right. This solenoid must be guided to slide smoothly and accurately with minimum friction. I made 3 rails: two side rails from ¼” acrylic (such as Plexiglas) and a center rail from 1/8″×5/8″ aluminum strip.

The center rail’s ends must be elevated 1/8″ to prevent binding. I made two 1/8″×¾”×¾” acrylic spacers, which double as limit stops. Mount them so that the right solenoid moves smoothly back and forth without excessive play, and stops about 2″ from the left solenoid at their closest positions. Travel distance will be about 1½”. Later, two springs will connect the two solenoids.

6.

I made the pecan holders/bashers from ¼”-20 bolts (¼”-28 is OK, too). Use 2 bolts with at least 11/8″ of smooth, unthreaded length. Cut them with a hacksaw, and file the ends smooth so they’ll easily go into the solenoids.

The heads need a conical recess to properly locate the pecans. With a drill press and vise, clamp each bolt and drill a 1/8″ hole in the center of its head (use a center punch) about 1/8″ deep. Switch to a 45° or 50° angle, ½” diameter (minimum) countersink bit, and countersink over the drilled holes until the diameter of the conical shape is 5/16″–3/8″ at the tops of the bolts.

These cups are important to properly hold the pecans for bashing.

7.

I made bolt-head spacers out of a ballpoint pen housing (think cheapest Paper Mate), about 7/16″ long. They should fit snugly over the bolts. If not, hot-glue them in place under the heads.

Poke the two bolts into the solenoid holes — they must slide in freely — and bring the solenoids as close as they can go together (about 2″, remember?). The bolt heads should now be in line with each other, about ¾”–7/8″ apart at their closest. In addition, when both bolts are pushed in until their spacers hit the solenoids’ laminations, the gaps between the outsides of their laminations to their plungers must be around ¼”. This is the distance each solenoid would/could/will push its plunger (depending on the toughness of the pecan). If not, reposition the right solenoid or adjust lengths of bolts and/or spacers as necessary.

8.

Make and install the springs. Actually, alter is the best word. Buy a pair of Hillman 5/16″×1½”×0.023″ wire diameter springs. Lowes stocks them. They’re too long for this task, but about half-length is just right. Snip both of them roughly in half, so the stack of coils measures about 5/8″. Bend out one coil on each for a hook.

Hook the springs into the 3/32″ holes you drilled in the sides of the solenoids.


The right solenoid will now be held inward. Check your dimensions again as in Step 7 above.

MAKE THE SHIELD

A shield is necessary to keep pecan bits from flying toward your face. When you close the shield, it will turn on a switch to energize the solenoids.

9.

Make the shield from a 2¾”×9″ strip of 1/8″ clear acrylic. I used a 23/8″-diameter rolling pin as a form to bend the strip around. A piece of acrylic pipe or other cylinder of that approximate diameter should work.

Clamp your form in a vise and begin slowly to heat the strip in the middle on both sides.

As the strip heats up, it will begin to sag.

Be sure to apply enough heat in a 4″-long area in the center for the strip to form into a U shape around your form.

Take your time; getting it too hot will cause the acrylic to distort and/or bubble. Once you bend it around the form, hold it there, with its two ends roughly parallel, until it cools and rigidifies.

10.

Because shield dimensions will vary, fitting your shield to your Pecan Blaster is a trial-and-error process. The goal is to mount and hinge the shield so that it swings freely from wide open (to allow placing a pecan) to all the way closed, completely shielding the opening between solenoids. When opening or closing, the shield must not touch the solenoids. As the shield fully closes, it (with an attached switch actuator) will turn on a 115VAC micro switch which energizes the solenoids.

Using 6-32 machine screws and nuts, fasten a 1″-wide hinge to the back center of the shield. Temporarily mount, with only a drop of hot glue, a small hinge-supporting wood block (about 1″×5/8″×½” high) about 3/8″ from the back of the base, centered between the two solenoids in their closest position. Using the hinge as a template, drill two small holes in the top of the block and use wood screws to fasten the other side of the hinge to the block.

Swing the shield from back to front, enclosing the space between the solenoids. Adjust the block’s size and location to make this work. Try to keep the shield as low as possible. You may have to remove (temporarily) the hinge and trim either or both ends of the shield to make it more compact. Safety is paramount here, so take your time and do it right. Do not permanently mount the block just yet!

11.

Add the switch and its actuator. As you did with the small block, temporarily mount the micro switch with hot glue as shown. I made the switch actuator from a scrap of ¼”×1/16″ aluminum bent in a lazy Z shape. Attach it near the bottom edge of the shield with a 6-32 machine screw and nut so that when you close the shield, the actuator encounters the micro switch’s button and presses it in fully. Adjust the actuator and/or micro switch to ensure they work perfectly every time.


When they do, permanently glue the block and switch actuator in their places and tighten all screws and nuts. Mount the micro switch with two #4×5/8″ screws. (You may have to enlarge the holes to 1/8″.) Finally, permanently glue or screw down the hinge-support block.

FINAL ASSEMBLY, 12.

Make a channeling ramp from an aluminum soda or beer can, or any thin aluminum, about 2″×3½”. Hold it temporarily at the front edge of the base, between the two solenoids. It’ll probably rest on the closest spring, and that’s OK! But make sure that the switch actuator misses the ramp when the shield opens and closes. Adjust the ramp or actuator length if there’s any interference. Then, with two tiny nails, secure the ramp to the base.

13.

Make guards for the solenoids from 1/8″ acrylic, ¾”×3¼”. Clean the top surfaces of the solenoids, then use double-sided tape to attach the guards as shown on page 44.

14.

Wire it! I followed a very basic schematic that shows power switched to both solenoids simultaneously.

Use female wire terminals that fit the male terminals on the solenoids. Use shrink tubing and plenty of electrical tape to insulate any exposed electrical parts. Route the wires from the right solenoid to the back through the slot in the bottom of the base and secure all with wire hold-downs or staples.

15.

Make the leg plate from ¼” plywood, 1″ longer than the base, then screw it to the bottom of the base. Ensure the crossing wires are in the slot. Attach 4 or 5 small rubber legs.


16.

Make a lever to pull the right solenoid to the right for loading pecans, from a small piece of walnut or other hardwood about 6″ long. Drill a 3/32″ hole 17/8″ from one end. From that same end, attach it to the leg plate with another hinge like the one used on the acrylic shield.

Thread braided nylon fishing line or thin wire through two holes in the right solenoid, and over to the small hole in the lever. Use a screw to keep the string or wire from slipping. Leave a bit of slack in the line or wire.

Test-pull the top of the lever to the right to open the gap between bolt heads. The solenoid must slide easily with no bind or excessive play.

17.

Make a catch tray. I used an old clock face and sawed and sanded a straight notch on one side about 2″ long.

LET’S GET NUTS

Before you blast, test your Pecan Blaster by flipping the clear shield back, then plugging in the solenoids. They must not fire. If they do, unplug and check your switch and your wiring!

USE IT


When all is well, follow these steps:

a. Open the shield.

b. Use the hardwood lever to open or close the gap between the bolt heads.

c. Load a pecan and twist it a bit to ensure it’s held securely by the bolts.

d. Important and at first unintuitive: Pull both plungers outward as far as they will go.

e. Close the shield to blast the pecan apart!

TROUBLESHOOTING

If the pecans don’t crack on the first hit (they usually do), try again. Make sure you pull the plungers all the way out before blasting; it’s easy to forget.

» Sliding solenoid. The right solenoid may not be moving freely, or may be moving too freely (side-to-side or up). Try pulling the lever back and forth a few times. The right solenoid must slide freely, directly opposite the fixed one. Just after the solenoids are fired, the right one should bounce a bit to the right in a straight line; it must not kick up or sideways.

» Sticky bolts. Also ensure the bolts slide smoothly in the holes you drilled in the solenoids.

» Check dimensions. Three dimensions are important:

1. The minimum distance between solenoids should be about 2″

2. The (empty) distance between bolt heads should be ¾”–7/8″.

3. The gaps between the outsides of the laminations and their plungers must be around ¼” before you pull them out.

Happy blasting!