Based on the trestles of a Japanese woodworking bench, these shop horses are a good beginning joinery project.

They’re constructed using the mortise and tenon, the fundamental joint in woodworking. The tenon (end projection) of one piece fits into the mortise (hole) in another piece.

This project uses the drawbore style of mortise and tenon, which is secured by a wooden pin that draws it tight and makes it look great.

Project Steps

Mortise and Tenon Joint

What makes a drawbore different from a regular pegged tenon is the offset pin holes. Instead of the pin passing straight through the joint to hold it together, the hole in the tenon is bored slightly closer to the shoulder. This offset causes the tenon to be drawn deeper into the mortise when the wooden pin is driven through.

Watching a joint that you made pull itself together like that is a very cool thing. And when you feel how strong it is with no glue or metal fasteners, it opens doors in your head. You realize that joinery isn’t just the realm of mountain-dwelling woodworking mystics, but an accessible approach to working with wood.

The joint may look intimidating, but if you take your time and use sharp tools, you’ll be surprised at how easy it is. And while the drawbore style is a little more complicated, when cut carefully it’s fairly forgiving of loose fits, a bonus for the beginner.

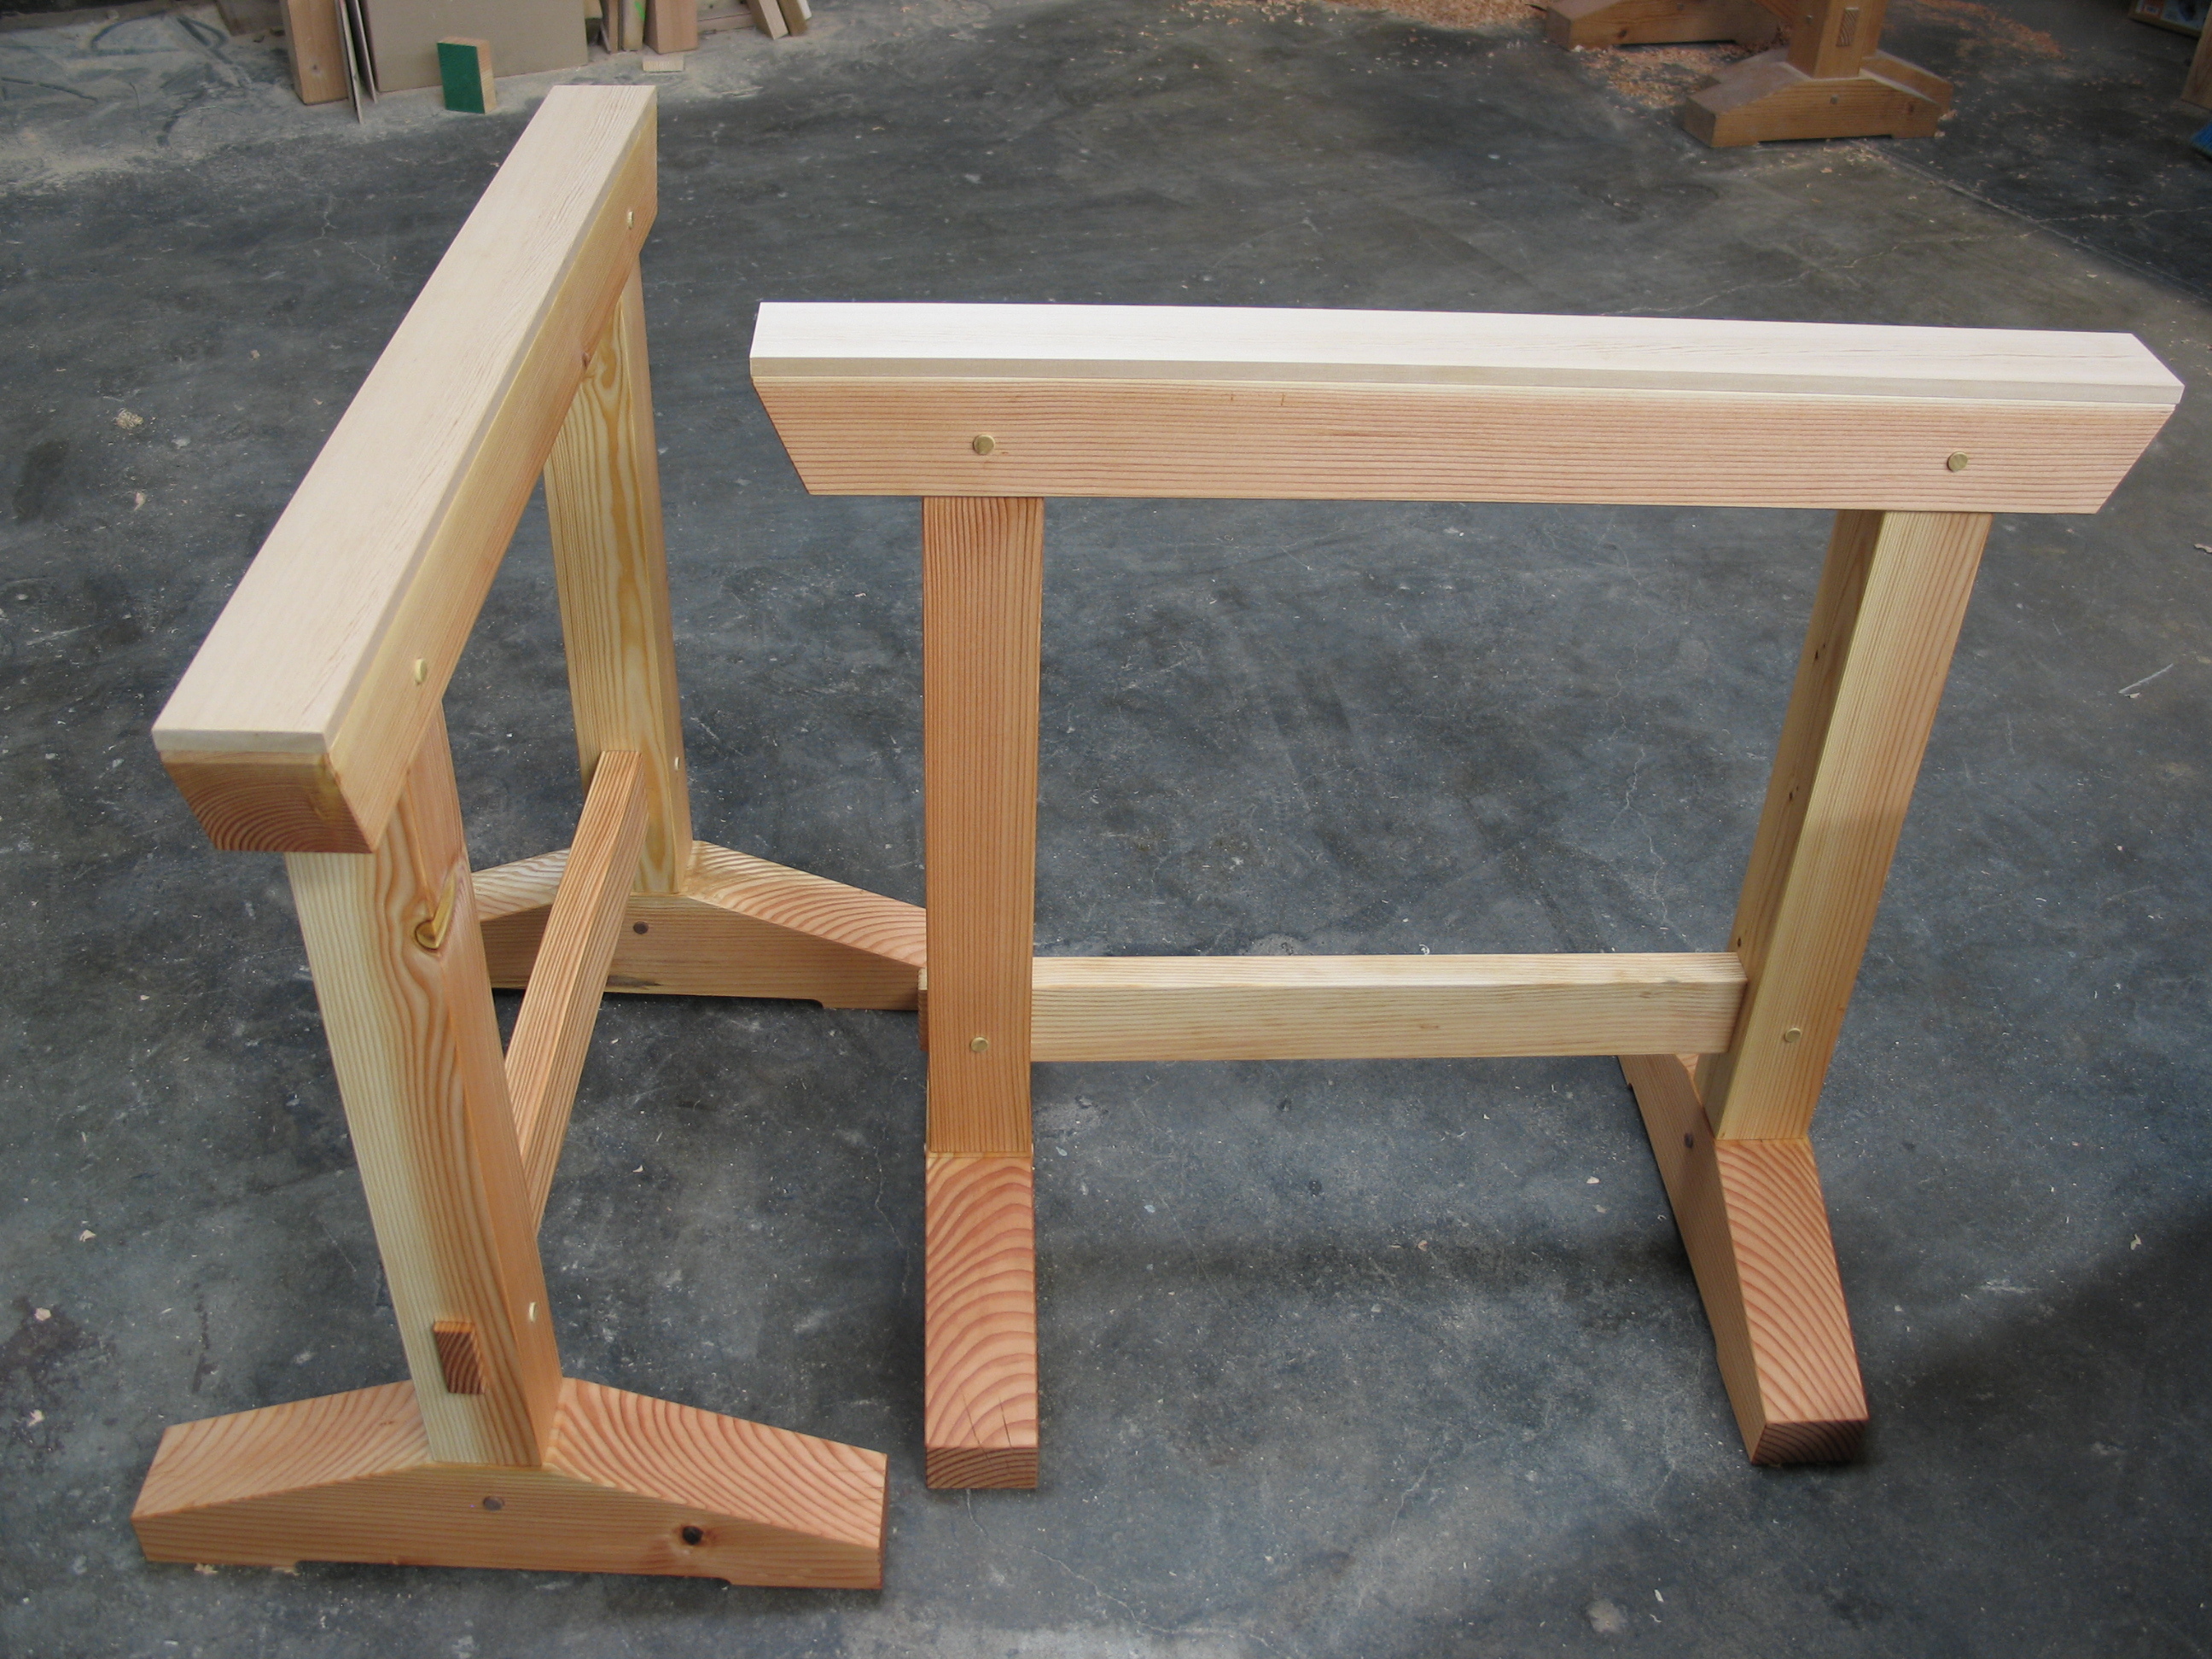
If you’re comfortable around woodworking tools, these horses should present a light challenge, then last a lifetime. Because of their myriad uses in the workshop, to call them sawhorses would sell them short. I prefer workhorses.

Lumber and Sizing

Choosing the right lumber can make the project much easier. Look for pieces that are straight and have the fewest knots. Sight down the length of each one to check for bending or twists

I chose fir for a couple of reasons. It’s heavy, stiff, and fairly easy to work, and since it’s basic construction lumber, it’s available most anywhere. You can also use pine or cedar or pretty much any wood you like, but do not use treated lumber. The total cost for the fir was $25.

The proper sizing for horses is largely about preference and use. I use 2 sizes in my shop: higher ones for standing work (sawing, planing) and lower ones for sitting work (heavy joinery).

Milling

To start, lay out and cut all your pieces to length. While there isn’t a lot of waste, there’s enough to allow you to move the parts around to avoid larger knots and other flaws. The cut list:

From each 4×4 cut:

1 @ 36″ beam, final dimensions 3¼”×3¼”×36″ 2 @ (H) legs, final dims 3″×3″×H

There are several ways to dimension the parts, from handsaws to band saws. My tool of choice is the table saw. Since most table saws don’t have the capacity to make these cuts in a single pass, I’ll do it in two.

Starting with the legs, set the saw fence to 3″ and raise the blade to just past half of the 4×4 wood’s thickness, in this case about 1¾” high. Putting the best face against the fence, push the piece through. Once you’ve made that cut, flip the piece end to end, and with the same face against the fence, make the second pass. You should be left with 3/8″-thick scrap.

Next, rotate the piece 90° and repeat the process, removing the second face. Repeat this process with all of the parts, finishing all like parts at once.

Layout

The accuracy of the layout is important, so take your time. Mark all like parts at the same time and check that they all match before making any cuts.

I generally measure joints from the center out. After measuring in from both sides to find center, I strike a line and work outward from it. You don’t have to follow this method, but it works well for me.

I also use the blade of my square to transfer lines. Once I have one measurement marked, I then transfer that same line to the matching or corresponding pieces. It speeds things along and helps keep everything consistent.

NOTE: If you’re using a handsaw, the easiest way to get a good straight cut is as follows. Using a square, mark cut lines around all 4 sides. Make a diagonal cut about a quarter of the way through, roll the piece 90°, and cut again. Continue rolling and cutting until you’ve cut through.

Tenons

To lay out the leg tenons, start by marking the shoulders. Measure in 2½” in from each end and strike a line around all 4 sides. For the cheek line, measure ½” to either side of center and strike a line all the way around the end. Transfer these lines to the ends of all 4 legs (remember to orient each leg’s 2 tenons 90° to each other).

The layout for the stretchers is the same, only you should be 3¼” in from the ends, and these tenons are aligned with each other.

To cut the tenons, I like to use a saw called a ryoba nokogiri (“double-edged saw”). The ryoba is a Japanese generaluse carpentry saw with two sets of teeth: big teeth for ripping (cutting with the grain), and small teeth for crosscutting (across the grain). Unlike most western saws, which cut on the push stroke, Japanese saws cut on the pull stroke.

Using the crosscut side of the saw, cut along the shoulder line, being sure to stop when you reach the cheek line. To help. keep the cut straight, you can hold another piece of wood along the line as a guide

Flip the saw to its rip side, and cut along the cheek line. When you have a diagonal cut from the shoulder to the center of the thickness, roll the piece over and finish the cut from the other side.

Once all the cheeks are cut, lay out and cut the edge cheeks. Measuring out 1¼” from center, strike your lines and cut.

Clean up any high spots with a sharp chisel.

The last step is to put a small chamfer or bevel on the end of the tenon. This can be done with a knife, chisel, or sandpaper, and it will help ease assembly.

Mortises

Again, working out from center, mark all your lines. When laying out the mortises in the legs, be sure to mark them on both sides of the legs because the tenon passes all the way through.

The first step in the mortising is to remove the waste using a drill. While a hand drill will work, a drill press is recommended. A drill press will give you reliably straight holes with sides that can be used for reference as you chisel out the waste.

Feet and beam mortises: Using a 1″ Forstner bit, drill out the mortises to a depth of 2 5/8″ these are blind mortises (or stop mortises), which don’t go all the way through. To keep the sides straight, first drill holes at either end, and then connect them by drilling a hole in the center. Use a sharp, 1″ chisel to clean up the sides and square the corners

Use a sharp, 1″ chisel to clean up the sides and square the corners

Stretcher mortises: Because the stretcher is a through mortise, you’ll want to work from both sides. Only drill halfway through from one side before rolling the piece over and drilling the rest of the way from the other. This will keep the drill bit from blowing out the exit side, making a splintery mess of things. After drilling, use the same procedure for chiseling, working from both sides to keep both faces intact.

Pin Holes (Drawbores)

Lay out the holes for the pins through the mortises (but not the tenons yet). For the feet and beams these should be centered 1½” from the mortised edge. For the stretchers they should be on center.

Use a ½” bit to drill all the mortise pin holes. Again, using a drill press is highly recommended. Drill slowly to minimize splintering on the exit.

NOTE: I’m using dowels for this project, but if you want to take it further, you can square the holes with a chisel and make square pins instead.

It’s time to fit the joints. Since each will have a slightly different fit, be sure to mark each one for its corresponding part. I usually mark letters on the tenons and on the edge of the mortise in places that will be covered once they’re assembled.

The pieces should slip together with no more than a few raps of a hammer. If it’s a lot tighter than that, carefully pull it apart and inspect the tenon. You should be able to see compressions or shiny spots that will tell you where it’s too tight. Use a chisel to make adjustments. And remember, a slightly loose joint will be better than an overly tight one on this project.

Once you’ve fit all the joints, assemble the horses.

Using a sharp pencil, trace the edges of the pin holes onto the tenons. It’s important that you get the edges of the hole, so mark them carefully. Disassemble the horses. Next, measuring from the edge of the circle you’ve drawn on the tenon, mark a line 1/16″ closer to the shoulder. This line is the edge of the tenon’s pin hole; because it’s offset from the mortise’s pin hole, it will draw the joint tight. You can now drill through the tenon

Shaping

First, relieve the bottoms of the feet (make them concave). This will make them more stable on uneven surfaces. Clamp a pair of feet together with bottoms facing each other, and mark a line 4″ in from each end. Using a drill press and 1″ Forstner bit, drill a line of half-depth, overlapping holes where the bottoms meet, from one line to the other. Flip and repeat from the other side, then clean up with a chisel just like with the mortises, only this time, leave the ends round.

For the foot slope, mark a diagonal from each end to the top, starting 2″ from the bottom, and ending at a point 1¾” from center, and cut.

To finish the ends of the beams, cut a diagonal ¼” from the top edge to a point 1½” in from the end

To make the pins, cut the ½” dowel into twelve 4″ lengths. Using a knife, taper the last ½” or so.

Now clean up all the parts. Sand or plane all the pieces, being careful of the areas around the joints (too much will change the fit).

Assembly

Starting with the stretchers, slip the tenons through the legs and carefully drive the pins through with a hammer. You should see the joint tighten itself as the pin goes through. Drive the pin until it sticks out both sides equally.

Next add the beam, and lastly the feet.

You can cut the pins off flush, but I like to leave them a little proud. The easiest way to do this is to drill a hole in a scrap of wood about 1/8″ thick, slip it over the pin, and saw against it.

The Finish Line

The horses are now ready for the finish of your choice. I use Danish oil, but shellac, polyurethane, or varnish will do.

Once dry, the last step is to attach the optional sacrificial pieces to the top. Because I work with a lot of softer woods, I use clear cedar for this. That way, not only are the horses protected from errant saw cuts and the like, but the workpieces I place on them are protected from the horses’ harder fir. As before, you can use any wood you like, or none at all.

To make these tops easy to replace and free of metal fasteners, I use double-stick tape.

The Test

The mark of any good shop furniture is not only its strength but also its versatility — its ability to adapt to the odd secondary uses you come up with.

I could test the workhorses’ strength by stacking them with beams and chopping more mortises, but after two days spent building them, I’d rather test out their versatility. So with the help of some scrap lumber and a frosty beverage, they are transformed from workhorses to … relaxhorses.

Conclusion

This project first appeared in MAKE's Ultimate Workshop and Tool Guide, on page 38.