


The enthusiasm of the open source and maker movements has led to quite a democratization of tools. Capabilities once reserved for professional or academic users have become staples of our daily lives. One of the earliest tool sets that changed the world after it became democratized was printing. This happened in the 15th century and again in the 20th. Inkjet printers are so cheap that they frequently cost less than the refills of their ink. The materials they print on are also varied and easy to acquire. T-shirt transfers, stickers, business cards, transparencies, and other media are common materials for personal computer users.
Yet computer printing’s predecessors remain in use. The market for printing presses may have receded, but it hasn’t disappeared. Of the many printing processes that continue to have utility, screen printing manages to remain a viable practice among professional and DIY users. T-shirts may be the most popular choice, but there are many other uses for this venerable technique. The basic activity is dead simple and can be done with surprisingly primitive equipment. As with many interesting skills, incredible results can be achieved by learning the subtleties of the art.
HOW DOES IT WORK?
The fundamental concept of screen printing is to stretch some kind of tightly woven material and block specific parts of the material so that when ink (or paint) is forced through it, the ink only passes through the unblocked portions. The blocking, or resist, creates a negative image on the screen of what you want on the printed surface (Figure A). Screen printing is often called “silk screening” because silk was once the best available material. Synthetic materials have largely replaced silk over the years, but the name remains.

The screen maintains its stretch by attachment to a frame of some sort. Many screens are stapled or glued to a wooden frame, but there are lots of ways to use metal or even plastic frames. Using a frame that won’t warp or distort the screen is important for reuse.

Most screen printing techniques use a squeegee to evenly force the printing medium through the screen onto the print surface. This operation is referred to as pulling a screen since the squeegee is usually drawn toward the printer for the print stroke (Figure B).

Screen printing is a binary operation; if you’re printing with black ink, you cannot directly print gray. However, special techniques have evolved to emulate fades and gradations. Instead of mixing white with black to get gray, a halftone image is created that uses proportionally sized dots to create the perception of gray, or pink from red and so forth (Figure C). This method also allows for mixing colors on the print. A 50% halftone of yellow printed on top of a 50% halftone of red will create the perception of orange (Figure D).


Multicolor prints require a screen for each color (except for some interesting effects achieved by mixing multiple colors of ink or paint on the screen). A print shop that prints color images will usually have a screen press with four screens arranged in a manner that allows the print surface to be carefully registered on each screen until each of the colors (cyan, magenta, yellow, and black are common) has been pulled (Figure E).
For this skill builder, we’ll stick to printing a single color without halftones. There is a wealth of opportunities for this approach; printing labels on control surfaces, adding logos to products, making basic T-shirts, or even putting a resist layer onto a surface for etching printed circuit boards.

MAKING THE SCREEN
Screens can be created with a variety of methods. You can paint the resist material onto the screen by hand, you can use a vinyl cutter to create a stencil and apply it directly to the screen, or you can use photo emulsion to transfer a transparency onto the screen. Each of these methods has pros and cons. We’ll do the simplest for this first screen and you can let your level of interest determine which other methods you pursue.
Most art supply stores carry basic materials for screen printing and online sources have everything you need whether you’re printing for fun or running a screen printing business. In the interest of simplicity, we’re going to use commonly available materials to demonstrate the ease of basic printing. Feel free to upgrade if you’re interested.
Rather than going through the process of stretching screen material to a wooden frame, we’ll use an embroidery hoop for holding our stretched screen material. In the spirit of low budget skill hacking, we can use any sheer polyester material or organza for our screen instead of commercial screen cloth. I bought a bathroom curtain at Goodwill. The results won’t be as good as using a high thread count fabric made specifically for screen printing, but it will still work. Cut the material so that you have a section slightly larger than the hoop. Lay the material across the smaller hoop ring, then put the larger ring around it and tighten while stretching the material as tightly as possible. I used small binder clips to lock the cloth in place (Figure F).

ADD YOUR DESIGN
Next we need to create the art. We’ll hand paint it onto the screen, so you’ll want to match the art to your dexterity level. For your first effort, avoid fine lines and stick to something basic. Print the art out on paper to the same size you want to screen it. You’ll need a couple inches around the art to move the squeegee, so don’t make the art bigger than half the size of the hoop.
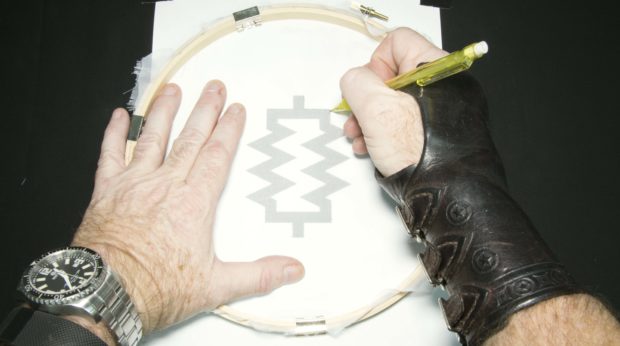
Tape the print of the image to a solid surface so it won’t move and place the screen on top of it. Use a soft pencil to trace the outline of the image onto the top of the screen (Figure G). We’re going to use Mod Podge for resist. Commercial resist products are available that are better for serious efforts, but that’s true for pretty much every aspect of this project.
Our goal is to block passage of the ink through any tiny holes in the screen other than the ones we intentionally left uncovered. We will paint the Mod Podge resist onto the screen to cover areas where we don’t want paint to go through. It may take multiple coats of resist to fully block the cloth (Figure H).

GATHER YOUR TOOLS
Squeegees are traditionally rubber with a firm but flexible edge. They come in a variety of sizes, but it’s important that the squeegee be wider than the art so that you can pull the print in one motion. We can use a credit or club card (Figure I) as our impromptu squeegee, but anything with a firm plastic edge will work.

For ink, we’ll use acrylic paints. Commercial inks are available that are designed specifically for different surfaces. Screen printing ink (or paint) has to be thick enough so that it doesn’t run when you push it through the screen.
GET READY, GET SET, PRINT!
Whatever your intended print surface will be, it’s always a good idea to pull a couple of prints onto paper or cardboard to get a feel for the squeegee, ink, and screen. Place some protective newsprint onto your work area and lay down a piece of cardboard. If things are likely to slide, tape everything in place. To avoid blurring, it’s very important that neither the material being printed nor the screen move while printing.
Pulling the print is typically done in three motions; first drop some ink onto the screen, use a good dollop so that you’ll have more than enough for a print (Figure J). Second, use the squeegee without pressure to lightly spread an even coating of ink over the art (Figure K). Third, press the squeegee onto the screen above the art, hold it toward you at 45° and pull it toward you while pressing evenly, but not too firmly, down, forcing the ink through the screen (Figure L). Learning the correct pressure is an important reason to run through some test prints first.


Lift the screen directly off of the print. Commercial (and many home) screen printing rigs mount the screen on a hinge so that it can be easily lifted up. Give it time to dry before touching it (Figure M). If you’re printing fabric ink on clothing, you’ll need to heat-set the ink with a heat gun before washing.

We’ve really only scratched the surface of screen printing. For another great project, try cutting stencils with adhesive-backed vinyl that you apply to the screen (use a heat gun to get the vinyl to stick). Photo emulsions allow you to make screens with incredibly fine detail. Screen printing is a great way to get professional-looking patterns onto your projects or to do short runs of clothes, posters, or art. I hope you’ll keep looking into the next steps now that you’ve seen how easy it is!
ADVERTISEMENT
Join Make: Community Today


