Untitled

Over the past few years there has been a resurgence of interest in classic printing techniques like relief printing and letterpress, but the techniques involved in creating printing plates and moveable type have been out of reach for most people. Luckily 3D printing has changed this, making it very easy to create custom printing plates, moveable type, and stamps.

In this tutorial I want to show you how to create simple custom stamps directly from vector images using Inkscape and OpenSCAD — both of which are free. We will use Inkscape to edit the image and prepare it for printing and OpenSCAD to generate an STL file for 3D printing. The feature that makes OpenSCAD perfect for this project is that it can easily extrude 3D objects from 2D vector graphics, so we can generate a printable STL file from an SVG image with just a few lines of code.

Preparations

Software Setup

First, you’ll need to download and install the required software programs if you don’t already have them installed on your computer. You’ll need Inkscape, OpenSCAD, and the Inkscape OpenSCAD DXF Exporter, which will allow us to export the vector image from Inkscape into a format that OpenSCAD understands.

Choosing an Image

2

When choosing your image make sure it works well as a pure black and white image and does not have too many small details. The thickness of your thinnest lines should be greater than nozzle size of your extruder. This ensures that the design will print cleanly and not get lost during slicing.

Since Christmas is coming up, I chose this image of a Christmas tree. If you don’t have a suitable vector image you can also use Inkscape to autotrace a bitmap image and turn it into a vector image.

The Handle and Other Materials

3

I’m using a 4×4×4cm wooden cube from a craft store as a handle for my stamp. You can also buy pre-made round and square traditional stamp handles at craft stores if you want a more traditional look. Of course you can always 3D print a handle for your stamp if you wish. In addition, you will also need glue, some sandpaper or a file, and an ink pad of your choice.

What will the next generation of Make: look like? We’re inviting you to shape the future by investing in Make:. By becoming an investor, you help decide what’s next. The future of Make: is in your hands. Learn More.

Project Steps

Creating the Image

SETTING UP THE DOCUMENT SIZE


At this point you should have a suitable image you want to turn into a stamp opened in Inkscape. The first thing we need to do is to set our document size to the size we want our stamp to be. To do that open the document settings (Shift+Ctrl+D) in Inkscape and set the image width and height to the desired values.

1

The handle for my stamp is going to be 4×4cm in size, so I set the document to be 40×40mm. I also changed the default unit to millimeter since working in pixels is not very useful when dealing with real life objects.

After having set up the document size you might notice that your drawing does not fit the document size anymore. Make sure to scale your drawing to fit the size of your document and position it however you want it.

PREPARING FOR DXF EXPORT


Depending on where your image comes from it might be made up of any number of lines, shapes, objects, groups, and layers. OpenSCAD can only work with solid shapes though, so they all need to be converted into simple paths.

First, you need to make sure your drawing is on a single, new layer. Sometimes layers have transformations on them that can mess up the DXF export. Open the layer window by pressing Ctrl+Shift+L and create a new layer by clicking the plus button. I’m calling this layer “Stamp.” Remember the name of this layer, we’re going to need it later in OpenSCAD when loading the DXF file.

20

Next, select all the parts of your drawing, then hit Ctrl+X to cut them, select your new layer and hit Ctrl+Alt+V to paste them in their original location. You should now be able to delete your other layers by selecting them in the layer window and pressing the minus button and be left with a single layer with your image on it.

TURNING THE IMAGE INTO A SINGLE PATH.


First, ungroup all groups in your image. The simplest way to do this is to select everything and hit Ctrl+Shift+G. You might find that some of your groups contained more groups, in that case you might need to repeat until there are no more groups.

Now, while you still have everything selected hit Ctrl+Shift+C or select “Object to Path” from the “Path” menu. This will take everything that is not already a path — like rectangles, circles, and text — and convert them into paths. If you have any text in your image, this will have create grouped paths for the text object, so you will need to hit Ctrl+Shift+G again to ungroup those.

Lastly, we also need to convert all our lines into paths, which can be done by hitting Ctrl+Alt+C or selecting “Stroke to Path” from the “Path” menu.

The status bar at the bottom of the window should now show that you only have objects of type “Path” selected.

We can now combine all those paths into one single path by hitting Ctrl-+ or selecting “Union” from the “Path” menu.

EXPORTING THE IMAGE

21

Assuming you have installed the DXF exporter correctly, you should be able to Save as and select “OpenSCAD DXF Output” as the file type.

Save the DXF file in an easy to reach location and we’re done in Inkscape.

Generating the STL File

SETTING UP OPENSCAD

Open up OpenSCAD and select “New” on the start screen to create a new, empty file.

22

On the left side you have a text editor where we will enter the code, while on the right side you have a preview of your model. Below the preview you have a console that shows the error messages and information about your model.

Before continuing any further, save the OpenSCAD file into the same directory as the DXF file we just created, this will make importing it much easier.

IMPORTING AND EXTRUDING THE DXF FILE

Importing the DXF file is very simple and can be done in a single line of code. In my case I enter the following into the editor inside OpenSCAD

import(file = "stamp.dxf", layer="Stamp");

The import function will load an external 2D vector graphic into your 3D space as a flat object. It takes the filename and layer as argument. You’ll need to change these to fit your file.

9

Once you’ve saved your file or refreshed the preview by hitting f5, you should see your image appear in the preview window. Since OpenSCAD can’t display infinitely thin objects it will give some artificial thickness to the object in the preview window.

To turn this artificial thickness into real thickness we can actually print we are going to extend our code as follows:

linear_extrude(height = 1, convexity = 10)
import(file = "stamp.dxf", layer="Stamp");

As you can see we have just added in one additional line above the previous one. The linear_extrude function takes our 2D shape and turns it into a 3D one of a defined height.

By setting the height to 1 we extrude the shape by 1mm. In case your model does not render correctly in the preview try increasing the convexity setting. It is only needed to create the preview, and has no effect on the final model.

10

With the image extruded to create a profile for our stamp we can now continue by creating the base plate of the stamp.

ADDING THE BASE PLATE

Next we need to add the base plate to the stamp so we have a solid backing we can attach to the handle. To do this we are going to add two more lines to our script like this:

linear_extrude(height = 1, convexity = 10)
import(file = "stamp.dxf", layer="Stamp");
translate( [0,0,-0.6] )
cube(size = [40,40,0.6]);

The cube function adds a cube of the specified size to the model. In this case the cube is 40mm wide and 40mm deep and 0.6mm high. I chose a height of 0.6mm since this means there will be 3 layers when printed at 0.2mm layer height.

Since the cube would stick up by default we add the translate function to it to move it down by its own height so it sits flush with the bottom of the profile.

23


FLIPPING THE IMAGE

Since the final image will appear flipped after stamping it’s important we mirror the stamp so our image will appear correctly. To do that we add one more function to the script.

mirror([1,0,0])
{
linear_extrude(height = 1, convexity = 10)
import(file = "stamp.dxf", layer="Stamp");
translate( [0,0,-0.6] )
cube( size = [40,40,0.6]);
}

As you can see we have wrapped the entire code into the mirror function which will mirror our model around the X axis. It’s important to include the curly brackets since we want to apply it to more than one object.

12

EXPORTING THE MODEL

Now all that is left to do is to export the model as an STL file. To do that hit f6 or press the render button in the toolbar. After the rendering is done select File>Export>Export as STL to save the model as an STL file.

Printing and Assembly

PRINTING

13

For slicing and printing I use Slic3r and Pronterface, but your workflow might differ. I printed mine in white PLA at 195°C with a layer height of 0.2mm on a Printrbot Play.

POLISHING THE SURFACE

To ensure that the profile of the stamp makes good contact with the paper it’s important to get it as smooth and flat as possible. For that it’s a good idea to temporarily stick the stamp to the handle with some tape to have something to hold onto.

For the first pass you can use a coarse nail file or 100 grit sandpaper to remove most of the unevenness of the print surface. In case there is excessive stringiness between parts of the print it might be good clean that up as well.

To make the next step easier we’re going to paint over the face of the stamp with a black marker. This will allow us to easily judge when all parts have been polished perfectly flat. Set down a piece of 600 grit sandpaper onto a flat surface and slowly move the face of the stamp over it in a circular pattern, making sure to keep it level, until all the black parts have been sanded off.

14

ASSEMBLY

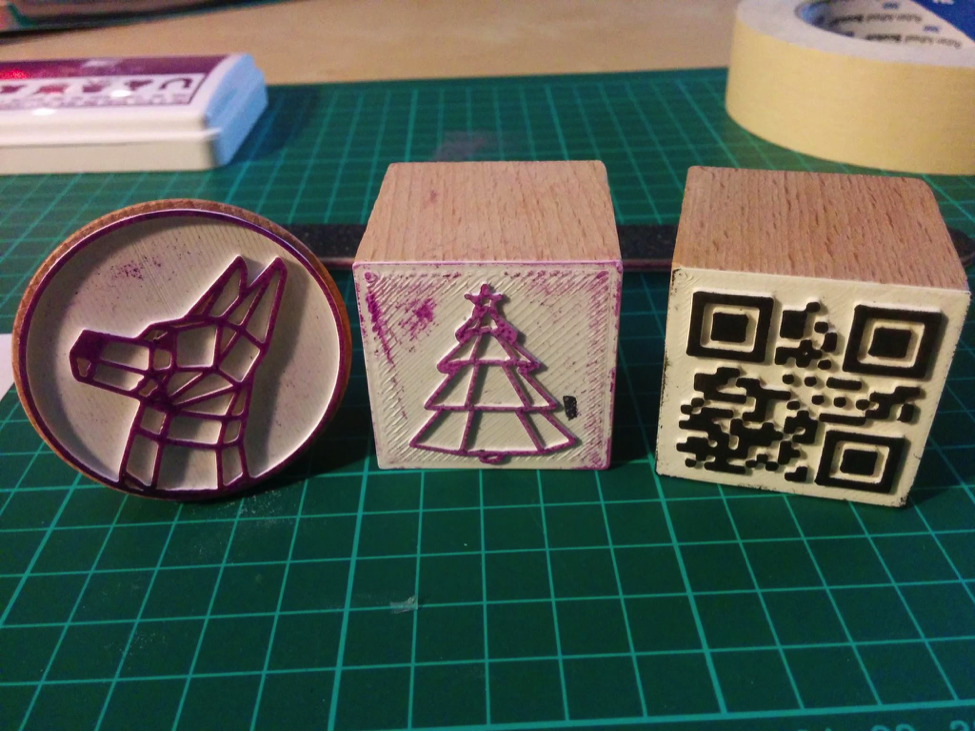
Peel off the tape and clean any remaining dust off the stamp. I chose to use the stamp to apply an image of itself to the back of the handle, so you can easily see the motif of the stamp if you have more than one.

15

Next, apply some superglue to the opposite side of the cube and attach the plate, making sure that the orientation fits the image we just stamped on the top. Apply pressure to the plate to make sure it sits as flat on the holder as possible and let the glue cure.

Untitled

Congratulations, you’ve made your own stamp! Apply some ink from an ink pad to it and try it out. Since the stamp itself is quite hard it helps to put something softer like a piece or cardboard or a cutting mat under the paper you’re stamping on.

The stamp also works great on cloth and other soft materials.

WHERE TO GO FROM HERE

Using this same technique you can create a number of different things, like stamps, embossing dies, and even printing plates using vector images. If you have access to a printing press you can use your own 3D printed printing plates to create custom postcards, greeting cards, beer coasters, and other artwork.

16

It’s a lot of fun to bring old technology like relief printing back to life using modern a technology like 3D printing and make them accessible to a wider audience. I hope you had fun with this tutorial and try your own variations of this technique.