In 1832, long before the invention of modern cinema, Belgian scientist Joseph Plateau created the illusion of a moving image through a series of revolving discs, a device which he called the Phenakistoscope. You can recreate this mystifying early form of animation at home with the help of a record player & a cameraphone.
Download one of the prepared phenakistoscopes and print it out. Cut along the dotted lines to prepare the disc for the turntable, including cutting the center hole for the spindle.
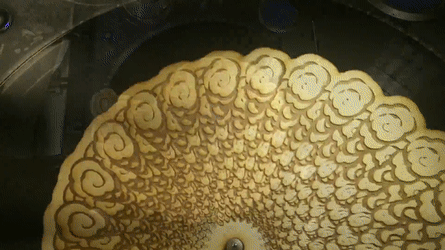
Place the disc on the turntable at the speed specified (for example, 78RPM for “Smokebomb”). Point a light at the disc; the brighter the light, the clearer the image will appear. Best results may even be achieved through the use of multiple light sources.
In order to see the animation on the disc, you need to trick your eyes into separating the moving images. Early versions used a series of slits or flashing lights, but it’s easier now to let the frame rate of a camera blend them together. View the rotating disc through a cameraphone (or any other camera with a digital display shooting at 30FPS) and watch the disc spring to life.
Phenakistoscopes trick your eyes by using the framerate of the camera to separate the layers of the spinning disc into discrete frames. By the time the camera display refreshes, the platter has rotated the next frame into position, and so it appears to show a steady animation effect.
Animation is a notoriously laborious medium, but the good news is that you only need 24 frames for a 78RPM phenakistoscope. Splitting a circle into a 24-cell polar grid shows you the framework of the animation, and the unusual shape of the cells caused by their narrowing towards the center. For this reason, strongly vertically-oriented subject matter tends to work best.
If you’re an analog illustrator supreme, you can print out that polar grid & draw in a frame-by-frame animation yourself. However, most people will appreciate the help of a computer program such as Adobe Illustrator to handle the warping. The first step is to establish a grid of frames, which can be done by using the Rectangular Grid Tool. 24″×4″ with 0 horizontal dividers and 24 vertical dividers does the trick, as 1″×4″ is about the practical size of a frame on these discs.
Next, you’ll want to start filling in the blanks with your artwork. For this example, we’ll use a series of cartoon clouds to create a billowing pillar of smoke. I work from the end first by piling up the cloud illustrations to fill the final frame.
Once the final frame is sorted, we copy the subject over to the first frame and rearrange the objects to fit the beginning of the animation. In this case, the clouds are arranged on top of each other at the bottom of the frame with some light rotation. Feel free to use your imagination for wilder effects & movement.
Now, to fill in the gaps, select the start & end objects in pairs & create a blend. (Object > Blend > Make) You will most likely have to dial in the spacing by going to Object > Blend > Blend Options, then setting the Spacing to “Specified Steps” of 22.
Blending will cover a lot of ground in the tweening process, but you may have to do some fine-tuning. Either way, the next step is expanding the blend (Object > Expand) to separate the steps into individual objects. At this point, you can ungroup & tweak the individual steps. Once you’re satisfied, convert the background to a transparency & drag the whole ensemble into the brushes palette to create a pattern brush. The default pattern brush settings should be fine.
Create a 6″ circle and select your new brush to see the fruits of your labor.
In the case of “Smokebomb”, the extra space behind the animation was filled in with copy/pasted duplicates of the design to flesh out the space. You may find similar ways to finish your animation.
Once you feel satisfied, create a .285” circle in the center of your disc (for the turntable spindle) and return to step 1 with your new custom phenakistoscope.
There are a number of fun little visual tricks that can be pulled with phenakistoscopes, such as setting up separate rings at different frame rates that appear to move forwards and backwards on the wheel or warping a filmstrip with polar coordinates. The medium can also be carried from print over to a laser cutter for the extra analog power of a wooden disc. No matter what, it should certainly give you an appreciation for the roundabout route that motion pictures have taken to achieve their current form & the bygone optical tools of the past.
Our websites use cookies to improve your browsing experience. Some of these are essential for the basic functionalities of our websites. In addition, we use third-party cookies to help us analyze and understand usage. These will be stored in your browser only with your consent and you have the option to opt-out. Your choice here will be recorded for all Make.co Websites.
Allow Non-Necessary Cookies
Escape to an island of imagination + innovation as Maker Faire Bay Area returns for its 15th iteration!
Buy Tickets today! SAVE 15% and lock-in your preferred date(s).