Those tired rice-paper shoji screens aren’t your only option for creating division within an open space. Inspired by the classic tabletop ant farm, this design is nearly all the fun of the living variety, plus you can sleep nights knowing there won’t be any escapees.

Project Steps

Using the miter box to make a 45 degree angle, cut 2 of the pine planks at 4+1/2′ lengths, and 2 at 3′ lengths (measurements given are from the longest mitered ends).

Lightly sand corners and edges of the cut ends.

From the tip of a 1/2″ drill bit, use masking tape to mark a length of 2″.

With a pencil, mark points on the long side of each of the 3′ sections, centered at a point 8″ from each end of the narrow edge.

Drill a hole at each of the marked points, using the 2″ marking on the drill bit as your stop guide.

Brush away sawdust from each piece.

Clamp 1 long frame board to a table, and then clamp the short frame board flush with 1 end, clamping across the joint and making sure that the corner is square.

Drill a 1/8″ hole through the edge of the short board and into the mitered end of the long board.

Unclamp the corner and apply glue to both faces, then re-clamp and screw the corner together using 2½” drywall screws.

Wipe off excess glue, repeat for the other 3 corners, and let the whole thing dry.

Remove 1 side of the protective plastic sheeting from 1 piece of plexiglass.

Lay the plexi on the floor, exposed side up, over newspaper.

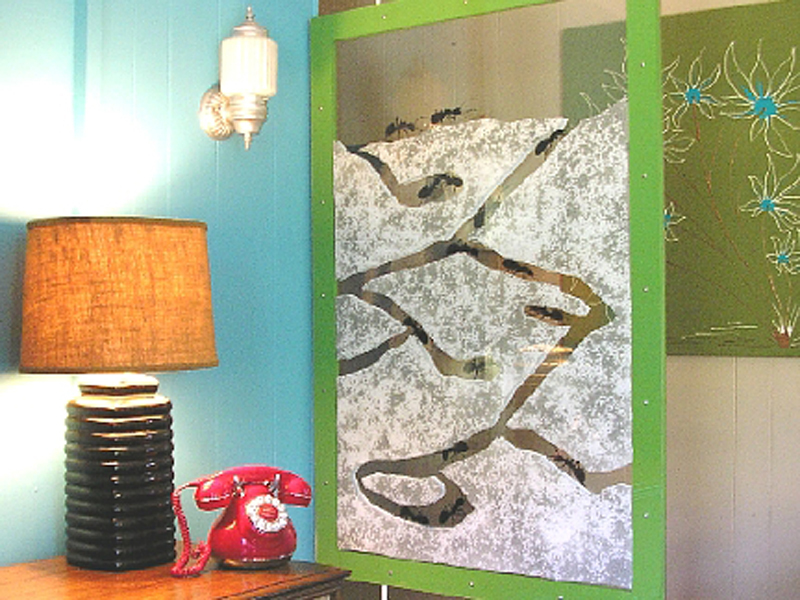
Start by creating a horizon line, about 14″ from the top edge of the 3′ end of the plexi.

To mask the horizon line and tunnels, tear the masking tape in half lengthwise, and working in sections, use only the torn edge for the template lines.

From the horizon line, create your network of tunnels, roughly 2″ in width, by either using this design as your guide, or creating your own.

Tape off one 2½” border along the 3 edges of the plexi below your horizon line.

NOTE: To cut plexiglass, score a deep line, using a straightedge. Sandwich the plexiglass between an straight board (like a 2X4) and a table with the scored line about 1/2″ away from the edge of the table, and clamp it in place. Put on your safety goggles. With even pressure and a quick downward motion, snap the plexiglass along the line.

With newspaper, cover everything above the horizon line.

In a well-ventilated area suitable for spray painting, place the sheet of plexi – masking-tape side up – over the newspaper.

Loosely sprinkle the aquarium gravel over the face of the plexiglass, making sure the gravel doesn’t clump or cover solidly.

With the granite finish spray paint, spray the entire prepped area, coating evenly and lightly (better to do 2 light coats than 1 heavy coat).

Dry completely, for at least 4 hours.

Carefully lift the plexi upright, allowing the gravel to fall to the newspaper.

Use a dry paintbrush or whisk broom (or your hand) to break loose any gravel that adhered to the paint.

Collect the gravel and reserve.

Brush the painted surface clean, and using the white spray paint, evenly coat the entire gravel-treated surface of the plexiglass to an even opacity.

Dry completely, then remove the masking tape.

Lay painted side down, onto the floor or a large work surface.

Take the second piece of plexiglass, remove the protective plastic sheeting from both sides (or only one, if the sheeting is clear), and place squarely on top of the first.

LIghtly tape the corners in place to keep pieces from moving.

Again, mask off the template for the horizon line, the network of tunnels, and the border, but this time using your first pattern as your guide, tracing through the plexi.

Once the template is complete, separate the plexiglass.

With the second one, place newspaper above the horizon line.

Cover the unmasked side with the reserved protective sheeting.

Repeat the same gravel/painting process as before.

Once the paint is dry, scan the ant silhouettes provided here to a maximum height just short of 2″(144 pixels).

Print. To get more ant action, flip the scans horizontally and print again, using mirrored images to give your ants more variety.

Lay a plexi sheet over the newspaper, painted side up, and position the printed ants underneath it, inside the tunnels and along the horizon. (Don’t overcrowd — it looks nicer if you allow ample space between ants.)

With the fine-tipped paintbrush, trace-paint over the ant template using black acrylic paint. Dry.

Repeat the process on the second sheet of plexi, placing ants in the vacant spaces left on the first sheet.

The purpose here is to give your ants three-dimensional appeal, without overlapping ant images on top of one another.

Allow to dry.

There are 2 pieces to the curtain rod: a narrow end that slides into a lager rod. Unscrew the narrow rod from the larger one and separate.

Unscrew the spring from the narrow rod and remove.

Measuring from the rubber-tipped end, cut larger rods down to 21″ with a fine carbon steel saw (your remaining piece will be around 5+1/2″ long, bearing 1 cut end and 1 finished end).

With wire cutters, cut each spring to 14″.

The narrow rods will have 1 rubber-tipped end and 1 unfinished end.

Note the dimple stamped into the unfinished end. This is used to guide the rod along the spring for adjustment, and we need to keep it.

Measuring from this end, cut each rod to 14″. Then take the rubber foot off of the finished end and put it onto the end you just cut.

Lay the framework on the floor. Working on 1 end of the framework, fill 1 of the drilled holes with hot glue, and insert the 21″ rod.

While the glue is setting, use a square and a level to establish a straight positioning of the leg. Repeat with other 21″ rod. This will be the bottom end of the divider.

Working on the opposite end of the framework, repeat the process with the 5+1/2″ lengths of the remaining larger rods, inserting the cut edges.

Once the glue has set, screw each spring, cut end first, into each of the 14″ narrow rods, leaving 2″ of the spring exposed.

Firmly slide each of these rods into top anchor rods.

From here, you will be able to screw down or unscrew the narrow rod — just as you would a curtain tension rod — to adjust and secure the divider to your desired ceiling height.

Lay one of the plexi panels, painted side down, over the framework and center it.

Make marks along the edge of the plexi at 9″ intervals, centered over the frame. These marks are where you will drill holes to attach the panels to the frame.

Take the panel off of the frame and drill a 3/16″ hole in the panel at each mark. Be careful not to press too hard while drilling to avoid cracking the plexiglass. Repeat with second panel.

Lightly wipe away dust and fingerprints from the painted sides of the plexi with a soft towel and glass cleaner, being careful not to affect painted areas.

Lay the framework over newspaper and secure each side of the plexiglass; space the screw/washers at 9″ along the top and sides of the framework.

Screw the panels onto the frame using the pan head screws and washers, making sure the panels are centered on the framework.

Now set up your divider in a spot where you can marvel at your farm while enjoying a new atmosphere.

Conclusion

This project first appeared in CRAFT Volume 01, page 86.