Snowboarding is a sport of blessed simplicity. One plank. Two edges. Clean lines. But the critical element is the clean lines. From ski-resort brochures to Warren Miller movies, all we ever see are untracked vistas populated by solitary riders who might have simply dropped out of the heavens.

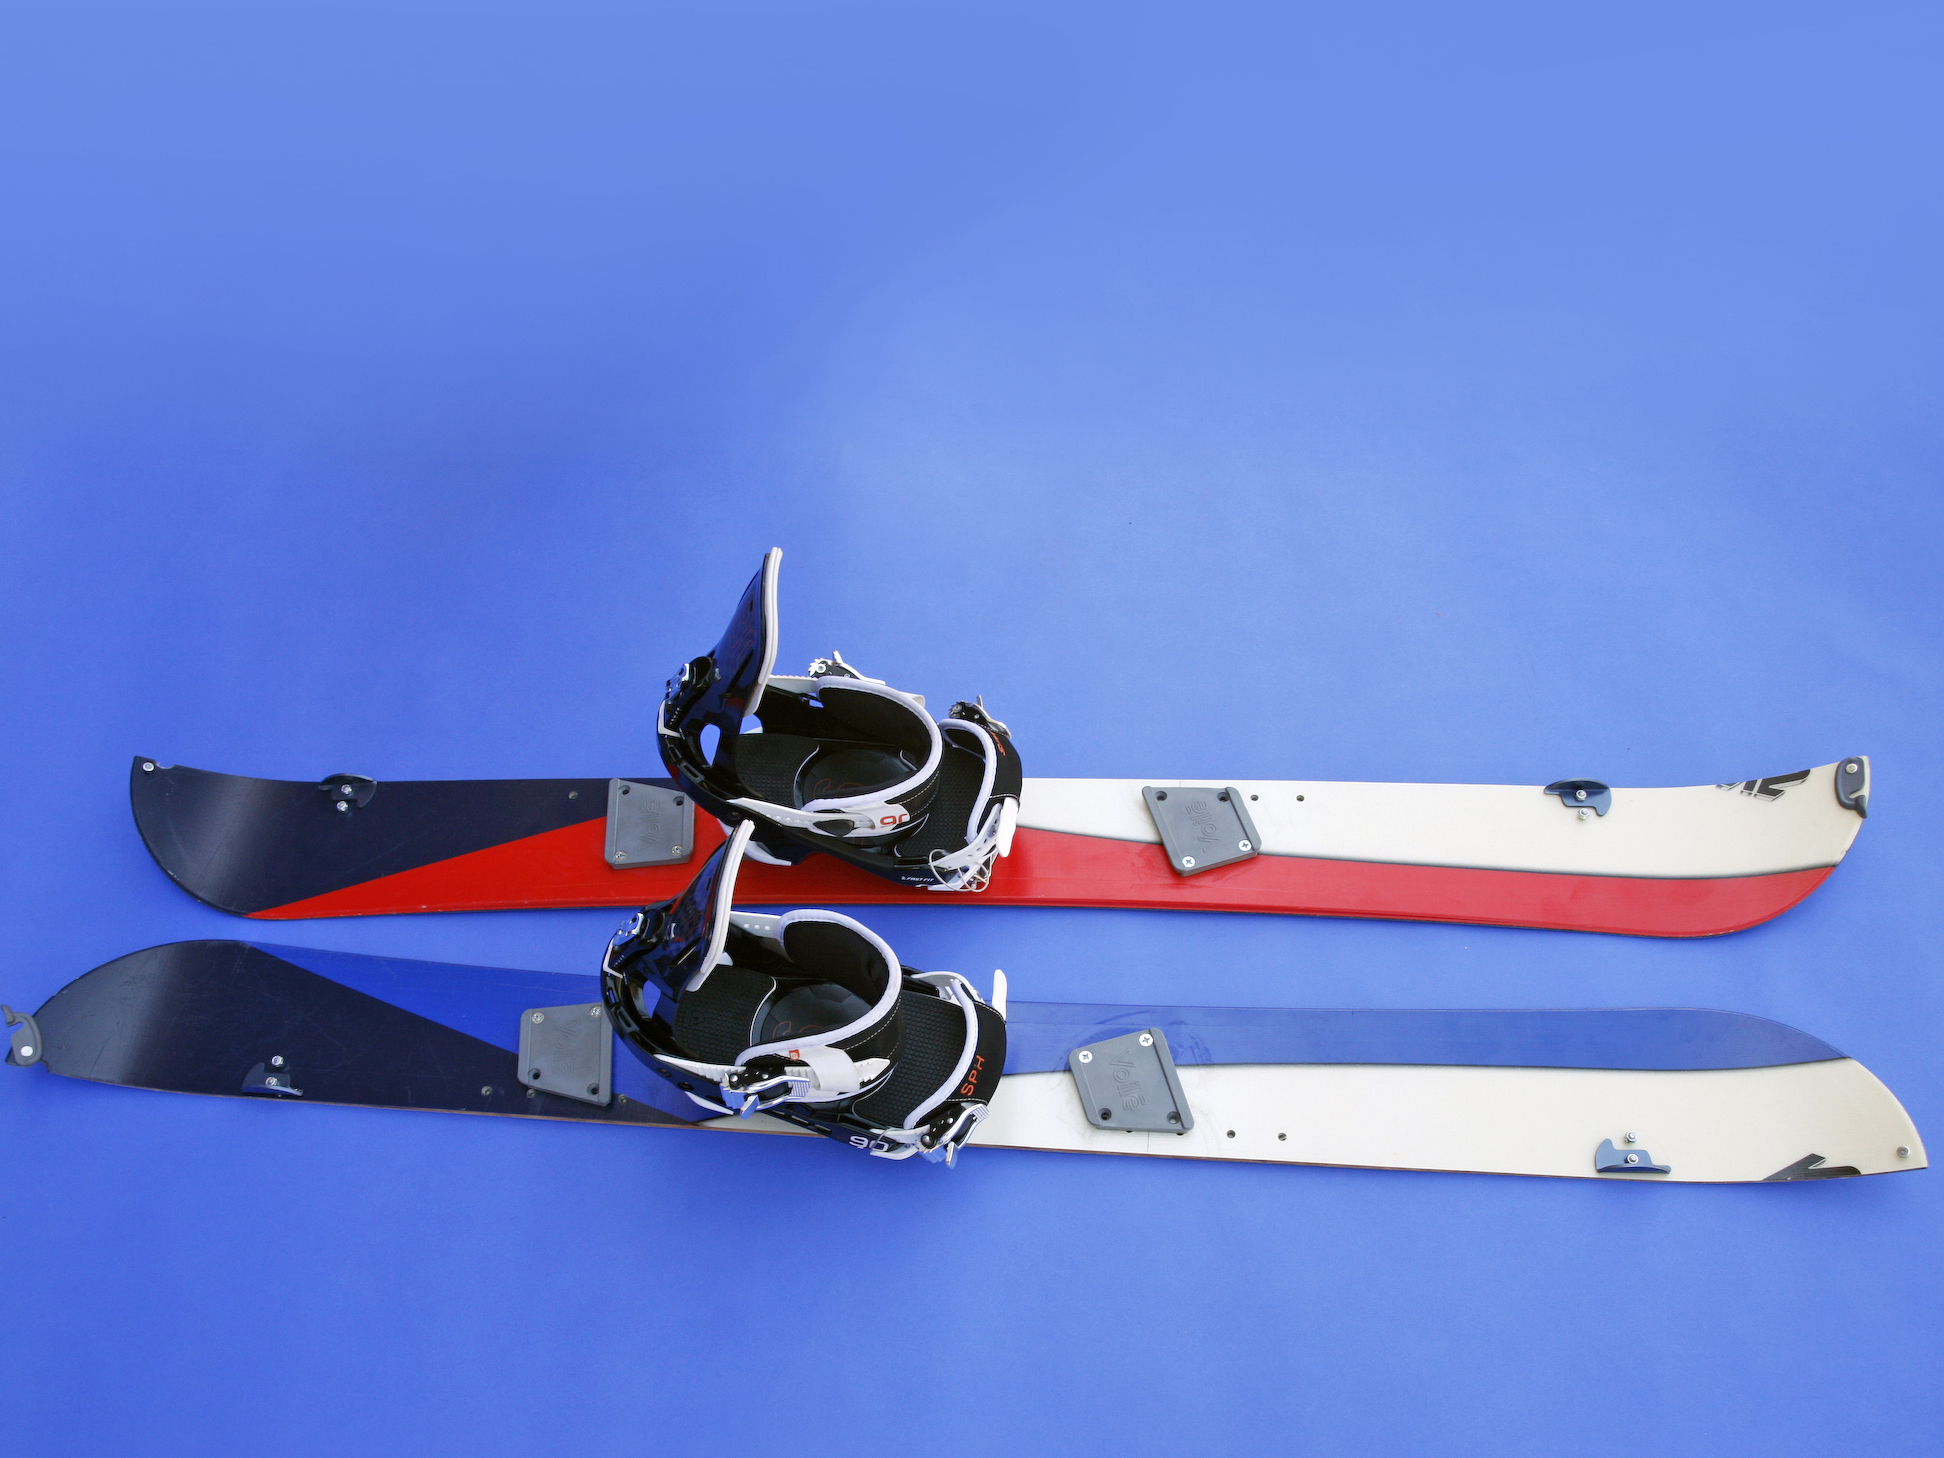
So how can you get to that untracked snow stash? Most ski resorts are surrounded by miles of wilderness, offering the same chutes, bowls, and tree glades, with none of the crowds. This is what we lovingly refer to as “the backcountry.” And to get there, you’ll want a splitboard — basically a snowboard that splits in two in order to function as a pair of touring skis. No more humping it up the hill with your board on your back while skiers push past you, snickering.

Factory-built splitboards are available, but they’re expensive ($600–$1,200 without bindings). If you have an extra board, a prefab kit is available from venerable telemark and splitboard maker Voilé. A number of specialized parts are available only from Voilé, so it’s easiest to just purchase the kit. Due to the tremendous abuse that snowboard equipment is subjected to, the connections and hardware must be very durable. Nothing spells trouble like damaged equipment deep in the backcountry.

WARNING: The consequences and risks of bodily harm, as well as avalanche danger, only increase as you move away from the patrolled boundaries of ski resorts and rescue personnel. Know your limits, get basic avalanche training (AIARE Level 1), and carry avalanche rescue equipment.

Project Steps

Make the jig and mount the board.

NOTE: If you really trust your skills with a circular saw, then go ahead and use one. However, cutting the board is easily the most critical step in this project, and there’s no good way to correct mistakes. For that reason, I chose to use a table saw and build a quick-and-dirty jig to keep the cut straight.

This step is critical. Using a ruler along the base of the snowboard, measure and mark the center in at least 6 places. Using your center marks, take a long straightedge and draw a line the full length of the base sheet.

Flip the board over and run a strip of masking tape down the center of the top sheet (eyeball it), to reduce splintering.

Cut the 1×10 to the full length of the board plus at least 8″ of overhang on both ends. Remove a rectangular section at each end that’s at least 11″ long and 7 1/2″ deep, to accommodate the nose and tail.

Clamp your 1×10 jig to the board, with its outside edge parallel to the centerline, and its inside edge roughly centered between the factory binding mounts. Mark the jig edge on the top sheet, and mark the locations of 2 factory mounts on the jig. Remove the jig and drill 2 holes at your marks, using a  1/4″ bit. Be accurate, as you’ll be using the outside of the jig against the saw guide.

Screw the jig in place using two M6x20mm screws.

Cut the snowboard and finish the inside edges.

Mount the thinnest blade you can on your table saw, to minimize the amount of material removed; I used a 7-1/4″ Skilsaw blade.

Place your snowboard, base-side down, on the saw table. Support it in place and adjust the blade height so it’ll cut through as much of the board as possible, except the metal edges.

Adjust the saw’s guide to align the blade with your centerline. Repeat at the other end of the board (“measure twice, cut once”).

Wear a filter mask, goggles, and gloves to make the cut. With moderate and constant pressure, place the jig against the table saw guide and push the board through. Move the board steadily through the cut and keep any readjustments to a minimum.

Cut the metal edges with a Dremel and 2″ cutoff wheel. Any remaining board core must be cut through with a hacksaw.

If you’re a stickler, you can mount steel edges into the seam of the cut for better edge performance in ski touring mode, but I chose not to — this is best left to the professionals.

Sand the edges until the seams are parallel and smooth, then clean the edges with a damp cloth and let dry. Mix a batch of epoxy and apply along the edge in a thin layer. Avoid a thick buildup, as it can make connecting the board halves difficult.

Let epoxy cure, then sand and repeat (3–5 coats).

Mount the pivoting board hooks.

To maintain alignment over the next few steps, precisely align the snowboard halves, and wrap packing tape around the width of the board in several places, and down the center seam.

With the base on a flat surface, locate and mark the 2 contact points at the nose and tail. From each point, move 1″ toward the center (lengthwise) and mark the top sheet.

On the top sheet, position the alignment sticker for the pivoting board hooks (aka “Chinese hooks”) at your marks and center it along the seam. Center-punch or drill 1/8″ starter holes for accuracy, then drill 4 holes with the 3/16″ bit. Clean excess top sheet material with a razor, and wear gloves to protect yourself from the fiberglass.

Flip the board over and countersink the holes about 3mm deep with a 1/2″ bit, to keep the screw heads flush with your base. Clean up excess base material with a razor.

Remove the sticker from the top sheet and mount the hooks on your screws. The bushings go on the open section of the hook. Tighten the locking nuts down with an 8mm wrench and hex tool — the hooks should swing, but not loosely.

Mount the touring bracket.

Place the touring brackets, climbing blocks, and all associated hardware in approximate positions on the top sheet to find an accurate position of the balance point of the board (the extra weight will affect this). Locate the balance point by placing the board on a single Toko bracket or some other fulcrum. Mark this point on the top sheet. Various sources recommend placing the pivot point  1/4″ to 1″ forward of the actual balance point. This will make the tails drop quicker, thus increasing efficiency in your stride and kick turns.

Align the paper template with your mark and tape it down. Center-punch or drill 1/8″ starter holes, 3 for each bracket, front hole first. Then drill them with a  1/4″ bit and remove excess material with a razor. Flip the board over and use a 3/4″ wood bit to remove the base material — at least 3mm deep. The T-nuts must be sunk into the wood core, and must sit below the surface of the base material. Remove excess with a razor.

Mix more epoxy and apply a healthy glop to each hole in your base. Place M6x12mm T-nuts (with teeth) into the holes and use a heavy-duty clamp to seat them. Repeat for each hole. Place the board on a hard surface, top sheet down, and fully set the T-nuts into the core. This involves a hammer and a sacrificial 13mm socket to do properly. Oh, and a lot of noise. I also recommend a second set of hands to hold the boards in place.

NOTE: You may want to drill all your holes at the same time, to minimize the episodes of epoxy and loud hammering. If so, skip ahead and drill holes for the climbing block and bindings. If not, you must let the epoxy cure before doing any further drilling.

Slice off the top part of the template, leaving the climbing block section in place for later (unless you’ve drilled all the holes at once). Clean the top sheet with the base cleaner and mount the touring bracket using a drill with a large Phillips screwdriver bit. Flip the board over, remove excess epoxy from the connections, and wipe the base clean. Let the epoxy cure. Repeat for the other bracket.

Mount the climbing block.

Following the template, drill the marked holes using a 7/32″ bit (this is smaller than for the other hardware). Remove excess top sheet with a razor and flip the board over. Countersink with the 3/4″ wood bit and remove excess material.

Set and epoxy the 10-32 T-nuts, as you did for the touring bracket.

The climbing blocks have 3 parts: the shim, the block, and the climbing bar. The shim should be facing the tail of the board; the climbing bar fits into the block and should flip down facing the nose. Clean the top sheet and screw the accompanying hardware into place with 10-32 x 1/2″ hex screws.

Mount the binding pucks and bindings.

Placing the alignment stickers is important, since the blocks provided with the kit don’t allow adjustment once they’re set. Based on your preferred stance width, find the center of each of the binding positions. Mark the center and note the angle of your bindings.

Remove any packing tape and place the stickers on your marked stance center. Use the appropriate stickers for your stance (goofy vs. regular). Carefully angle the stickers to approximate your binding angles, and avoid wrinkles.

NOTE: Minimum stance width is 18″. Make sure the stance angle of your rear binding doesn’t come too close to the climbing block (maximum 25°), or it will interfere with getting the slider track off and on. Make sure there’s enough room to unclip the pin at the front of the tracks before drilling.

Drill the holes for M6x12mm T-nuts (not the Pozidriv screws supplied with the kit). Make sure you use the appropriate size of wood bit.

NOTE: Here we depart from the kit instructions. Given the terrific forces placed on these binding mounts, and my general paranoia about gear failures in the field, I chose to mount T-nuts through the base just like the touring bracket rather than use the Pozidriv screws provided. But M612mm T-nuts are not widely available. I recommend purchasing them directly from Voilé (they don’t offer them online, so you have to phone). There are more widely available T-nuts (M4x6mm or  1/4″ or 1/2″ standard), but these have a shorter collar or a smaller base.

When drilling, you’ll probably run into the factory T-nuts for the bindings. If you’re lucky, you can use one of these to mount your pucks. But if not, make sure to avoid drilling too close to them and hitting the nut. I simply avoided the hole closest to these and drilled only 3 holes per puck (6 per binding). Using the  1/4″ bit, drill through the board and clean any excess material. Remove the stickers.

Set and epoxy the T-nuts as you did previously.

The kit comes with 2 sets of pucks (called Nylon Track Location Blocks in the instructions): goofy, and regular. The only way you can tell them apart is the tiny “R” molded in the bottom of the regular pucks. Using a Phillips bit, screw the appropriate pucks into place. Slide the metal binding mount on them to ensure that they’re parallel across the center seam.

Mounting the bindings is the easy part. The rubber gasket goes between the binding and the aluminum mount; if your binding has good dampeners in the base, you can leave this out.

Mount the locking T-nuts through the bottom of the binding mount (the open end is the front) and screw the binding on tight. The screws may need to be cut down to prevent interference with the pucks. Make sure the bindings’ toe edges don’t extend beyond the front of the mount, as this will affect the touring performance.

Slide the pin through the hole in the front of the binding mount and girth-hitch the cable to the binding. The pin should be easily removable from the mount. For snowboard mode, slide the mount over the pucks. For best performance in touring mode, switch the board halves around so the straight edge faces the outside.

Remove the binding and binding mount and slide the pin through the holes in the touring bracket. Make sure the binding buckles face the outside of your “skis.”

NOTE: You’ll need to buy a set of skins for touring. For steep or icy terrain, there is also a set of crampons that mounts to the binding plate.

Mount the tip clips.

Remove the packing tape at the board tips, and place the tip clip alignment stickers. Ignore the rounded dashed line, and place the stickers so the clips will be flush with the tips of the board (nose and tail) and centered on your seam. Center-punch the marks and drill holes with a 3/16″ bit, at as close to a 90° angle as you can get. It helps to use a drill block.

Now, flip the board over and countersink the base about 2mm.

Install the rivets, with the head on the top sheet, and the bushing in the slotted side of the clip. Flip the board and, using a thin metal rod (the binding pin is the perfect size, but be careful not to bend it), lightly hammer the rivet to pre-flare it.

Place a metal block on your work surface and hammer the head of the rivet until the rivet is set into the countersink. If possible, have a partner help you to angle the board so you’re striking the rivet at an appropriate angle. Test the connection: the clip should be tight, but able to rotate.

Repair the base.

Remove the packing tape holding the board together and pull it apart. It’s easier to work on one half at a time. You still have a Swiss-cheese base, so you’ll have to do some significant repair work. The key to successful base repair is essentially patience and lots of shaving. Normal polyethylene P-tex repair string and candles do not bind to metal, so you’ll have to use a graphite-infused P-tex repair material, like Metal Grip, to bind to your T-nuts.

Cut a 6″–12″ piece of repair string and place it close to your hole. Using the base repair iron, heat up the P-tex and glop it into the hole, slowly mixing it in with the flat edge of the iron to remove any air bubbles. Build up P-tex to fully fill in the hole, and extend it a bit over the rim. Let it cool to the same temperature as the rest of your base (15–30 minutes). Repeat for the rest of the holes.

Using the Surform, file down the P-tex blobs roughly level with the base, taking care to avoid grabbing any of the excess and yanking out your plugs (the planing heats them up and can weaken the bond). I used a razor to trim back any large bits outside my plugs. Try to plane in the same direction as the base of the board — lengthwise.

Once you’ve roughly leveled the plugs, use a metal scraper/burnisher to further smooth them. Ideally, the plug will feel seamless where it meets the base. Alternate with the scraper, a base brush, and a fine Scotch-Brite scouring pad to smooth the base as much as possible. Although time-consuming, this helps prevent the plugs from ripping out when you remove the skins, and it eliminates drag for better downhill performance.

Tune and wax the board.

Numerous online tutorials offer tips and tricks on how to improve your board performance. The best ones I’ve come across are on http://www.tognar.com.

For more about splitboards and the freaks who ride them, check out http://www.splitboard.com.

Conclusion

This project first appeared in MAKE Volume 20, page 129.