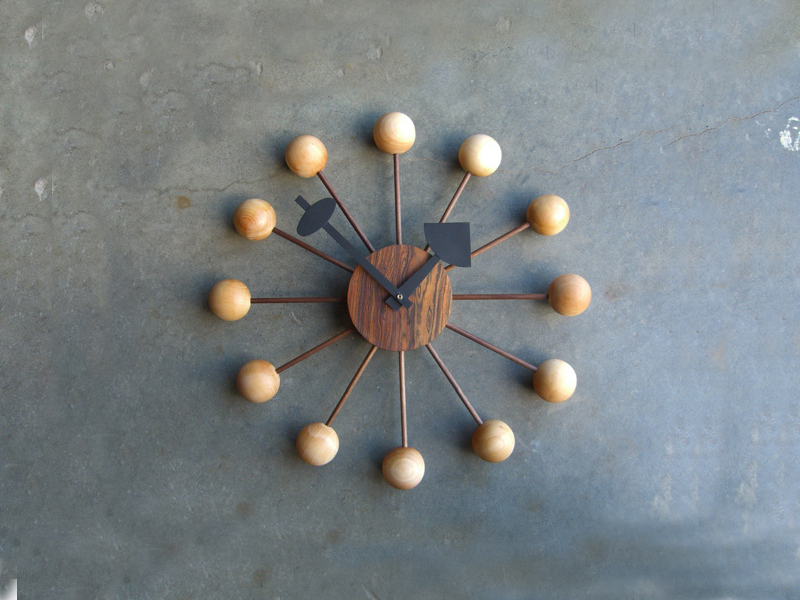
The George Nelson ball clock is a neat little slice of mid-century art and architecture, but with the current licensed reproduction selling for around $265, I decided that if I were going to have one, it would have to be an unofficial version.

I made my first ball clock as an exercise in learning how to use a MIG welder, and ended up with a double-sized, welded-steel version of the clock. I was excited when asked to write this how-to piece, but realizing that most people probably don’t have access to welding equipment, I decided to create a new ball clock that could be put together with all wood parts and assembled Tinkertoy style.

Conveniently, I found that I was able to gather up all the supplies for the clock with a single stop at a Rockler woodworking store, or a session on their website (http://rockler.com).

Project Steps

Shape the central hub.

Use a compass to mark a 4½” circle onto the wood block. Use a jigsaw or band saw to cut out the circle. You should make radial “relief” cuts before cutting out the circle; this will prevent the blade from binding and burning the wood, and allow it to turn a tight corner. Next, use a belt or disc sander to remove any cutting marks, square up the hub, and make it smooth and round.

Drill the holes.

Drilling the holes for the radial spokes is the most critical part of this project. If the holes aren’t all on the same plane and drilled directly toward the center of the hub, the clock will look catawampus.

First, drill a 1⁄4″ hole through the center of the clock. Next, scribe a line all the way around the outside of the hub, centered edge-to-edge. Using a protractor, make a mark every 30 degrees around the face, to make 12 evenly spaced marks. Transfer these marks down to intersect the line, and mark for drilling. Use a drill press to drill each radial hole 1½” deep, aligning the drill directly toward the center hole.

Prepare spokes and balls.

While you’ve got the 1⁄4″ drill bit in the chuck, drill a 1″ deep hole in each of the 2″ wooden balls. Typically, there will be a little flat spot on one side of each ball; this makes a great spot to drill the hole. Take care to drill straight into the center of the ball.

Next, use a fine-toothed saw to cut the 1⁄4″ hardwood dowels into twelve 12″ lengths. Lightly sand the cut ends of each spoke.

If you prefer to stay truer to the original design, you can make the spokes from 1⁄4″ brass tubing, available at hardware and hobby supply stores.

Cut the clock movement recess.

Remove the locking nut and washers from the movement and insert the center shaft into the hole in your wooden clock hub.

With a pencil, trace around the movement’s case onto the hub. Draw the outline of the movement 1⁄4″ or so larger than it needs to be, to make fitting the movement easier. I used a router with a straight-cutting bit to excavate the recess for the clock movement, but you could also use a drill with a Forstner bit, and then square up the corners with a wood chisel. Cut the recess to a depth of 1¼”, which will leave you with a 3⁄4″ floor. Test-fit the movement to make sure that there is enough shaft exposed to thread on the lock nut. Deepen the recess if necessary.

Make the hands.

To recreate the whimsical, oversized hands of the original Nelson clock, I started with a handset that was specifically made to work with the movement that I was using, and then augmented the stock hands with some oversized cutouts.

Balsa wood or thin sheet metal are ideal choices for a hand material, because they are thin, light- weight, and fairly rigid. The finished hands need to be light, or the somewhat anemic quartz movement won’t be able to swing them around the clock dial. I cut the oval, triangle, and rectangle shapes for my new hands from a scrap piece of light-gauge aluminum dryer duct that I had lying around the shop. Mix up some epoxy, and cement the new hands in place over the old hands of the clock. Use something heavy to press the hands flat while the cement dries, and use waxed paper to keep the cement from sticking to your work surface. Once the glue dries, use an X-Acto knife to reopen the holes where the hands mount onto the center shaft of the movement.

Paint the hands with a few light coats of flat black spray paint. Flat black will help hide any imperfections in thin sheet-metal hands. If you make your hands from balsa wood, lightly sand the top surfaces with 400-grit sandpaper between coats of paint.

Finish and assemble.

Sand all wood parts with 220-grit, then 400-grit sandpaper. I made my clock body from a beautiful Mexican hardwood called bocote, which has a really nice natural color and figure, so I chose to finish the wood with a simple oil finish. I was happy with the color of the walnut spokes, so they received a coat of oil and wax too. If you plan to use a stain, varnish, or polyurethane topcoat on any of your wood components, apply it now. I gave the maple balls two coats of clear, non-yellowing acrylic lacquer.

Put a small amount of wood glue on the ends of the dowels before inserting them into the balls. Then press each ball/spoke pair into a hole in the hub, again using a small drop of wood glue.

Install the clock movement, securing it with its locknut. Install the hands, and thread on the little nut that holds them in place. Check that the hands don’t interfere with each other as they move, bending them slightly to make adjustments if necessary.

I was able to mount my clock by simply hanging it on a nail, using the clock movement recess itself as a hanger, but if you want a more secure mounting, you could add one of those sawtooth picture hangers to the back of the clock. Or, drill a 1⁄4″ hole in the back of the clock hub to use as a mounting point.

Now you’ve got what is, in my opinion, better than an original Nelson clock. Not only does it have an accurate quartz movement that doesn’t need a plug, but you get to fine-tune the size and finish to suit your needs.

Meanwhile, back at the ranch, you’ve got the perfect clock for that timeless spot.

Conclusion

This project first appeared in CRAFT Volume 01, pages 135-137.