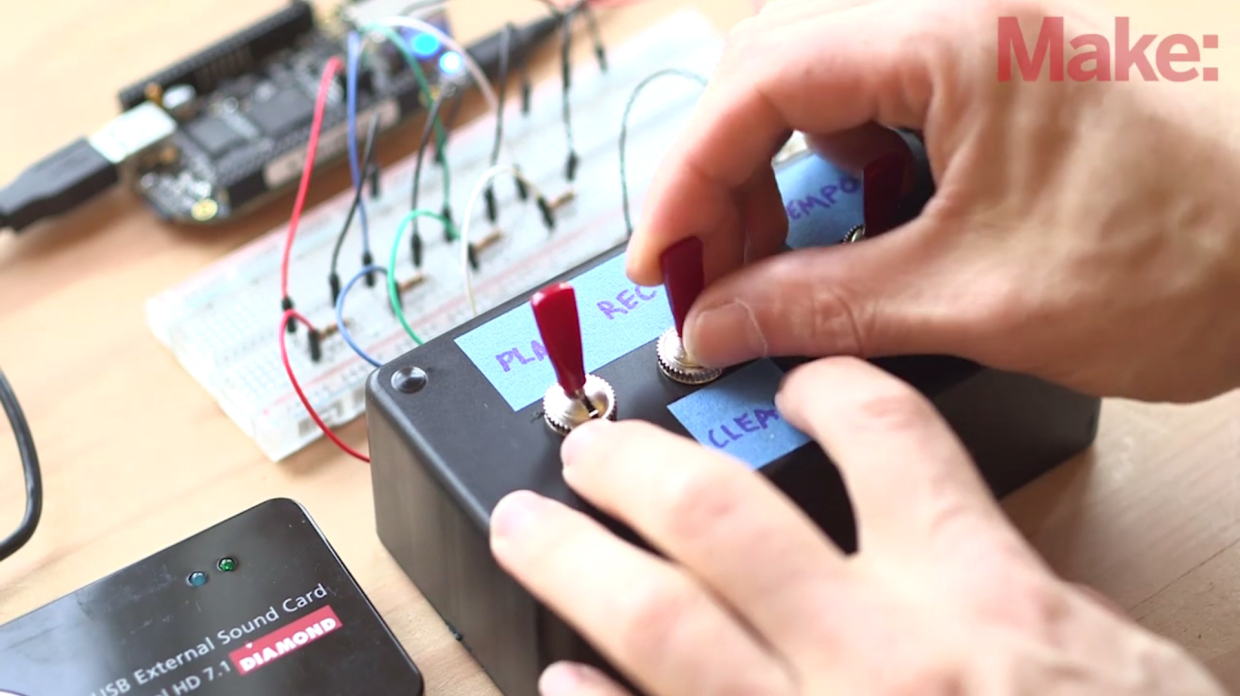
Many artists will use looping stations to slowly build up an entire song in real-time as they play, recording one track at a time. There are plenty of great examples of this on YouTube. This project will show you how to use a BeagleBone Black, sound card, Python, and Pure Data to build an audio looping station for use with instruments. This looping station will allow you to build a loop, alter tempo, and adjust the loop as it plays. You’ll also lay the groundwork for building very complex synthesizers and effects pedals using the BeagleBone and Pure Data.

wp20_bbal-hero2

Pure Data (Pd for short) is the programming language that the looping software is created with. It’s a visual programming language that is representative of the wiring of early synthesizers. Software written in Pure Data are called patches. This project started with an existing patch but was modified to fit the new control scheme you will build for the BeagleBone. The patch was modified to remove extra features and enable it to speak to other devices on the network.

Pure Data is also the base software that you would use to create, edit, and debug patches in its graphical user interface, or GUI. You’ll also download Pd-extended, which adds some additional functionality to Pd that the looping software will use. Presently, Pd-extended doesn’t work well with ALSA sound drivers on the BeagleBone, so you’ll switch over to using another sound server.

NOTE: There have been a few revisions of the BeagleBone Black since its initial release. If you have the recently updated revision C board, you can skip to Step 3 to install the software directly onto the onboard flash memory (eMMC). The revision of your BeagleBone Black is indicated next to the barcode on the sticker on the side of the board.

A sticker should be located on the side of one of the banks of expansion headers. The designation at the end indicates the revision board you have.

What will the next generation of Make: look like? We’re inviting you to shape the future by investing in Make:. By becoming an investor, you help decide what’s next. The future of Make: is in your hands. Learn More.

Project Steps

Prep BeagleBone Black Disk Image

NOTE: If your BeagleBone Black is a revision C board, skip to step 3 to install Pd directly onto the eMMC.

For pre-revision C boards, there’s not enough space in the onboard flash memory (eMMC) for all the software required by this project, so you’ll have to boot from the microSD card. Windows OS users go here and Mac OSX users go here, and follow the necessary instructions for creating a Debian SD card — be sure to proceed “without flashing the eMMC” per those instructions. In other words, you want to install Debian onto the microSD card.

With the microSD card inserted and your BeagleBone connected to the network, power it up.

Log in to the BeagleBone using:

ssh -X root@beaglebone.local

It will not require a password.

NOTE: If beaglebone.local doesn’t work, you can connect using its IP address instead. There are a few ways to get your BeagleBone’s IP address:

  • With a keyboard and monitor connected to the BeagleBone, execute ifconfig. The IP address will be listed next to inet addr in the eth0 section.
  • Or check your router’s admin panel for a section called “DHCP Clients,” which should list all the connected devices and their IP address. Look for a device with the hostname “beaglebone.”

Resize Storage

You need to expand the filesystem to take up all the free space on the microSD card since Pure Data and other software will need more space than is provided in the default 2GB Debian image. To change the partition table on the BeagleBone, run fdisk from the command line:

fdisk /dev/mmcblk0

WARNING: Using fdisk improperly could cause data loss. Don’t try this on an installation that has any important work in case there’s a problem.

At the fdisk prompt, press d to delete a partition and then 2 to select the second partition.

At the fdisk prompt, press n to add a new partition and then p to select primary. Then type 2 to add partition number 2. Use default values after that.

Still at the fdisk prompt, press w to write the new table. This updates the partition table of the running operating system and sizes it to match the size of the entire microSD card.

Reboot immediately by executing:

shutdown -r now

After the BeagleBone reboots, reconnect to it from your computer’s command line:

ssh -X root@beaglebone.local

From the BeagleBone’s command line, issue the command:

resize2fs /dev/mmcblk0p2

After this completes, the disk image will now fill the newly expanded partition table of the card.

One more reboot:

shutdown -r now

After logging into the BeagleBone again, confirm that the drive is larger by issuing

df -h

and observing the file system size of rootfs. It may look something like this:

Filesystem Size Used Avail Use% Mounted on

rootfs 7.2G 1.8G 5.2G 26% /

Install Pure Data and Project Files

To add the repository for Pd-extended, you’ll need to edit the apt package manager’s sources list. From the BeagleBone’s command line, open the file in the text editor nano:

nano /etc/apt/sources.list

At the end of the file, add:

deb http://apt.puredata.info/releases wheezy main

Type Ctrl-O to write the file, keeping the existing file name and then Ctrl-X to exit nano.

Update the date and time on the BeagleBone:

sudo ntpdate pool.ntp.org

Update the apt repository listing and install Pure Data, Pure Data Extended, and a few extra Python tools:

apt-get update

apt-get install puredata pd-extended build-essential python-dev python-pip -y --force-yes

NOTE: If prompted about unverified packages, accept. This is caused by the Pd-extended repository that does not have a signature installed to verify against.

Install the Adafruit BeagleBone GPIO library:

sudo pip install Adafruit_BBIO

Download the project code with the following commands:

cd /root

wget www.novaslp.net/download/looper/pyBeagleToPD.py

wget www.novaslp.net/download/looper/GuitarExtended-looper.pd

wget www.novaslp.net/download/looper/GuitarExtended-looperBeagle.pd

wget www.novaslp.net/download/looper/startup.sh

Set up USB Sound Card

The BeagleBone Black has an HDMI video port, which includes sound. This sound device gets preference in the ALSA audio driver configuration. You’ll change it so the HDMI port and HDMI audio are disabled. This gives preference to the USB sound card when booted with it. To do this, first edit uEnv.txt:

cd /boot/uboot

nano uEnv.txt

Uncomment the line after the DISABLE HDMI comment by removing the # sign before it. It should look like this:

optargs=capemgr.disable_partno=BB-BONELT-HDMI,BB-BONELT-HDMIN

WARNING: Make sure you do not uncomment the line that disables both the HDMI and eMMC.

Save (Ctrl-O and then enter) and exit (Ctrl-X).

Next tell ALSA that it is OK to use a USB audio device as a primary sound card.

nano /etc/modprobe.d/alsa-base.conf

You’ll see a line that has a comment of “Keep snd-usb-audio from being loaded as the first soundcard.” On the following line change index=-2 to index=-1.

Save the configuration file (Ctrl-O and then enter) and exit nano (Ctrl-X).

Plug in the sound card via USB and reboot.

NOTE: The BeagleBone is super picky about power supply. If the supply drops below 4.9v, the board disables the USB devices. A reboot brings them back. I find it useful to plug in all devices that I plan to use before powering up. Alternatively you can run the sound card off a powered USB hub.

When it finishes rebooting, the sound card power light should light up. It will flash when the card is in use.

Plug in a microphone and headset to the sound card for testing purposes. You can plug in your instrument to the MIC input and amplifier to the headphone port if you like.

Now test that ALSA is choosing the USB sound card as the primary audio device. From the command line, execute

alsamixer

If the top left corner says “Card: USB Sound Device,” you’ll know that the USB audio card is properly set as the primary device.

NOTE: You can use alsamixer to adjust sound input and output levels. If while playing your loops, you would like to hear what you are actively playing, on the playback tab, you will need to enable the microphone.

Press escape to exit alsamixer. You can save the alsamixer levels with the command:

alsactl store

Try to record a sound via the microphone input. The following command records for 5 seconds at DAT quality.

arecord -vv -fdat -d5 test.wav

To play back the recorded sound use the play command:

aplay test.wav

Confirm you can hear sound. If not, adjust volume of the input and output devices using alsamixer. I find 50% on recording and 50% on playback levels works well.

Build Control Enclosure

Unbag the three center off DPDT switches. The mounting hole is listed as 12.2mm but most people won’t have a drill bit that size. A half inch bit is a decent approximation if your drill press has little run out (slightly too big).

First mark the project box for drilling the three mounting holes. I used a center punch to do this.

Drill one hole and test fit a switch. If it works, drill the other two holes. You can remove any plastic that builds up around the holes by lightly sanding around the edge. The first switch will control if the loop is playing or not. The second switch will control if the loop is recording, in a neutral state, or is being cleared. The third switch will be used to set tempo or timing of the loop.

Once all switches are mounted and fit nicely, remove them to make it easier to solder the connection wires to them. Consider labeling your switches for easier reference. I used blue painters tape to make temporary labels.

Wire Controls

Take two lengths of wire and solder them onto the first switch. I used black to denote the central common pin and blue to denote a play state. By using hookup wire, it makes it easy to plug the other ends right into the breadboard.

The second switch gets three wires. The center is black, the clear function is white and green is record. Note that when the switch is flipped the pins connected are actually on the opposite side.

The third switch gets two wires. The center is black and one of the top pins is red.

Wire Controls to BeagleBone

Mount the switches in the project box. With a nibbler, cut a small hole for the wires to pass through the top of the box. If you have a big enough project box, you can mount the BeagleBone inside the box with the controls.

With the BeagleBone disconnected and powered down, connect the top pin of header P8 (near the Ethernet port, either left or right works) to the ground rail on a breadboard. Run 4 wires from ground to different rows on the board.

NOTE: This BeagleBone pinout diagram may come in handy for the next few steps: stuffwemade.net/post/beaglebone-pinout

Connect a 1K ohm resistor to each newly grounded row and the resistor’s other end in a free row. To each of those 4 free ends, connect one of the function wires from the project box (blue, green, red, white). These resistors will act as pull-down resistors, which connect the signal pin to ground when it’s not connected to 3.3 volts through the switch.

Using the second pin from the top (by the power jack) on header P9, attach a red wire and connect it to the positive rail on the breadboard. This pin carries 3.3 volts when the BeagleBone is powered on. When the switches are enabled, 3.3 volts will be passed to the signal pin for the specific function the user is enabling. From this newly powered 3.3 volt rail, connect the three black wires coming from the control box.

Place the wires that will connect the BeagleBone signal pins to the breadboard. One side of each wire connects to the free end of each of the resistors. The other side of the wire connects to the following pins on the BeagleBone:

  • P8.11 (GPIO1_13) – Blue – Play
  • P8.12 (GPIO1_12) – Green – Record Loop
  • P8.16 (GPIO1_14) – White – Clear Loop
  • P8.15 (GPIO1_15) – Red – Timing

Now connect the wires from the control box to the same row on the breadboard where you connected the wires from the BeagleBone. Your board should now look something like what is shown in the final photo.

Enable Controls in Linux

Power up the BeagleBone and connect via SSH:

ssh -X root@beaglebone.local

Using page 84 of this manual: github.com/CircuitCo/BeagleBone-Black/blob/master/BBB_SRM.pdf?raw=true, you can figure out the signal pin number that is used within Linux:

  • P8.11 (GPIO1_13) is Linux GPIO signal 45
  • P8.12 (GPIO1_12) is Linux GPIO signal 44
  • P8.16 (GPIO1_14) is Linux GPIO signal 46
  • P8.15 (GPIO1_15) is Linux GPIO signal 47

(To figure this out on your own: When looking at a signal labeled GPIO1_13, multiply the first number by 32 and add the second number.)

Export these pins which will allow you to verify that your wiring works and allows the Python program to poll the switch states.

cd /sys/class/gpio

ls

echo 44 >export

echo 45 >export

echo 46 >export

echo 47 >export

ls

After the second ls is run, verify that 3 new directories have appeared. They should be named gpio44, gpio45, gpio46, and gpio47.

The exported pins’ values can be shown by executing:

more /sys/kernel/debug/gpio

You should see that GPIO 44, 45, 46 and 47 all show direction of “in” and value of “lo” with the switches set to neutral/off. If they don’t, restart the BeagleBone and try again.

Once all show “in” and “lo” toggle a switch and again run:

more /sys/kernel/debug/gpio

Do this for multiple pins and verify each shows properly a value of “hi” when they are enabled.

Set up Pure Data Looping Software

Try running Pd:

pd -oss &

The Pd client window should pop up on your computer as long as you connected via SSH with the -X option.

NOTE: Pd is an X Window program. In order to display X Window programs from the BeagleBone on your computer, you need to use X forwarding. On Linux and Mac, always use the -X flag when using SSH. If you’re using a Mac, you may need to install XQuartz from xquartz.macosforge.org/landing/. On Windows, consider installing XMing from: sourceforge.net/projects/xming/

NOTE: With Pd-extended installed, the way to start pure-data in vanilla mode has changed slightly. The following are the commands to start various instances of Pd:

puredata will run puredata-vanilla. pd or pd-extended will run puredata-extended.

NOTE: Pd-extended has a problem with ALSA on ARM. To work around this, tell Pd to use OSS instead with the -oss command line option.

To test the sound within Pd, select “Test Audio and MIDI” in the Media pull-down menu. In the window that pops up, first switch test tones to 80. Do you hear sound? If not, check your sound levels again in alsamixer. In the same window, click monitor-inputs. Can you hear the sound you make in your speakers/headset? You should also see the level indicators for audio input moving.

Close the audio test window and load the looper patch by clicking File → Open and navigate to /root/GuitarExtended-Looper.pd This patch is originally posted and documented here: guitarextended.wordpress.com/2013/08/05/making-a-looper-with-pure-data/.

To try the BeagleBone Audio Looper out:

  • Clear the sound by clicking the clear box.
  • Set the tempo by pressing the Tempo bang (radio button) two times. This sets the tempo by measuring the length between the two presses. Your loop will be 4x this length.
  • Record a sound by clicking the record box.
  • Turn loop on/off by clicking the sound box.

In this video, you can see my own experimentation with this Pd patch: youtube.com/watch?v=wLswV18sRho

Now load the modified Pd patch called GuitarExtended-LooperBeagle.pd. This version was modified to take input commands from the BeagleBone’s GPIO pins instead of the checkboxes within the GUI. It also adds networking support and removes some of the functions that don’t map to the control setup.

Now test it out with the switches. To do this, execute the downloaded Python script from the command line. This will read the state of the switches and pass that information onto Pd:

python pyBeagleToPD.py

Loop Sounds!

Now it’s time to play with the BeagleBone Audio Looper! Toggle the play switch to on.

Toggle the tempo/timing switch twice to set the timing (wait 2-3 seconds between). The length between is multiplied by 4 to set the loop length.

Toggle the record switch and record something. Flip it back to neutral when done.

Toggle record again to record over the existing loop.

Enjoy the music!

Finishing Touches

With the BeagleBone Audio Looper now working, the last step is to configure it to run on boot and without the need for a network connection. Edit the configuration file for cron, Linux’s task scheduler:

crontab -e

At the end of the file add:

@reboot sh /root/startup.sh

Type Ctrl-O to save and Ctrl-X to exit.

Reboot the BeagleBone. After it is powered on for a few moments, the light on the sound card should flash rapidly. This is the visual indicator that you are ready to loop.

Conclusion

After you complete the project consider how you could alter it to accommodate the following use cases:
  • Add multiple loop channels.
  • Utilize the extra "Effect?" position on the control switch in combination with the other side of the DPDT switches to add different effects to the BeagleBone Audio Looper.
  • Add Indicator LED to show which channels are playing or when the device is fully loaded.
  • Offload processing of audio in Pure Data to another machine.