diy-hot-tub5

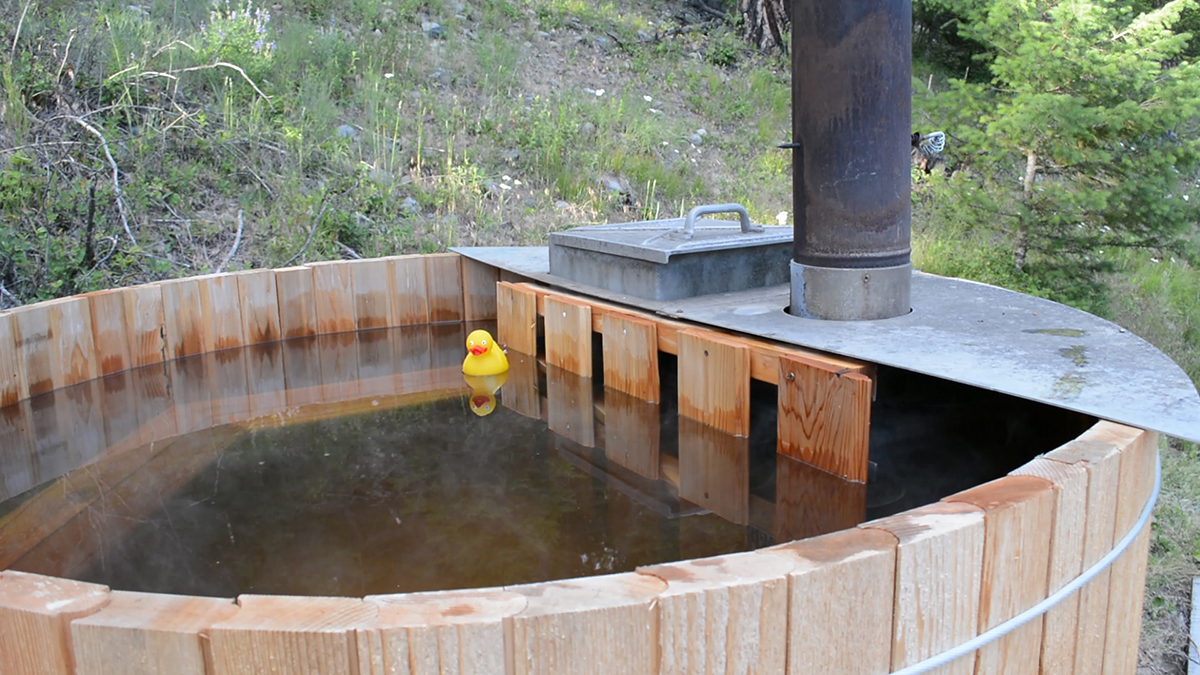
Our lives have never been the same since we left the comforts of the city to move to an off grid property deep in the Idaho mountains. We are building an off-grid homestead from the ground up (and blogging about it at purelivingforlife.com). We have the mentality that it’s better for the mind and body to start small and slowly build up to bigger projects, so rather than tackling the difficult task of constructing our house right away, we decided to start with something a little more, well, relaxing. We wanted to build something that would make it easier to build our home and something that could ease our sore muscles. A wood fired cedar hot tub seemed like the perfect project.

Why choose to build a wood fired hot tub?
Because we live off grid, our electricity is limited. Though a full solar set up is our dream for the future, all we have right now is an electric generator. A propane-powered system was an option, but seeing that we live in the middle of the woods it seemed silly not to take advantage of the free wood fuel all around us.

What is the advantage of using cedar?
Our initial plan was to build a cheap and simple “cowboy” hot tub, but we soon became captivated by the allure of building with cedar. This gorgeous wood would add a touch of refinement to our home, be more durable, and would be a whole lot more fun to experiment with!

Check out our hot tub series!

Cedar hot tubs are expensive, costing anywhere from $3,000- $7,000 to buy. We wanted to go a cheaper route by getting deals on materials and doing everything ourselves, and we thought it would be useful to others if we documented the process. When everything was done, we had only spent about $850 for the entire project. Not too shabby. If you want to see a list of tools that were needed to complete this project look here, and keep reading for farther building instructions.

Project Steps

STEP 1: SOURCE AFFORDABLE, HIGH QUALITY CEDAR BOARDS

YouTube player

By far the hardest part of building your own hot tub is finding clear cedar lumber at an affordable rate. Any board with knots in it can’t be used because knots are weak places in the wood that might blow out under pressure, creating a huge leak in the side of the tub. Yet clear cedar (considered #1 grade) doesn’t come cheap and is hard to find at most lumber yards.

We used Craigslist to find a lumber yard in our area with plenty of cedar available. The only catch was that it was #2 grade and full of knots. We requested permission to go through the pile to search for clear lumber that could we could use for our project. This is pretty rare — sorting lumber is usually frowned upon at lumber yards, so be sure to ask permission before you try!

diy-hot-tub7

The tub we built is 5′ in diameter and 3′ in depth and we knew these measurements before seeking out wood. For your own project, make sure to calculate the amount of wood you will need before buying any as it will save a lot of headache later on.

Additional, knotty lumber was also purchased to be used for a patio fence, hot tub seats, and other tub accessories.

STEP 2: CUTTING THE STAVES

YouTube player

The staves are the boards that make up the sides of the hot tub, and cutting them was the first part of this project we tackled. The dimension of each stave is going to depend on the size of lumber you are using and the circumference of your tub. Be mindful that the staves will be connected to the inside edge of the hot tub floor, meaning that the inner circumference will be decreased.

diy-hot-tub8

Because we were using #2 lumber we worked hard to get the most out of every board. We paid special attention to the order of our cuts to maximize the amount of usable clear wood. A table saw and cross cut saw were essential for this part of the project.

STEP 3: STAVE JOINERY

YouTube player

We can’t overstate how important the stave joinery is for the success of this project. Seriously. Carelessness or inexact cuts will make it virtually impossible to get your tub water tight.

Building Bead & Cove Joinery
We decided to use a canoe joint (also called a bead and cove joint) for the joinery. Our stock was 1.5″ thick so we used a bead with a ½” radius and a cove bit. We found these measurements left a small shelf on the staves which allowed the joint to rest on them properly. Your router should work fine for this. Each board has to be run through four times to complete the joint, twice on each side.

A lip on the joints can be taken care of with a planer to smooth the joint. If you create your joinery correctly, the cedar should swell when water is added, allowing the tub to become water tight.

diy-hot-tub9

Dado Joinery
We used a dado joint to attach the boards to the floor. Later in this article we will talk about the depth you will need to create this joint at. Getting it super snug on every stave is super important. We used our table saw for this step, but there are lots of other ways you can do it. It’s worth jigging your saw because this cut needs to be as accurate as possible for maximum snugness. Check each joint to ensure they are being cut consistent.

diy-hot-tub10

STEP 4: BUILDING THE FLOOR

YouTube player

For our floor, we used the cedar that was available, which was 1×6 v-groove tongue and groove. This wasn’t ideal, and we don’t recommend using v-groove with something else is available. Most cedar tubs are built with 2×6 stock which would be a lot easier than what we used.

To build the floor we followed the some technique of maximizing cuts as we did with the staves. We positioned the lumber on the ground so that the whole floor was clear cedar. To make the cut, we made a guide the length of the radius of our tub (2 ½ feet) and used it to draw a circle.

We built the floor joists with 4×4 cedar, using two pieces that were 5′ in length and two that were 3′. These were equally spaced around the tub.

The dado joints were cut to the theoretical perfect length that would give us the length needed to have a whole number of staves around the tub (it’s hard to use half a stave). We have a secret way to come up with the magic number for the depth of the dado joint, so watch this video to learn about it!

Sadly our magic fell a little short for us and our measurements were slightly off, meaning we had to get a little creative with our last few staves. But all’s well that ends well, right?

Once everything was put in place we used a ratchet strap to hold it all together while we used a jig saw around the circumference.

STEP 5: ASSEMBLING THE HOT TUB

YouTube player

The Staves
The staves were super simple to put in place. We gently tapped them in with a dead blow hammer. Getting a tight fit is essential, so take your time with this part and switch out staves if they aren’t fitting right.

Just need half a stave to finish it?
When we finished putting the staves in place we discovered that we needed a partial stave to finish it. We came up with a creative solution that’s shown in this video where we cut a stave in half and attached it to the second-to-last stave with a tongue and groove joint.

Cable Tension Bands
We used 3/16″ vinyl-coated cable to hold our tub together because we thought the coating would prevent it from harming the wood. We used two clamp sets on each cable (with three cables total) because we thought it made them look more finished. The ends were attached with a stainless steel turn buckle.

TIP: Ratchet straps are really helpful for holding the tub together when you are putting on the cable bands. It’s a good rule of thumb to have the turn buckles tightened half way when you finish, because the tub will swell when water is added and might shrink back down after being in full sun for a few days.

STEP 6: BENCHES & PLUMBING

YouTube player

Building Benches
Because it doesn’t matter if there are knots in the benches, we got to utilize our leftover wood. (This is why it pays to be careful with your cuts!) We used 2×4 #2 grade cedar for the legs and leftover staves for the seats.
We built the benches to fit in a hexagon shape, but we only built four sides of the hexagon. This means that the longest length of each bench is equal to the radius of the tub, and the angle of the seat lumber is 30 degrees from every direction. We invested in corrosion proof stainless steel hardware for the benches. Pricy, but certainly worth it.

Plumbing
For the hot tub drain, we installed a simple push-style floor drain like can be found in most bath tubs. Below the tub we attached a 90 degree pipe with additional fittings that could be connected to a garden hose when we want to drain the tub. A ball valve was installed as a backup measure, which was great foresight because the regular drain leaks! It’s most likely because we skimped on quality, which is almost always a mistake.

STEP 7: FILLING THE TUB

For those of you lucky folks that live on grid and have an endless supply of water, filling the tub is super straightforward. For us… not so much. This was the most miserable part of the whole process for us because we don’t have any large scale water system yet.

When we first started filling the tub it leaked like crazy… for three whole days. Eventually it swelled enough to stop leaking and held water. This is actually pretty normal for cedar tubs.

Our impatience eventually got the best of us and we caulked the tub with a marine-grade clear caulk. It helped a bit but we aren’t sure it was completely necessary. However, we weren’t fully confident in our joinery (super important to get right, like we said earlier) so we wanted to be safe rather than sorry.

diy-hot-tub2

STEP 8: ADDING THE WOOD STOVE

YouTube player

A wood stove is just one of many ways to heat a hot tub. We perused Craigslist until we found a used stove for sale. They aren’t listed often so check regularly.

Our stove was extremely buoyant so it took careful attaching to keep it from floating up. Beyond that the installation process was very straightforward.

Thankfully the stove came with 6′ of stove pipe, which allowed the smoke to be released above our heads.

For your own tub, be sure to research the best type of stove for you. An external wood stove that you plumb in can also work. If you live on grid, a propane of electric system can also give you good results. In a lot of ways stove type depends on personal preference and what’s available in your area.

Our initial plan was to build our own external stove with a washing machine drum and an old truck radiator, but when our stove came up on Craigslist we couldn’t resist the deal.

STEP 9: ENJOY YOUR HOT TUB & MORE TIPS

YouTube player

After all the hard work of building comes the fun part, relaxing in your new tub! We were so happy to discover our wood stove fired up easily and that our tub could be heated from 65 degrees to 102 degrees in less than two hours. The stove is simple to shut down when the temperature gets warmer than is comfortable, so we aren’t TOO worried about cooking ourselves.

diy-hot-tub5

OUR TOP TIPS & TRICKS

(Updated Regularly)

For additional resources on how to build this project with ease, make sure to check out our DIY cedar hot tub videos series page. We use this page to answer all the questions we have been getting about our tub so that all the information is consolidated in one place. You can also check out our blog post about the most rewarding experience we’ve had so far — our first soak.

Conclusion

STAY IN TOUCH FOR FUTURE VIDEOS, UPDATES, AND SERIES!

This won’t be our last tutorial — we are eager to share even more about our new-found off grid life! You can find us at our personal blog Pure Living for Lifeour Facebook pageInstagram page, and YouTube channel!

Thanks for reading our tutorial and be sure to send us any questions you might have.