Photo by Hep Svadja
Read articles from the magazine right here on Make:. Don’t have a subscription yet? Get one today.

In May of 2016, the Self Racing Cars group held their inaugural autonomous track day for full-size cars at Thunderhill Raceway Park in Northern California. Will and I both attended, but wouldn’t actually meet until a few months later. We were intrigued by the event, but we knew that full-sized autonomous racing cars were not for hobbyists like ourselves.

Then in November, Chris Anderson announced a hackathon for scaled-down cars (later named DIYRobocars), and we both showed up excitedly. The new mini series included a league for 1/10th scale R/C cars, which is a perfect scale for a low-cost car. I brought an R/C car, a Raspberry Pi, and some hastily 3D-printed and laser-cut parts. While I was assembling my vehicle, Will introduced himself to me and asked if he could help — thus beginning the partnership that has led to the creation of the Donkey Self Racing Car.

Why Donkey?

» Donkeys are one of the earliest domesticated pack animals.

» They’re safe for kids.

» They occasionally don’t follow their master’s commands.

» The word donkey has a negative or ugly connotation, so expectations are super low!

Initially I had modest goals of using computer vision line-following techniques with OpenCV, but Will was more ambitious. He wanted to leverage machine-learning techniques used in self-driving cars like those made by Google and Tesla, but the challenge was where to start.

Will and Adam work on the first iteration of the Donkey vehicle. Photos courtesy of Adam Conway and Will Roscoe

The event ended with a race featuring all running cars. There were about six cars being hacked on through the day, but only three were up and moving by the time the race began. One of those was the one Will and I worked on, and although it required manual control via a terminal connection, it demonstrated motion and control with our basic hardware setup. One of the other cars, built by Otavio Good and Matt Ball, wowed the crowd with its high speed and ability to learn and autonomously emulate Otavio’s remote control driving. The open source code for their car, dubbed the “Carputer,” gave Will the machine-learning starting point he needed as we moved forward with the project after the event. I helped refine the hardware and “Team Donkey” is now competing and finishing races in the DIYRobocars monthly events. Even better, there are now about 10 Donkey vehicles up and running in the world — maybe after this article there will be more!

The Carputer, the Donkey, and the Compound Eye (by Haoyang Wang and Jason Devitt) line up to race at the first DIY Robocars event, held in Carl Bass’ Berkeley, California workshop.

Donkey Car Overview

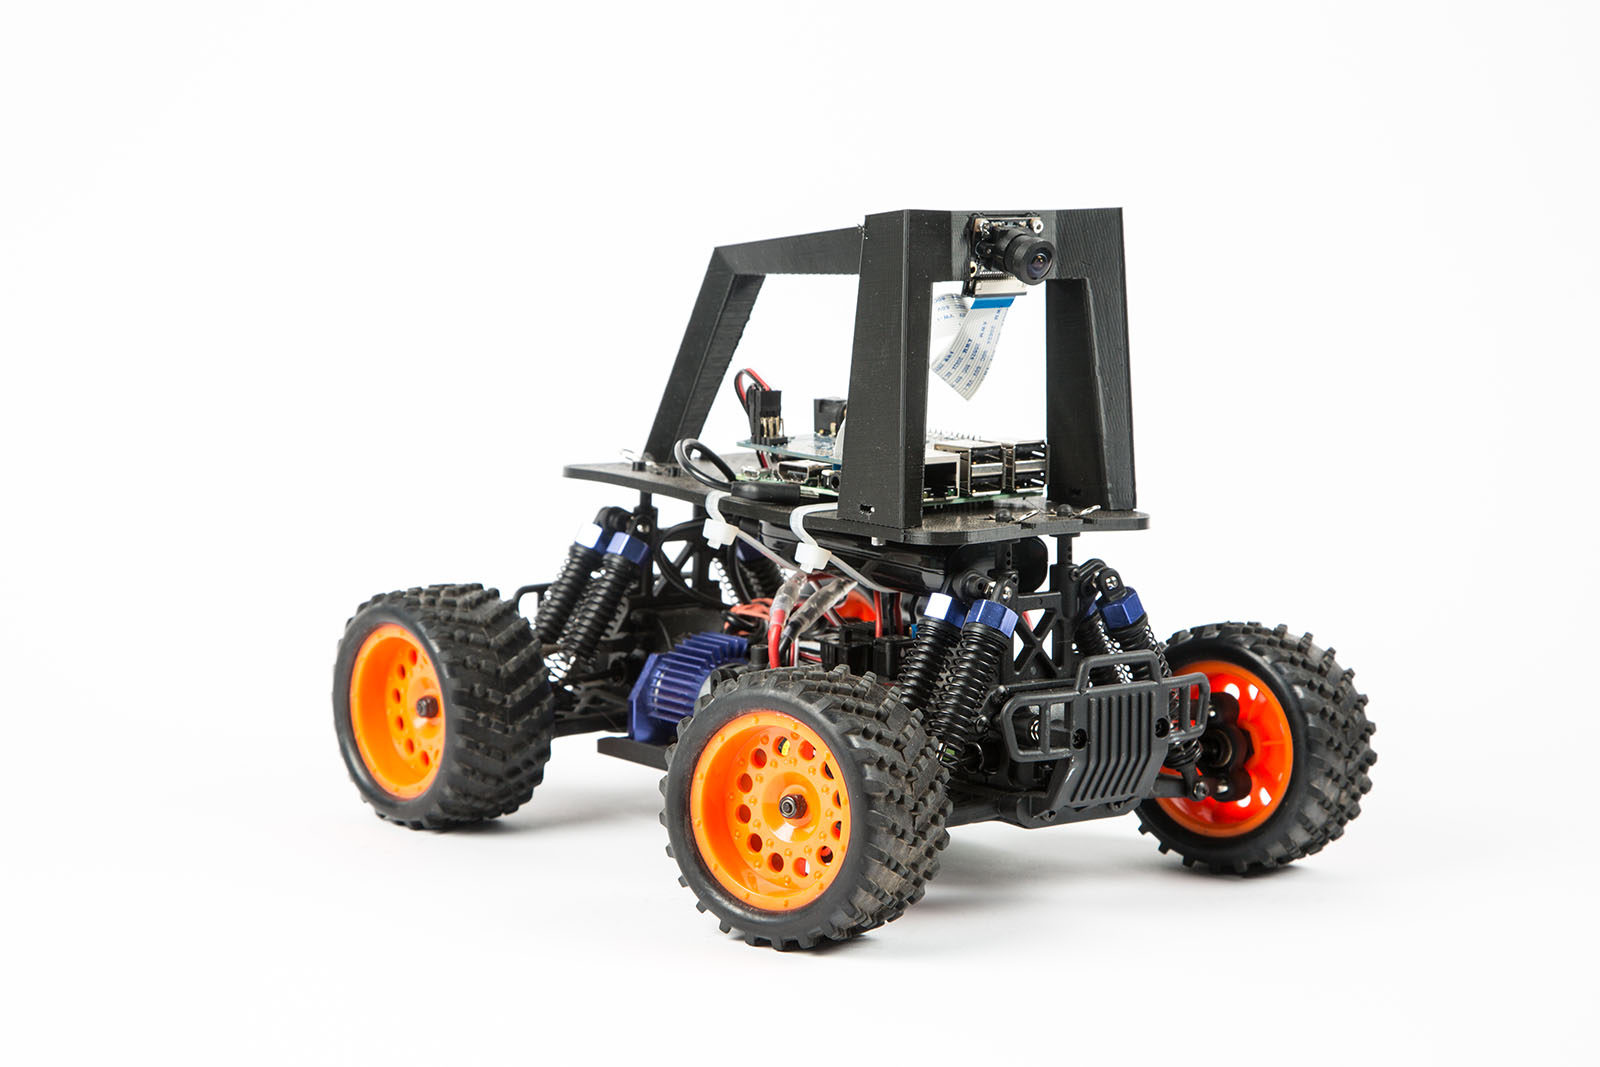
The Donkey autonomous car is a very simple car. It’s based on a Raspberry Pi computer, a camera, and a servo shield (or “hat”) board to interface with the R/C car. You drive the vehicle around a lined track to capture images and steering angles, which trains a neural-network autopilot to drive itself around the track. Top speeds around corners are about 4–6mph.

While collecting training data, the car itself doesn’t do all that much. It basically takes pictures and sends them to an Amazon server and gets servo commands in return. The server is where the magic happens. First it collects the images and driving information from the user manually driving the car around the track. The default way to do this on the Donkey is via the mobile-friendly web page delivered by the server.

The mobile web page even has a live video view of what the car sees and a virtual joystick. The server records data from a person driving the car, then uses those images and joystick positions to train a Keras/TensorFlow neural network model in software. This happens quickly — full trip latency (car > server > car) takes about 1/10 second.

Once trained, the model can be loaded on the car and the car should be able to drive like you. This how-to will teach you to get a car up and going.

How to Build a Donkey V2

While you can use these instructions to modify most hobby-grade R/C cars, these directions focus on modifying the Exceed Magnet 1/16th scale truck. Get an invite to our Slack channel to ask questions and post pictures.

Project Steps

1. PRINT AND CLEAN THE PARTS

Download the 2 files, for the top plate and the roll cage, from Thingiverse and print them. I used black PLA, with 2mm layer height and no supports. The roll cage prints upside down. If you don’t have a 3D printer, you can order parts from Shapeways.

Figure A

Almost all 3D-printed parts will need cleanup. Re-drill the holes where needed, and clean up excess plastic (Figure A). In particular, clean up the slots in the side of the roll cage, as shown in Figure B.

Figure B

2. ASSEMBLE TOP PLATE AND ROLL CAGE

Figure C

Slide the M2.5×12mm screw into the slot in the side of the roll cage. This is not particularly easy. You may need to clean out the hole again and use a small screwdriver to push the nut in such that it lines up with the hole in the bottom of the roll cage (Figure C).

Figure D

Once you have the nut in, you can attach the bottom plate (Figure D). Once again, this may be tricky. I use a small screwdriver to push against the nut to keep it from spinning in the slot. Good news: You should never have to do this again.

3. CONNECT SERVO SHIELD TO RASPBERRY PI

You could do this after attaching the Raspberry Pi to the bottom plate, but it is easier to see the parts when they are lying on the workbench. Connect the parts as you see in Figure E. We connect to 3.3V, the two I2C pins (SDA and SCL), and ground.

Figure E

Note: While it is possible to have the Raspberry Pi provide power to the servo shield, you should never set up the shield this way. Steering servos pull too much power and create too much noise for the Raspberry Pi.

4. ATTACH RASPBERRY PI TO BOTTOM PLATE

Figure F

Before you start, now is a good time to insert the already flashed SD card and bench-test the electronics. Once that is done, attaching the Raspberry Pi and servo is as simple as running 4 screws through the board into the screw bosses on the top plate (Figure F). The M2.5×12mm screws should be the perfect length to go through the board and the plate, and still have room for a washer. The “cap” part of the screw should be facing up and the nut should be on the bottom of the top plate (Figure G). The Ethernet and USB ports should face forward. This is important as it gives you access to the SD card and makes the camera ribbon cable line up properly.

Figure G

5. ATTACH CAMERA

Figure H

Attaching the camera is a little tricky; the four M2 screws can be screwed into the plastic but it is a little hard. I recommend drilling the holes out with a 1.5mm bit (1/16″ in imperial land) then pre-threading them with the screws before putting the camera on. It is only necessary to use 2 screws (Figure H). Before using the car, remove the plastic film from the camera lens.

Figure I

The camera’s cable will drape down such that it does not need to be twisted before being plugged into the Raspberry Pi board. It is easy to put the camera cable in the wrong way so look at Figures H and I to make sure you do it properly.

6. PUT IT ALL TOGETHER

Figure J

The final steps are straightforward. First, attach the roll bar assembly to the car. This is done using the same cotter pins (R-clips) that came with the vehicle’s original body (Figure J).

Figure K

Second, run the servo cables up to the car. The throttle cable runs to channel 0 on the servo controller and steering is channel 1 (Figure K).

Figure L

Now you’re done with the hardware! (Figure L)

7. GET RASPBERRY PI RUNNING

Download the zipped disk image (2.5GB). See our FAQ for instructions at donkeycar.com/faq to install the required packages manually. Unzip the disk image (8GB).

Insert your SD card into your computer and use a disk creator utility to create a disk image. Eject the SD card from your computer and put it in the Raspberry Pi. Plug a monitor, keyboard, and mouse into your Pi, then turn it on by plugging in the battery. Finally, connect to Wi-Fi.

8. START A PILOT SERVER

A Donkey vehicle uses a separately hosted web server to route communications and perform autopilot calculations. To begin driving your vehicle from your phone you need to first start a Donkey control server on your laptop or a remote server.

Install Docker if you don’t have it already. Then type in the following from a command-line tool:

git clone http://github.com/wroscoe/donkey.git
 cd donkey
 bash start-server.sh

(This will take about 10 minutes the first time to create the Docker container.)

Now you can go to localhost:8887 to view the web interface.

9. Drive the Vehicle

CONNECT TO THE PI VIA SSH

You can’t have the Raspberry Pi attached to the monitor while you drive, so first you must connect to the Pi remotely via SSH. Then you’ll simply start the drive loop and the Pi will start requesting directions from the server.

Find your Raspberry Pi’s IP address. Assuming your Pi is connected to the same local network as your computer, you can find the IP address of your Pi by running this command on your computer:

python scripts/find_car.py

SSH into your Raspberry Pi using:

ssh pi@<your raspberry pi ip address>

ACTIVATE THE VIRTUAL ENVIRONMENT

Still in the command line, type:

cd donkey
 source env/bin/activate

START THE VEHICLE

Connect your car to the server:

python scripts/drive.py --remote http://:8887

Note: If you’re using a different car, check the FAQ to learn how to update the PMW settings in drive.py.

Now turn on the power to your car. You should first see the ESC blink red, then hear a beep indicating that the ESC has been calibrated.

COLLECT TRAINING DATA

Go to <your server ip>:8887 in your web browser. Then go to the vehicles tab and select “mycar.” To start driving your car, use the virtual joystick (Figure M).

Figure M

TRAIN AN AUTOPILOT

After you’ve driven for about 10 minutes around a track and collected over 1,000 training images and steering angles, you can train an autopilot by entering this command:

python scripts/train.py --sessions <your session name(s)> --name <name your autopilot>

After that, refresh your control screen and you’ll see the autopilot in your Pilot dropdown. Select your autopilot here. Press “Start Vehicle” to make it begin. Try increasing your throttle to see how the pilot steers!

How to Run Donkey on Amazon EC2

Figure N

Amazon Elastic Compute Cloud (Amazon EC2) is a web service that provides secure, scalable computing capacity in the Amazon Web Services (AWS) cloud. Users rent virtual computers on which to run their own computer applications.

1. Log in to Amazon EC2.

2. Click Launch Instance.

3. Make sure you’re using the N. California region (recommend g2.2xlarge).

4. Click Community AMI’s.

5. Search for “donkey” to find the instance. Pick the one with the highest number next to it. As of this writing it was ami-df5e07bf.

6. When you launch, your Security Groups should look something like Figure N, but with the source IP changed to your IP. One note — we are not using a secure protocol or login, so this is the only thing protecting you from the internet.

7. Once you launch the server, either SSH to it or use the AWS console to get terminal access:

cd donkey
git pull origin master
source env/bin/activate

8. Start the server:

python scripts/serve.py

Go Forth and Experiment

This is a work-in-progress, open source project. It will be refined as people continue to contribute improvements to the Donkey platform. Get creative and make your car do amazing things. (With only a few changes the same Donkey setup can be used to make a differential drive vehicle, for example.) The faster we innovate, the faster we’ll see a self-driving world.

Donkify Your Own R/C Cars!

Almost any R/C car where the receiver is not integrated into the ESC motor controller can be made into a Donkey autonomous vehicle. Here’s what to look for:

» The servo should use a 3-wire connector. ESCs have 2 wires on one side to connect to the battery; on the other side, they’ll have 3 wires if they’re for brushless motors, or 2 wires for brushed motors.

» Brushed motors are easier to use because they don’t need calibration and handle lower speeds better.

» An ESC with a BEC (battery elimination circuit) or UBEC makes integration much simpler. A BEC provides 0 and 5 volts from the ESC through the 3-wire cable, which can be used to power the servo shield. This is important because the servo shield does not get power from the Raspberry Pi by default.