


Over the years there have been many electronic toys that let you play with and learn about electricity. Jay Silver’s Drawdio (Figure A) from 2008 combines a simple 555 timer circuit with a pencil to make squeals, beeps, and musical tones. When you draw, the graphite (carbon!) in the pencil conducts an electrical signal — you’re literally drawing a circuit! The longer and skinnier the pencil lines, the higher the electrical resistance and the lower the audio tone created by the oscillator. Short, fat lines have more conductive carbon, giving a lower resistance and making higher-pitched tones. Adafruit sells a Drawdio kit with a clever 2-sided circuit board — one side for wired components, the other side for surface-mount!
Thirty years earlier Mattel produced The Electronic Connection toy (Figure B), which included game cards printed with conductive ink: drawing with the electronic pencil let you solve squealing mazes, play beeping games, and create music! The silk-screened and heat-cured conductive inks on the game cards were formulated with real silver, expensive even then!

Now, new developments in conductive ink pens let you draw your own circuits: quick, easy, and (relatively) cheap!
Here’s a simple DIY project that combines all three: Build a simple sound-making circuit with an electric pencil stylus. Then draw with conductive ink pens to make and play electronic sound games. You can use the included print-and-use card designs, or create your own.
Wire the Circuit
This simple circuit uses a minimum of components. You can assemble it on a protoboard or easily solder it up with point-to-point wiring on a perf board. I used a DIP socket for the 4049 chip, but you don’t have to. Make each connection, one-by-one, following the circuit diagram (Figure C).

How does it work? Usually used for decoders and multiplexers, the lowly 4049 was re-imagined by Mattel’s engineers to create musical tones in The Electronic Connection toy. Three of the six inverters are linked head-to-tail with a resistor and capacitor to create a simple, self-oscillating, on-off-on-off square wave generator. The “lead” in the pencil, together with the marks and circuits on the paper, act as a feedback resistor: the greater the resistance, the faster the circuit oscillates, and the higher the pitch of the tones. The output of this oscillator is hooked up to the remaining three inverters in parallel, and their combined output is enough to directly drive a dynamic speaker — no audio amplifier needed!
Once you’ve built the circuit, attach or solder an 18″-long wire with an alligator clip to the connection marked “A” and another 18″ wire with alligator clip to the connection from pin 2 on the 4049 hex inverter chip.
Try it Out!
Sharpen both ends of a 2B (not 2H!) or softer pencil and attach one of the alligator clips to the pencil. An ordinary No. 2 pencil is too hard and won’t leave enough carbon on the paper to complete the circuit. Look for drawing pencils marked 2B or 4B or even 6B at an art supply store. Staedtler Mars Lumograph 6B pencils work great!
Draw a thick, fat patch of pencil marking near the edge of a piece of paper. Connect the free alligator clip directly on that mark. When you touch the pencil tip to the pencil mark, you complete the circuit and hear an audio tone: BEEEEEP! Make crazy sound effects from a low growl to a high squeal as you draw with the pencil and add more and more conductive carbon lines to the circuit: ggrrrreeeEEEEEE! (Figure D). Have fun making sounds and drawing paths and pictures. You can also use your fingers to touch and complete the circuit. Hold the pencil tip in one hand and touch the pencil marks on the paper. Just making sounds with the circuit is fun by itself — but there’s more.

More Fun with Game Cards!
The next step is to create game cards using conductive ink pens to draw circuits. You can create your own original game circuits using the conductive pen lines as traces together with pencil lines for resistors. To get you started, try these fun electronic circuit game cards, updated from the original Electronic Connection toy. Go print out the game card layouts (they’re the 3rd, 4th, 5th and 6th “Print” buttons on the top row.) For a longer-lasting card, laminate the paper onto thin cardboard (like a file folder) with some glue or double-back tape, then cut out.
Color in the solid blue lines, shown in Figures E–J, with conductive ink. Let the ink dry completely, then use the soft 2B pencil and press firmly to fill in the resistance values, as shown in red, with a nice, thick layer of pencil. Press down hard for a dark pencil line. Hook up the alligator clips and use the pencil stylus to check the continuity of each of the lines as you draw. You may need to go back and fill in any nonconductive gaps or thin spots.


Photos by Bob Knetzger
Let the games begin!
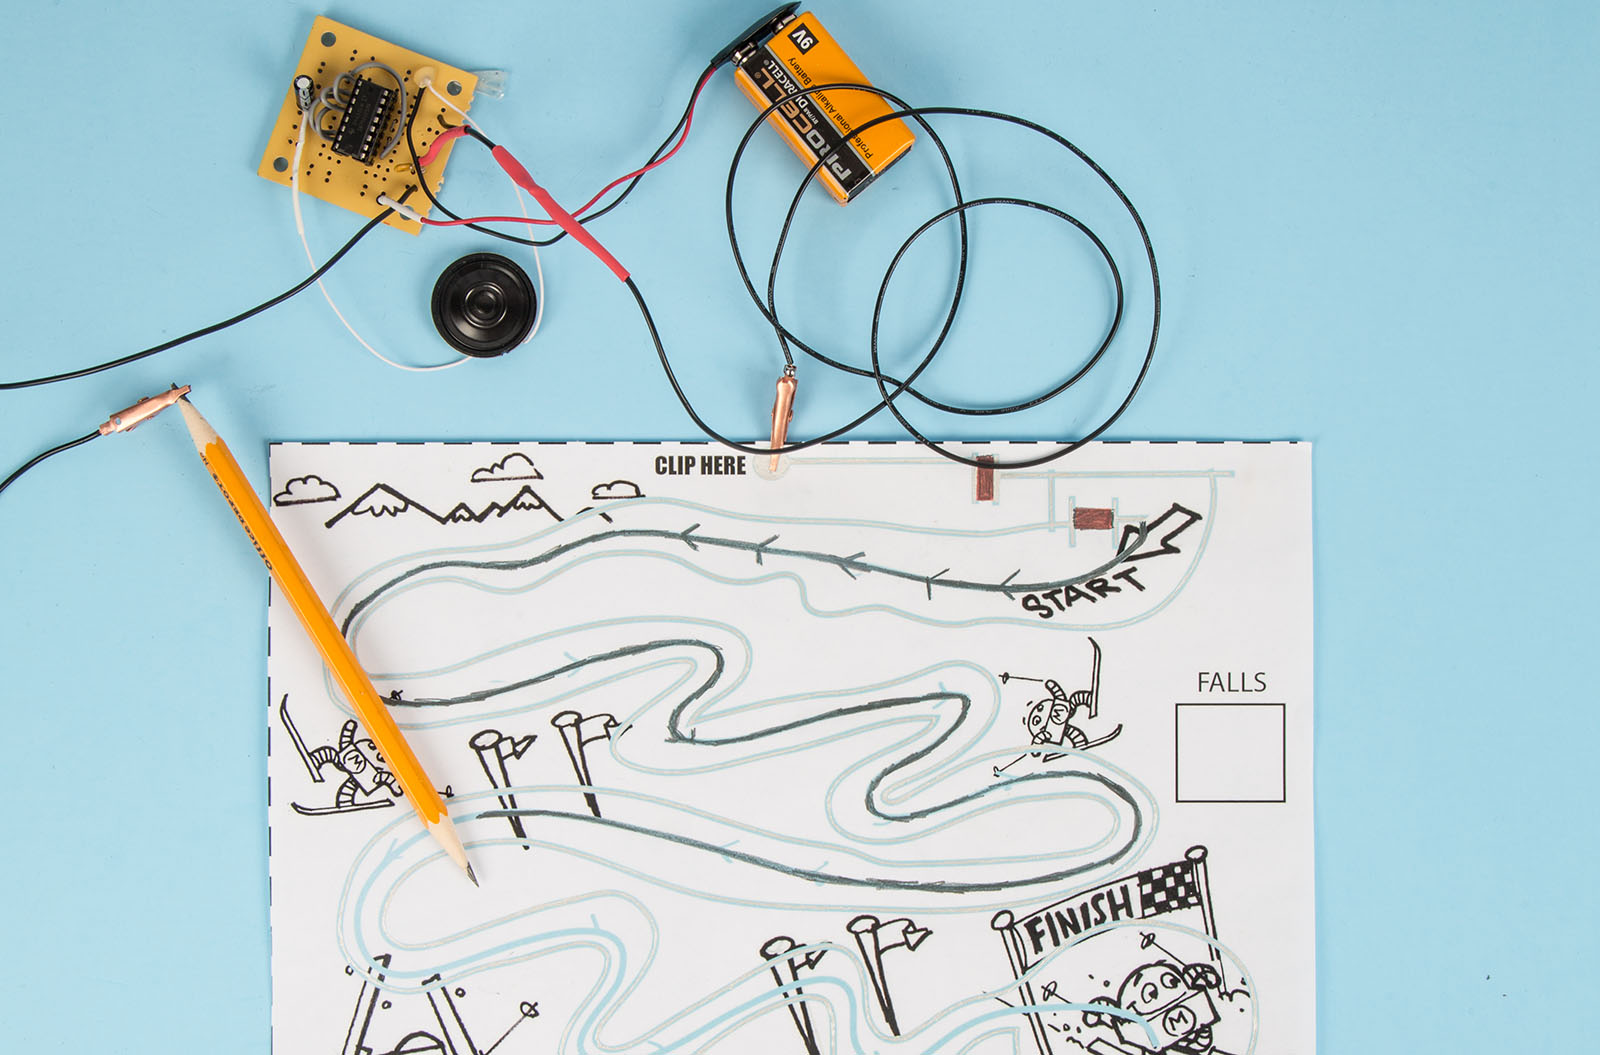
Dexterity Ski Run
Here’s how to play this easy skill game: Start your pencil probe on the center line at the START. You’ll hear a low tone — that’s good. Now trace the path of the center line toward the FINISH (Figure F). Don’t press or draw, just touch lightly with the pencil tip to keep the tone playing. Be careful! If you stray or lift the pencil, the tone stops: that’s a “fall.” Make a tick mark in the FALL box and go back to the start and go again. If you really stray you’ll hear a high-pitched tone: that’s a double fall. Make 2 marks in the score box and go back to the start and try again. What’s the fewest number of falls you can make to get to the finish? Can you do a perfect run? Think it’s too easy? Hold the pencil in your other hand!
3-In-1 Sound Maze
This game (Figure G) is a maze that magically changes sound to direct you to one of three different goals. First, use the pencil to completely fill in one of the three goal circles to make an electronic connection. Go to the START and lightly touch the pencil tip as you trace a path through the maze. Listen to the buzzing tone. As long as the tone you hear keeps getting higher, you’re going the right way. If the tone you hear starts to fall, that means you’re going the wrong way. Retrace your path and keep going, following the rising tones until you get to the finish. Then, erase and color in a different goal circle: The maze changes sounds as you trace to the new goal.
Two-Player Baseball
Here’s a baseball game for two players with hits, outs, and innings (Figure H).
At the start of the inning one player secretly chooses five of the “hit” baseballs and colors in their five red squares with pencil. Each filled-in ball will make a “buzz” sound when touched with the pencil. Then fold the paper over to hide the colored-in choices. The second player “bats” by choosing a ball and touches it with the probe. If there is no tone, it’s a hit! Mark the base runners on the diamond lightly with the pencil and bat again by choosing a different ball. But if you hear a buzzing sound, that’s an out! Update the scoreboard and keep playing. Keep tallying base, runs, and outs just like in real baseball. After three outs, players switch sides: Now the first player will bat after the second player erases and colors in five red squares. Will he fake out his opponent and keep some of the previously colored hits as outs again? That’s up to you … play ball! You can play nine whole innings of conductive ink fun.
Makey Bot Music
Three Makey bots are playing some music (Figure I): a low-pitched bass, a sliding trombone, and a high wailin’ sax!
Hook up the alligator clip to the card. Touch the pencil tip to the spots on the various instruments. The bass plays low notes. The sax plays high notes. Slide the tip along the trombone to make a sliding trombone sound! Slide your way across the trombone to play a melody.
Cross Grid Strategy Game
A strategy game for two players: First player to complete a continuous line that connects all the way across the grid and sounds the buzzer is the winner! (Figure J)
On their turn, each player draws a line connecting two of their shapes. (Press firmly to draw solid pencil marks along the dotted lines.) The “circle” player draws on the dotted lines connecting any two adjacent circles. The other player, playing “squares,” draws on the dotted lines connecting any two adjacent squares. No diagonal lines are allowed. Players cannot cross their opponent’s lines. Keep taking turns coloring in lines until one player has drawn a continuous line connecting all the way across the grid.
To claim a win, touch the pencil tip to your shape’s WIN TEST spot. If you hear a beep, buzz, or growl tone (no matter how low-pitched), you win!
Carefully erase all lines to play again.
Closer Look: Conductive Pen Reviews
I found several different kinds of conductive ink pens that will work well with this project. Look for these in electronic stores or online. Here they are, starting with the best:
Circuit Scribe by Electroninks
These roller ball pens lay down a very controlled and fine line of silver-based ink. Dries really fast and conducts well. They’re also sold with kits that include magnetic electronic modules, like LEDs and switches. Even though they can cost more, you’ll get more electronic parts to play with. Cost: $20
TIP: Store these pens vertically with the tips down for best ink flow.

Silver Conductive Pen by MG Chemicals, CAIG, and Circuitworks
These paint-pen type markers leave a thicker, painted line. They’re a little harder to use, and tricky to keep clog-free, but they give great results on almost any surface. They can be a little messy (clean up with nail polish remover) and take more time to dry, but the end result works really well. You might find two versions with different sized tips: The larger 1mm tip is easier to use. Expensive — made with real silver! Cost: $30–$50
TIP: You must shake these pens really well before and during use. If they clog up you can remove the tip for cleaning but note: the caps twist off backward with a left-handed thread!

Nickel Conductive Pen by MG Chemicals
A lower-cost version that uses nickel instead of silver. Similar application: squeeze to draw a thick, paint-like line. Not quite as conductive as the silver but costs a lot less! Cost: $10–$15
TIP: Remember to shake — there’s a small ball inside (like in a can of spray paint) to help mix the nickel paint and solvent.

Electric Paint from Bare Conductive
This product uses carbon in a black, water-based, paste-like paint. Not as conductive as the silver or nickel pens, but not smelly and cleans up easily with water. Comes in a small squeeze tube so if you can’t manage the tiny squeeze tip, try a fine brush to draw lines. Cost: $10


