YouTube player

For millennia, men and women have studied birds, bats, and beetles, observing and experimenting, attempting to determine what humans must do to fly by flapping.

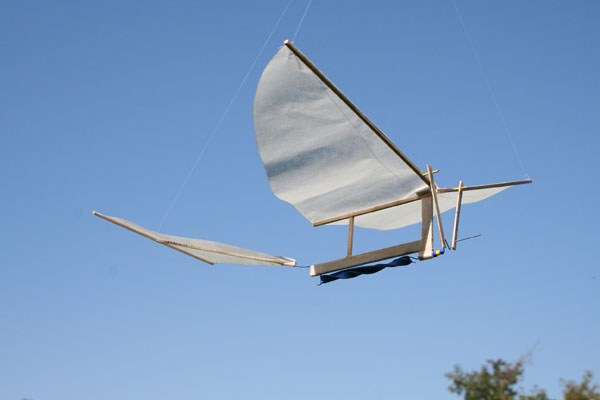
But people can’t fly by flapping: not with wings covering their arms; not with pedaled, chain-driven wings; and, so far, not with internal-combustion engines, either. Nonetheless, the concept of manned ornithopters continues to hover on the periphery of aeronautical engineering. This project shows you how to build a small, rubber band-powered ornithopter we call Orly.

There are many types of ornithopter designs. Orly is a simple monoplane, meaning there is a single wing mounted above the motor-stick, and its motion is similar to a bird in flight.

Orna-move

How do ornithopters fly? According to Nathan Chronister of the online Ornithopter Zone, “The ornithopter wing is attached to the body at a slight angle, which is called the angle of attack. The downward stroke of the wing deflects air down- ward and backward, generating lift and thrust.

“Also, the wing surface is flexible. This causes the wing to flex to the correct angle of attack we need in order to produce the forces that we want to achieve flight.”
The mechanics of flapping flight are far more complicated than that of fixed-wing flight. For an aircraft with fixed wings, only forward motion is necessary to induce aerodynamic lift. But for flapping flight, the wing not only has to have a forward motion, but also must travel up and down. This additional dimension means the wing constantly changes shape during flight.

Without doubt, even the earliest humans watched birds fly past and felt, well, rather envious. Thus when Thag, a Pleistocene caveman, looked up and saw flocks of ducks and geese soaring above, he might have gathered together a few palm fronds, lashed them around his arms with a vine, and leapt off a tree. Poor Thag never got airborne, or at least he didn’t live to record the episode in petroglyphs on his cave wall.

Later, from ancient Greece, comes the legend of Daedalus and Icarus. Daedalus was a skilled engineer who angered King Minos. Minos ordered him imprisoned in a tower.

According to Bulfinch’s Mythology, “Daedalus contrived to make his escape from his prison, but could not leave the island by sea, as the king kept strict watch on all the vessels.

“So he set to work to fabricate wings for himself and his young son Icarus. He wrought feathers together, beginning with the smallest and adding larger, so as to form an increasing surface. The larger ones he secured with thread and the smaller with wax, and gave the whole a gentle curvature like the wings of a bird.”

Unfortunately for Daedalus, the attempt at flight didn’t entirely work. His son, Icarus, flew too near the sun, melting the wax that held the wings together. Icarus fell out of the sky and drowned in the ocean.

To a large extent, that’s been the typical outcome of human flapping flight experiments, right up to modern times.

The New York Times has run many stories over the years:

  • “Ornithopter Somersaults — Captain White Hurt in Crash” (June 1928)
  • “Inventor Tries to Soar Like a Bird; Narrowly Escapes Drowning” (March 1932)
  • “100,000 See French Birdman Die in 9,000 Foot Fall” (May 1956)
  • “[University researchers] named their ornithopter ‘Mr. Bill’ after the perpetually maimed character on the television show Saturday Night Live.” (May 1992)

Around 1490, Leonardo da Vinci was carefully studying the mechanics of avian flight. From his bird-watching came perhaps the first blueprint for a human-carrying ornithopter. More of a theoretician than a true maker, Leonardo never got his flying machine off the paper in his notebooks. Had it been built, it likely would not have flown. Still, experts say his design is clever, and embodies modern aerodynamic principles developed hundreds of years later.

Interest in flapping flight took off again in the 1870s. Building model ornithopters became fashionable in Europe, and a number of enthusiasts — among them Alphonse Penaud, Hureau de Villeneuve, and Gustave Trouvé — built internally powered birds that soared over the fields of France and Flanders. Soon, ornithopters powered by rubber bands, gasoline, electricity, and even gunpowder were flapping away, but as scale models, not people-carrying aircraft.

Since then, many people have tried to build a manned ornithopter, but none have yet succeeded. There are unconfirmed reports that the Germans made one during World War II and that the Soviets flew one during the Cold War, but solid evidence is lacking. Today the University of Toronto is making a game attempt.

Why bother with ornithopters at all? Because flappers can do things other aircraft cannot. They probably have the best maneuverability of any aircraft. Unlike fixed-wing drones, ornithopters, at least in theory, can stop and hover like a humming- bird, which makes them extremely versatile, and they need less space to maneuver than a helicopter. Couple all that with their ability to fly at very slow speeds, and ornithopters may be the perfect surveillance vehicles. The military applications for unmanned ornithopters are numerous.

Ornithopters have practical applications in civilian life, as well. For instance, the Colorado Division of Wildlife uses an ornithopter to research a hard-to-capture endangered species called the Gunnison sage grouse. This skittish bird flies away at the first sign of danger but will stay on the ground if it sees a hawk flying above. So state biologists use a motorized, radio-controlled ornithopter painted like a hawk to keep the flighty grouse on the ground long enough for them to capture it.

What will the next generation of Make: look like? We’re inviting you to shape the future by investing in Make:. By becoming an investor, you help decide what’s next. The future of Make: is in your hands. Learn More.

Project Steps

Make the fuselage.

Form a hook in the tail/rear motor attachment wire as shown. Carefully push the wire through the center of the motor stick at a point 2″ from the tall end. Then make two 90-degree bends in the wire as shown, and glue into place using CA adhesive. Reinforce the wire-to-balsa joint by placing a tissue paper cover over it. Dab the joint with a thin layer of CA. Spraying CA drying accelerator on the joint makes the process faster and less messy.

Glue the fuselage together as shown.

Roll the 2″×2″ paper into a narrow tube using the music wire for a mandrel. Remove the music wire and carefully daub the tube with CA, taking care to maintain the tube’s openings. Spray with CA accelerator. Cut into three 1⁄2″ long tubes and discard the remainder.

Make the fuselage (cont'd).

Attach the 3 tubes to the fuselage as shown, with CA and accelerator. Make certain the tubes are aligned with the long axis of the fuselage.

Use the needlenose pliers to bend the wire so the crank appears as shown. Insert the crank wire through the paper tube glued to the crank standoff. Place the 2 beads on the wire. Create a bend in the back end of the wire to serve as the motor hook.

Make the wing spars.

Bend the music wire as shown. Carefully push the wire through the wing spar at a point 3/4″ from one end. Glue into place using CA. Reinforce the joint by wrapping a layer of tissue paper around the joint and coating with CA.

Make the tail.

Use CA adhesive to glue the balsa rods into a T shape. Reinforce the joint by covering it with tissue paper soaked with a thin layer of CA.

Poke the end of the fuselage tail attachment wire into the balsa tail member; then glue the assembly with CA. Reinforce by wrapping with tissue and CA.

Make the connecting rods (Conrods).

The conrods undergo considerable stress. Harden the rods by coating the last 1/2″ of each end with CA.

Make 2 holes for the music wire in each conrod, 1/4″ from each end.

Final assembly.

Cut out the tissue paper wings and tail using the templates.

Glue the tissue paper wing to the wing spars and the top wing attachment member. Glue the tissue paper tail to the balsa T frame with a glue stick.

Connect the conrods to the wing- spar attachment wires and the crank. Adjust the spacing of the conrods so the crank turns smoothly. Place heat- shrinkable tubing over the crank and wing spar wires to maintain alignment, and carefully heat with a match to shrink the tubing.

WARNING: The tissue paper, the balsa wood, and the CA catch fire easily! Use great care in this step.

Bend the tail up so it is at about 15 degrees from the plane of the motor stick.

Sending Orly airborne.

Double the rubber band and place it over the front and rear motor attachment hooks. NOTE: To accommodate a longer rubber band, double it into 2 loops and place it over the front and rear attachment hooks.

Rub the band with a little vegetable oil for lubrication.

Wind up the rubber band motor by turning the crank at least 35 turns.

Angle Orly’s nose up slightly and release gently.

Troubleshooting

Ornithopters can be difficult to fly. Common problems include stalling, nosediving, and veering, in various combinations. If your ornithopter doesn’t fly well, try the following:

  1. If the ornithopter dives and veers, winding the motor in the opposite direction may help.
  2. Balance is important. Make certain the action of each wing is the same. Make the conrods and crank carefully to ensure balanced wing operation.
  3. If Orly has a tendency to flip or roll in flight, you need to improve your craft’s stability. Try lengthening the distance between the motor stick and the tail, or adding a rudder (a vertical stabilizing surface on the tail).
  4. If the ornithopter veers consistently in one direction and then nose-dives, add a small wire weight to the end of the wing tip on the side opposite the direction of the veer.
  5. The angle of the tail is important. Bend it slightly up if the flapper nose-dives, and bend it down if it stalls.
  6. If Orly goes through a series of stalls before ultimately diving into the ground, your tail may be mismatched to the rest of the aircraft. Fix this by decreasing the size of the tail. If that doesn’t help, extend the length of the tail boom — that is, increase the distance between the wing flappers and the tail.
  7. A direct head first plunge to the ground may be a signal to increase the size of the tail stabilizer.
  8. If your ornithopter flaps vigorously but won’t gain altitude but lowers into the ground tail first, try to move the center of gravity forward. It is best to make the rear lighter instead of making the front heavier.
  9. Bank and spiraling problems are common in ornithopters, and can be tough to correct. If your ornithopter starts out with few good looking flaps, but suddenly banks or rotates around its longitudinal axis and then spirals down, try the following:
    • Reapply the tissue paper to the wings, making sure the paper is not applied too loosely or too tightly stretched. Both wings should have the same amount of tension.
    • Bend a small rotation in the tail plane relative to the longitudinal axis of the ornithopter.
    • Add a small weight to the outside of the wingspar opposite the direction of the bank.
    • Fixing the bank and spiral problem can be difficult. You may need to try a number of fixes in combination before the problem clears.

Conclusion

This article appeared in MAKE Volume 08, page 90.