Pri_image037
Molds can be made of rubber, steel, clay, brass, wood, plastic, lead, and even sand, and people use them to cast objects ranging from 40-foot bronze Buddhas to microscopic cell structures. This article focuses on casting small objects in rubber, which is a reliable technique that’s employed throughout the film and special effects industries, as well as the jewelry industry. Photography by Adam Savage

In principle, moldmaking is a simple process, but with every object you want to replicate comes a new series of pitfalls, innovations, and solutions.

This article explains how to make a two-part, underpoured block mold, which is a versatile and beginner-friendly type that’s great for small, detailed objects such as jewelry, game pieces, masks, picture frames, and figurines. I learned this technique by apprenticing under some of the great moldmaking masters in the special effects industry, and this article reveals their unpublished tricks. I hope they don’t get mad.

We’ll make our mold out of silicone rubber, an excellent casting material, but it costs about $100 per gallon. This process uses as little of it as necessary, and it’s important to follow all of these instructions, because a mistake can be costly. Then we’ll cast our duplicates in opaque urethane resin (clear resin requires a more difficult process).

Why a Two-Part, Underpoured Mold?

Two-part molds can handle more shapes than one-piece molds, which work only for simple, completely convex objects. And underpoured molds minimize problems with bubbles in the resin.

Moldmaking-FigA
Fig. A: Cross section of underpoured mold.

Underpouring means that you pour the resin into a main intake vent (or sprue) that curves around to fill the mold up from below, rather than simply pouring into the top (Figure A). Meanwhile, smaller vents on top allow the displaced air to escape. As you pour, resin splashing down forms bubbles which can stay in the main cavity and ruin the surface of the casting. These bubbles also tend to collect in fine-detail areas, where they are the most difficult to deal with.

The advantage of under-pouring is that it generates fewer bubbles, and lets them rise up into the vents where they won’t cause trouble. Top-pour molds are sometimes acceptable, but pouring from underneath is generally worth the extra silicone required.

Taking Care

  • Many mold materials are time-sensitive, so after each step, you lay out all the things you’ll need next.
  • Molds are too often destroyed by impatience; not spending an extra 2 minutes mixing the silicone (for example) can throw away several days’ work.
  • Some materials, such as the thickening fillers, are also toxic, so wear eye protection, gloves, and a smock or apron, and work in a well-ventilated area.
  • Finally, no matter how careful you are, be prepared to mess up until you have more experience.

What will the next generation of Make: look like? We’re inviting you to shape the future by investing in Make:. By becoming an investor, you help decide what’s next. The future of Make: is in your hands. Learn More.

Project Steps

Design the Mold

The first step in designing a mold is to visualize your object upside-down and inside-out. Imagine it as a cavity being filled with resin, imagine the path that resin will take, and what happens to it along the way. Where will bubbles form? Where should the main vent go? How should the object be positioned? (Probably upside down, so most cleanup takes place on the underside.) What will be the hardest part to clean up? Where do I need to put vents? Should the piece be cast as one part, or broken into several parts?

Thinking through these questions makes everything easier later, when you clean up the casting. This means cutting off and sanding any excess resin from the vents and seam, and filling in any bubbles. A good casting has few bubbles and is easy to clean up, and this starts with good mold design. It’s always easier to sand away material than to fill voids.

Fig. B: The object we're going to cast, an angel figurine.
Fig. B: The object we’re going to cast, an angel figurine.

As an example, we’ll cast an angel figurine (Figure B). I decided to remove her arms and cast them separately because they looked like trouble; they extend far from her body, and the hands have delicate detail. Broad, thin parts are also difficult to cast, so I removed the wings and replaced them with new ones I made separately on a vacuuform machine, which is excellent at producing flat forms.

STEP 1.

Set up your object on a piece of foamcore and build up the pouring gate and vents. After removing the angel’s arms and wings with a Dremel tool, I set up the body upside down; the bottoms of her feet are flat, so they made an ideal point to pour into. I sprayed the body with primer in order to see the surface better where I had made the cuts (Figure C).

Fig. C: The angel being set up for molding. The sprue runs to her feet, which are a conveniently flat surface.

Form the pouring gate using a plastic hemisphere, and make the sprue and main outlet vent using armature wire. Use cyanoacrylate (CA) glue with an accelerator to piece everything together. To make clean-up easier, the contact between main chamber and vent should be as small as possible; I sanded the wire to a point where it touched the angel’s head. I then used .06″ square styrene strips to add smaller vents from the folds of her skirt and sleeves, which seemed bubble-prone.

STEP 2.

Fig. D: Marking the parting line, along which the mold will be cut later.

Use a Sharpie to mark along the parting line, the line along which you’ll cut the mold open (Figure D). It should extend across the base itself and all the way around the model, following any corners that exist, or along high points and open spaces to define a seam. Flash (excess material) from mold separation can form along this seam, so you should place it where the flash will be easy to sand and fill.

STEP 3.

Fig. E: Building the mold box using a single piece of foamcore.

Build the mold box around the object using one large piece of foamcore (Figure E). Score and fold the foamcore without cutting through it, roughly following the object’s shape. Keep at least ¾” between the model and the outside of the mold. Thinner, and the silicone can deform under the poured resin later; thicker, and you’re wasting silicone and the part will be harder to cut out.

STEP 4.

Fig. F: The mold box, ready for sealing with hot glue.

Use a hot glue gun to secure the box to the base, and to glue the (single) seam of the box (Figure F). Carefully examine your entire glue seam to make sure it will hold the liquid silicone, which will leak out of the smallest of holes.

Pour the Silicone, STEP 1.

Figure out how much silicone you need by calculating the volume of your box. I do all my moldmaking in grams instead of ounces, since it’s so much easier to multiply and divide by 10. Remember, volume = length × width × height. Measure in centimeters, and you’ll get a volume like 755 cubic centimeters. Silicone is close to the specific gravity of water, so thanks to the convenience of metric, this is the same number as the weight in grams of silicone you’ll need. If you measure in inches, multiply your cubic inches volume by 17 to get the rough equivalent in cubic centimeters or grams.

STEP 2.

Measure the silicone and activator. Almost all silicones use a ratio of 10:1 silicone to activator. You can also add an accelerator, in the amount of 2-10% of the total weight, but the resulting silicone won’t be as durable and will tear more easily. Curing times will be 24 hours with no accelerator, 4 hours with 2% accelerator, and 1 hour with 10% accelerator.

STEP 3.

Fig. G: The silicone before mixing.

Mix the silicone, activator, and accelerator, if used (Figure G). The activator is blue to give you a visual cue when you’re done mixing. If you see any streaks, you’re not nearly done. Make sure you’re using a mixing stick that’s strong enough, and scrape the sides and bottom, where it’s hardest to get a good mix. I usually mix by pushing the mixing stick down the sides of the bucket, and dragging it across the bottom, turning the bucket as I go, for as many as 6-10 full revolutions. Silicone is thick, so it helps to have someone else hold the bucket.

Fig H: The silicone after mixing. If you see any white streaks, you’re not nearly done.

Beginners often make the mistake of not mixing enough; a good rule is to mix until you think you’re done, then mix for another 3 minutes (Figure H).

There’s nothing worse than wasting a mold because of inadequate mixing.

STEP 4.

Fig I: Pouring the silicone. You should pour thinner than this, unless you have an evacuator to put the mold into immediately afterwards (like I did).

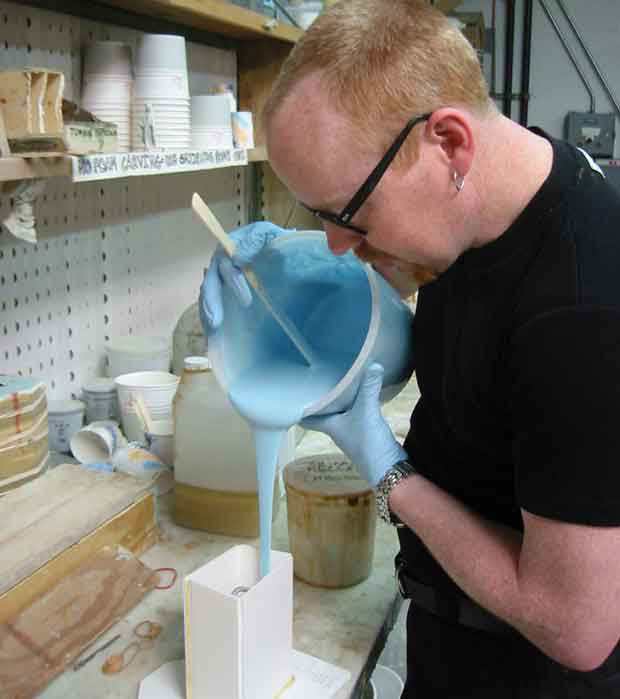
Now the silicone is ready to pour into the box. Don’t just pour it willy-nilly; this is a surefire way to trap bubbles in parts of your mold. Instead, pour in one location, away from your part, and let the silicone slowly fill up the mold around it (Figure I). Pour as thin a stream as you can, about as thin as a pencil lead. This starts to remove some of the tiny, invisible bubbles formed during mixing. Use the stir stick to scrape every last bit of silicone out of the bucket.

Should you discover silicone leaking from a small hole in the box, stop it with a wet paper towel or, better, a small piece of water-based clay. The water helps the silicone coagulate. Trying to patch the hole with hot glue might just make it wider.

STEP 5.

In a professional shop, bubbles are removed by putting the bucket into an evacuator (vacuum chamber), a piece of equipment which can cost $1,200. On a budget, you can degas your mold by agitating it with an orbital palm sander. Just hold the sander against the table, right next to the mold, for about 5 minutes. A layer of bubbles should rise to the surface.

STEP 6.

Wait until the mold “kicks,” 24 hours for most RTV silicones without an accelerator.

Cut the Mold, STEP 1.

Fig. J: The mold, ready to be cut out.

Remove the box and silicone from the mold base by inserting your X-Acto knife blade at an angle from just above the hot-glue seam around the bottom (Figure J). This frees the mold, but keeps almost all of the box intact. We like this box.

It will keep our mold aligned and accurate.

STEP 2.

Give the box a yank to separate it from the base. There will be some stickage of silicone and you will tear loose the glued-down pouring gate, but nothing major. After you free the base, cut an alignment key into the edge of the box and the newly exposed top of the mold. This is a marker notch that lets you exactly replicate how the mold fits into the box. Lining up this key prevents deformed castings when the box isn’t precisely symmetrical (which it isn’t).

STEP 3.

Fig. K: Cutting the box seam.

Cut open the seam by inserting the blade perpendicular to the butt joint of the foamcore and slicing downward (Figure K). Try not to damage the box, because as I said, it will support the silicone later, during casting. Release the mold (Figure L).

Fig. L: The mold, released.

STEP 4.

Fig. M: The jeweler’s cut.

Now that our mold is released, it’s high time we released the object inside. This involves what may be the toughest skill in the moldmaker’s arsenal: the dreaded jeweler’s cut. You’re going to cut the part out by cutting the silicone block in half, but you also want the 2 halves to line back up just the way they started, or “key together” in moldmaker’s terms. The jeweler’s cut creates bumps and ridges that force the halves to key together (Figure M).

On the silicone block, find the line of ink that transferred from the section of parting line that you drew on the base. Using a curved X-Acto blade, start cutting at this line from the inside out, never deeper than 3/16″ (3-4mm), following the line drawn on the object out to the edge of the block.

As your hand drags the knife through the silicone, twist the curved blade side to side with the tips of your fingers. This twisting action creates the hills and valleys that define the jeweler’s cut. After you cut your first twisty line, pry that slice as wide as you can with your fingers (or use mold spreaders, a tool that’s like reverse pliers), and make another twisty cut at the bottom of the gully you just created. This is where the curved blade comes in handy: a straight blade, encountering a bump from a previous cut, will cut right through it, whereas the curved blade moves around it!

Some pointers: Make your hills and valleys deep, but no wider than 3/16″. Areas where the model comes closest to the edge of the block have the most danger of leakage, so you want at least 2 complete passes of hills and valleys between the model and the block’s edge.

Stagger your cuts. Don’t cut your hills all in a line, because this will let the mold halves slide along one axis relative to each other. If your mold can move, I guarantee you it will. Also, if you’re slicing through the hills from a previous pass, you’re not spreading your mold apart enough. Always cut from the inside out, and go slowly!
This takes practice; I won’t lie to you. It takes a time to get a feel for it, and spreading the silicone is hard work. But careful attention here can make the difference between a casting that comes out ready to paint, and one that needs a day of sanding and filling.

STEP 5.


Keep cutting and cutting until you can separate the halves and remove the object (Figures M, N, and O).

Cast It!, STEP 1.

Fig. P: Dusting the mold with release agent (cornstarch or talcum powder).

Remove the original part, sprue, vents, and pouring gate, and dust the inside of each mold half lightly with cornstarch or talcum powder. I put my powder into a small cloth sack, secured with a rubber band, to spread it evenly without clumping (Figure P). Silicone rubber gets a slippery tack to it, as the silicone gradually sweats out. This means that silicone molds generally need no mold release, because the silicone itself prevents sticking. But a light dusting still helps the two halves align together perfectly, and also acts as a sponge to the resin, drawing it into the fine details of your mold and inhibiting small bubbles which can gather at the high points.

STEP 2.

Put the mold halves back together, box them in their original box, and secure it all with rubber bands, pouring side up.

STEP 3.

Mix the 2 components of the resin, following package instructions. I used a common, fast-setting urethane resin called Insta-Cast, from Douglas and Sturgess, which has a pot life of only 60-90 seconds. This means that you have to mix it fast! In general, I mix by counting 30 strokes with the mixing stick, taking care to scrape the sides and bottom as I go.

STEP 4.

Fig. Q: Pouring the resin.

Pour the resin into the mold (Figure Q). The hemispherical pouring gate provides a spill-proof cup for the resin (imagine trying to pour accurately into a tiny hole). When you see the resin come up the vents, you’re done. I usually keep an old simple mold at my pouring bench, so that when I have extra resin in a cup from a pour, I can dump it somewhere useful. If resin doesn’t come up the vent, the vent may be blocked, or the main sprue needs to be thicker. If that’s what you suspect, let the resin set, and use a knife to widen the vents or the sprue on the open mold afterwards. I often add vents where I find unexpected bubbles in my molds. Moldmaking is all about improvisation, and as long as you prepare well, there are many problems you can solve even after casting.

STEP 5.

Fig. R: The main casting unpacked from the mold.

Wait for the resin to set, and unpack the casting. To remove the extra resin from inside the vents, break them off with needlenose pliers, then sand the surfaces smooth. On my angel, I was right about the vents in the dress and the shoulders, as she needed no clean-up at all (Figure R). For her arms I just made an overpoured mold (Figure S) and shoved a Q-tip down the hole after pouring the resin to free up bubbles. Then I glued the arms on, installed new wings, and painted it all with primer (Figure T).

Fig. S: The arms removed from their mold.
Fig. T: The finished casting, cleaned up, glued together, and painted with primer.

Another tip: After pulling the parts out of the molds, I weigh them and write the number of grams on the foamcore mother mold. This lets you know exactly how much resin it takes, so you can mix only what you’ll need.