YouTube player

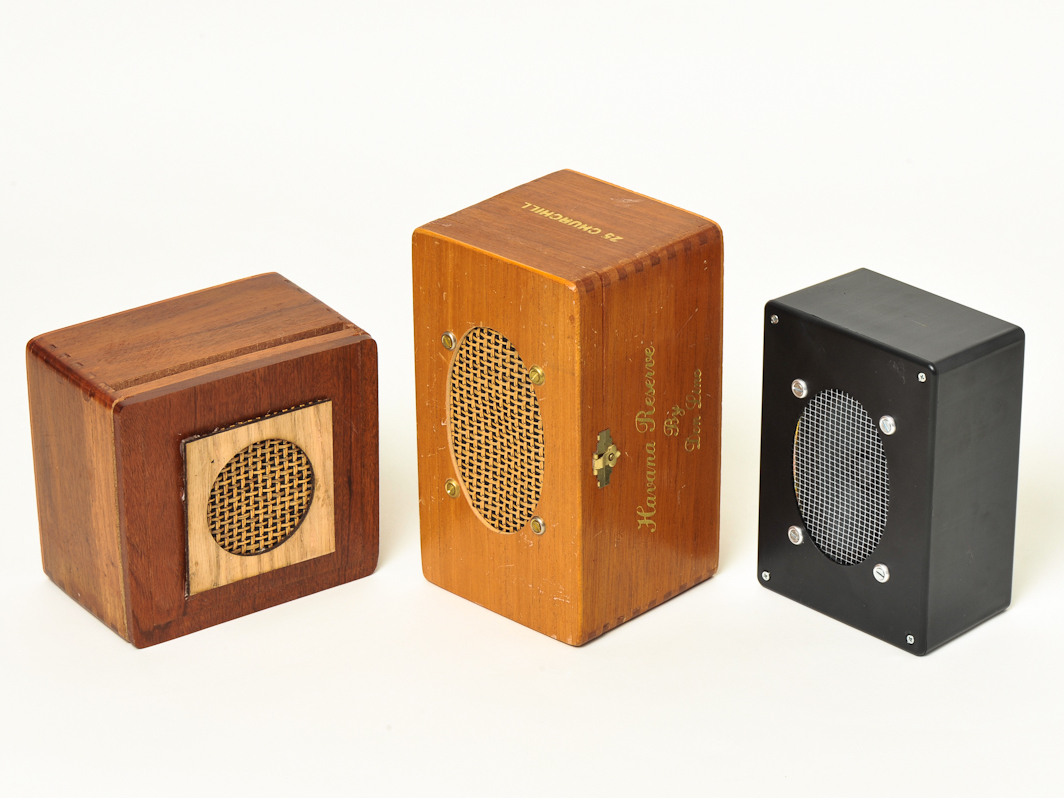
MonoBox is a small, inexpensive powered speaker that amplifies the output of your headphone music player. It’s little but it’s loud! All the circuit parts are available from RadioShack. The speaker and cabinet are left to your preference.

You’ll learn how to assemble and solder an audio power amplifier using an integrated circuit (IC) chip, and how to choose a speaker and install it in a cabinet with the amplifier.

The core of MonoBox is a compact and efficient audio amplifier based on the LM386 power amp chip. It will run on 200mA of current using power supplies from 6V–15V DC. This gives you the flexibility to power it from a wall adapter, a 9V battery, or a car accessory outlet.

You’re probably thinking, “Sure, but it’s so small. Does it rock?” Fair question. The prototype has been exhaustively tested and it does indeed rock. Maximum volume output is 90dB, and with the added bass boost your socks will be rocked clean off!

Project Steps

Select your cabinet.

There are many options for housing your MonoBox. I’ve used nice old wooden cigar boxes; you could also use a lunch box or small toolbox. Choose something between ⅛ and ¼ cubic foot (equal to 6″×6″×6″ and 6″×6″×12″, respectively). Make sure it’s deep enough for your desired speaker, and has one surface suitable to mount your speaker on.

NOTE: A box that can be tightly sealed against air leaks will provide the best bass sound.

Wood and plastic are good cabinet materials, as they’re easy to work. Metal is more challenging. Almost anything relatively rigid can be used. Construct a box from cardboard in any shape you like, and cover it with colored duct tape!

RadioShack sells two project boxes that are about the right size. They’re made of black ABS plastic that’s very easy to work. They measure 7″×5″×3″ for model 270-1807 (shown here), or 8″×6″×3″ for model 270-1809.

Choose your speaker.

The driver (speaker) will determine the sound quality to a great extent. Good-quality drivers are available cheap as manufacturing surplus. Look for a driver at least 3″ in size that’s described as “full range.” This type will reproduce the entire frequency range of sound from one driver.

Good online sources of drivers include Parts Express, Madisound, and any websites that sell overstock or surplus parts. Look in the Specials, Closeouts, or Bargains sections for great deals. The driver I used in my prototype cost $0.98 from Parts Express and sounds great.

If specifications for the driver are stated, the impedance should be between 6 and 12 ohms (6Ω–12Ω). Resonance frequency should be below 150Hz for good bass. High frequency range should extend to at least 8,000Hz (8kHz). And sensitivity of 90dB or higher will provide better volume output.

Drivers repurposed from table radios, computer speakers, etc. are often perfectly acceptable for DIY projects.

TIP: You can test a candidate speaker’s bass by temporarily mounting it in a cardboard box or in the middle of a panel of cardboard at least 20″ square. Connect it to any stereo and play music. The panel, or “test baffle,” will separate the front and rear bass waves, allowing you to hear what it will sound like in a finished cabinet.

Mark the circuit board.

Now you’ll build the guts of the MonoBox: the amplifier circuit board. The board has 20 copper traces, each with 5 holes connected together. Eight of these traces will be used for the chip socket. Others will be used for component interconnections and off-board wires.

Mark the hole designations on your board before installing components, because it can be difficult to tell the holes apart once some are obstructed. On the soldering side of the board (with the copper traces), use a fine-tipped marker to label the traces, from 1 at the upper right clockwise to 20 at the upper left.

Flip the board over to the component side (without the copper), and label the traces from 1 through 20 on this side too. Note that the left/right handedness reverses when you flip the board over.

Now label the 5 holes of each trace A through E, with A at the center of the board and E at the outer edge. Thus the inner hole on the trace at the upper left is 1A and the outer hole of the trace at the upper right is 20E.

Solder the socket and the caps.

Insert the DIP-8 socket for the amp chip into holes 2A–5A and 19A–16A, orienting the notch in the socket body toward 2A and 19A (up). Flip the board over and solder the socket leads to the traces.

NOTE: The electrolytic capacitors are polarized and must be installed in the proper orientation. The negative (–) lead is identified by a vertical band on the housing as shown in the second photo.

Insert capacitor C3’s (470µF) negative lead into hole 11A and bend its positive lead over to hole 16B. Insert capacitor C4’s (100µF) negative lead into hole 20C and bend its positive lead over to hole 17C. Solder and clip the leads.

Insert capacitor C2 (0.047µF) into hole 13D and bend other lead to hole 15D. (The ceramic caps aren’t polarized, so it doesn’t matter which lead is which.) Solder and clip the leads.

Capacitor C1 (0.033µF) consists of 0.010µF and 0.022µF capacitors in parallel. Install them together by inserting one lead of each into holes 16C and 14C. Solder and clip the leads.

NOTE: If you have a film capacitor with a value of 0.030µF to 0.035µF, you can use that in place of the two in parallel.

Add resistors and jumpers.

Insert resistor R3 (10Ω) into holes 15E and 16E. Insert resistor R2 (10K) into holes 1D and 2B. Insert resistor R1 (100Ω) into holes 4B and 5B. Solder and clip leads.

TIP: Where a resistor body is longer than the distance between its insertion holes, stand the resistor vertically on one hole and bend the other lead down toward the second hole.

Insert a short jumper wire, such as a cut-off lead, from hole 3C to 5C. For all other wires, solid-core insulated wire is recommended for ease of working. 24-gauge telecommunications wire, as from telephone or CAT5 cable, is ideal.

Cut a 5cm jumper wire (shown grey), strip 3mm of the ends, and run it from hole 1E to 14E, passing around 19 and 20 as shown.

Cut a 5cm jumper wire (shown brown), strip 3mm of the ends, and run it from hole 13E to 5C, passing around 8 and 9 as shown.

Cut a 4cm jumper wire (shown orange), strip 3mm of the ends, and run it from hole 20D to 5D, passing around 1 and 2 as shown.

Connect the off-board wires.

Wires to reach the power input socket, shown red and black, are soldered to holes 20E (black, –) and 17E (red, +).

Wires to reach the signal input socket, shown yellow and green, are soldered to holes 4E (yellow, signal) and 5E (green, ground).

Wires for the speaker, shown blue and purple, are soldered to holes 11E (blue, +) and 20A (purple, –).

Check your work.

Carefully examine both sides of the board. On the components side, check the connection holes against the assembly instructions.

On the solder side, use a magnifier to look for missed solder joints, cold joints, or accidental solder shorts between traces. This is a tiny board and problems are easily overlooked by the naked eye.

If you think you see a solder bridge between traces, run a knife point between the traces to scrape it away.

Add the amp chip.

Finally, carefully plug the LM386 amp chip into the socket. Orientation is as follows: with the board held with the socket in the upper part as shown, the ‘dot’ on top of the chip will be at the upper left.

That’s it! You’ve just built an amplifier.

Cut and drill the cabinet.

Trace the shape of the speaker on paper using a pen or crayon. Cut out your tracing and use it as a template to mark the box surface for cutting.

Place the speaker on the box and mark its mounting holes with a Sharpie.

How you cut the box will depend on the material. For my wooden cabinet, I roughed out the speaker hole with a 50mm × 1mm cutoff disk on a Dremel, then finished it to size with a 2″ sanding drum followed by 100-grit sandpaper.

In a rear corner, locate and cut a 10mm hole for the power socket and a 6mm hole for the audio signal input jack. My box was so thick I needed to cut a little relief inside so the power jack would reach through.

TIP: Place the jacks in a corner so the cords will be low if the box is placed either vertically or horizontally.

Near the jacks, place the circuit board on the cabinet surface and mark through 2 of its corner holes to place mounting holes. For #6 screws, drill the holes with a ⅛” bit for a snug fit.

Install the amp and jacks.

Solder the audio ground wire (green) to the outer tab of the audio input socket. Solder the audio signal wire (yellow) to both the left and right signal tabs of the jack.

The power jack mounts from the outside. Thread the black/red power wires through the power jack’s nut and washer, then pass the wires out through the power jack hole from inside the cabinet. Solder the black wire to the outer power jack tab and the red wire to the inner tab.

The circuit board requires standoffs to give it about 1″ of clearance from the cabinet. I used sections of ¼” plastic water tubing. Pass two #6-32 × 1½” screws through from the outside, and slip the standoffs onto them inside. Slide the circuit board onto the screws and install the nuts.

Put the audio jack through the 6mm hole and nut it on the outside. Pull the power jack through its hole and nut it on the inside.

Make the speaker grille.

The speaker needs an acoustically transparent fabric grille to protect it. You can use a variety of materials including speaker grille cloth, cane material, metal screen, or anything else that will pass sound through.

My speaker needed a gasket to keep the cone from hitting the grille. I recommend sheet cork. Use the speaker frame as a template for the outside of the gasket, and the cabinet speaker hole as a template for the gasket inside. Drill screw holes in the gasket also.

For a gasket, you can also use pasteboard, foamcore, thin wood, plastic, or other stiff foams. Soft foams and corrugated cardboard won’t work.

Install the speaker.

I used #6-32 flat-head brass screws in finishing washers from the hardware store because that looks fancy with my wood box. Again, use a 1/8″ drill bit for #6-32 screws.

Solder the blue (+) speaker wire to the + terminal of the speaker and the purple (–) wire to the – terminal.

For the best bass performance, seal any gaps or air leaks in the box with hot glue or caulk then fill the box with a moderate density of Dacron pillow stuffing. Fiberglass insulation works well too, but it’s an irritant and should be handled carefully.

If you’ve chosen a box that opens and you don’t want to permanently seal it, you can apply felt or adhesive foam to the edge of the lid rim to stop air leakage.

Done! Cool! Now we just have to talk about power and input signal and you’re ready to play your MonoBox.

Power up your MonoBox.

Your power source needs at least 300mA of current capacity. Voltage as low as 6V works for driving 4Ω speakers, but 12V is best for 16Ω speakers, so 9V is a good compromise. RadioShack’s Enercell 9V/300mA AC adapter is ideal. Install the type N power plug with the center (tip) positive. Now you can plug your MonoBox into wall power.

To build a battery adapter, solder the red (+) lead of a 9V battery snap connector to the center contact of a size N coaxial DC power plug. Solder the black (–) lead to the outer contact. Attach the battery to the back of the cabinet with the 9V battery holder.

TIP: After screwing the power plug’s body together, you can fill it with hot glue to secure the wires in place.

To use a car or boat’s 12V power system, make an adapter for the accessory “cigarette lighter” socket. Again, use a size N coax power plug and solder the negative lead to the outer contact, positive lead to inner contact.

Other DC power supplies can be used the same way, but make sure the voltage does not exceed 15V DC.

The MonoBox has no power switch. To turn it off, unplug the power from the back. Leaving a battery plugged in will drain it overnight even if no music is playing.

Hook up the music.

Audio signal input will depend on your music player. Purchase or make a signal cable suitable for your player with a ⅛” stereo plug on one end to plug into MonoBox. Most smartphones and MP3 players accept a ⅛” plug in their headphone jack.

Plug in the power source and the audio signal cable. Set your music player’s volume to minimum, start the player, and increase the volume until you hear sound from MonoBox.

MonoBox has no volume control, so use your music player’s volume control. Also use any tone controls or equalization on the music player to adjust the tone of the sound to your liking.

How your amplifier works.

The amplifier circuit is designed to be fed by a headphone output, so the input impedance set by R1 is a relatively low 100Ω. This helps load down the source and eliminate noise. Use a 10KΩ resistor for R1 if you’ll drive your MonoBox from a line-level source like a home stereo CD player.

Most small speakers need bass boost. Components R2 and C1 provide a high-pass feedback loop to boost bass by reducing frequencies above 200Hz. If the sound is too bassy with your speaker, R2/C1 can be eliminated or disconnected.

For the best bass in a 4Ω speaker, C3 can be increased to 1,000µF. In a 16Ω speaker, C3 can be 470µF or reduced to 250µF without losing bass performance.

R1 provides a load for the signal source and ground reference for the chip input. C4 decouples and filters the power supply. R3/C2 is a Zobel network to ensure a low impedance load at high frequencies and to damp oscillations.

Pin 5 is the audio output of the IC chip. This pin has a DC voltage of 4.5V added to the audio signal. Capacitor C3 blocks the DC voltage from reaching the speaker and passes only the audio signal.

Conclusion

Going Further

What if you really want stereo? Make 2 MonoBoxes! In each, connect only one channel (left or right) of the input jack directly to the amplifier circuit board, and use a SPST switch to connect or disconnect the other channel, so each box has its own mono (or 1-channel) selector switch.

Set both boxes to 1-channel, then use a stereo headphone splitter to connect both MonoBoxes to your music player.