3D-print a full-size electric violin, then plug in and play.

1H1A5566_back-2

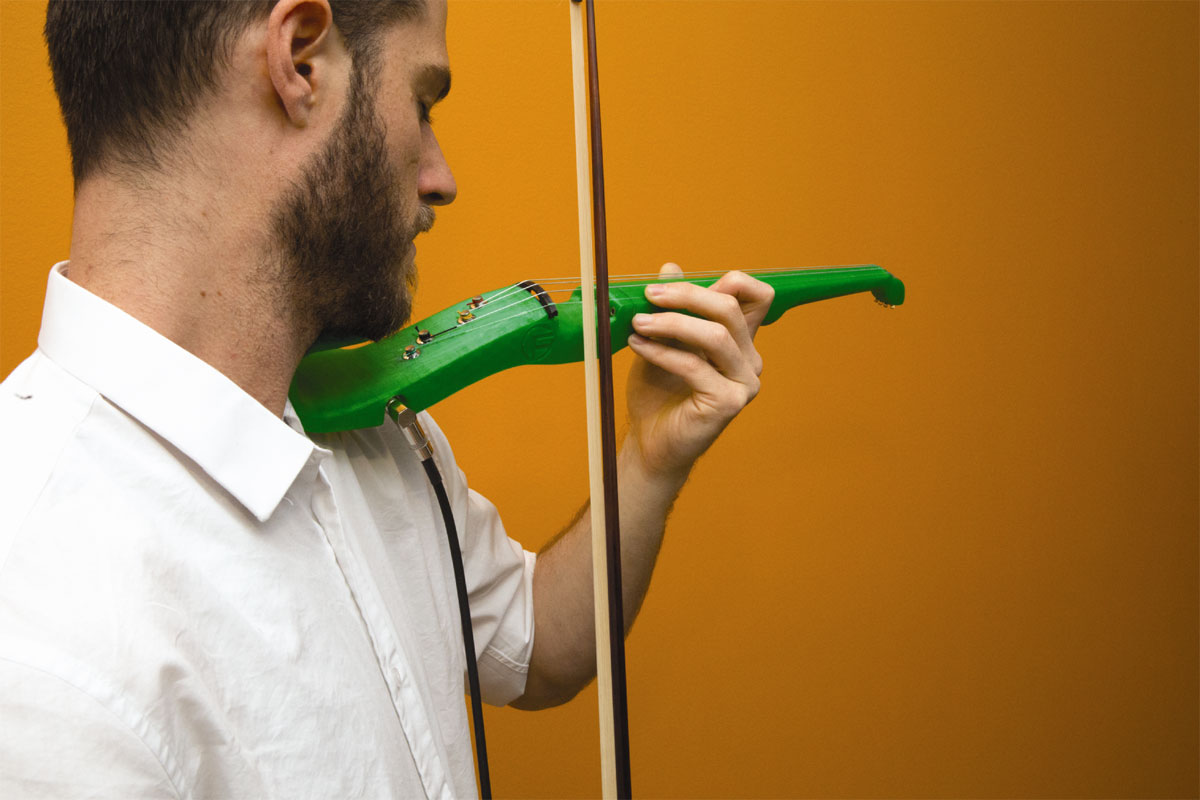
The F-F-Fiddle (pronounced EFF-EFF-Fiddle) is a full-size electric violin, designed in Autodesk’s Fusion 360, that can be made on a desktop 3D printer — the fused-filament fabrication (FFF) type. All parts can be printed without support material, and the finished fiddle is fully functional and fun to play!

YouTube player

The current fiddle is the seventh physical prototype and the eighth revision of the design. Each prototype was played and improved for playability. I’m still iterating, and each F-F-Fiddle is a little nicer to play. It sounds good, and I’m ready for others to try it!

Here you’ll find the most up-to-date assembly instructions. Check openfabpdx.com/fffiddle for project updates and to order a kit. If you order a kit, just mention that you saw the project on MAKE for 10% off! In preparation for your build, join the F-F-Fiddle Builder’s Google Group to offer your feedback and get assistance from other builders. Happy F-F-Fiddling!

Project Steps

Prepare the 3D-printed parts

Download the STL files from thingiverse.com/thing:219040 and 3D-print them: the bout (print 3 shells at least 10% infill), the neck (print 3 shells at least 10% infill), and the bridge (print at least 2 shells, 5% infill).

If you don’t have access to a 3D printer, I also offer F-F-Fiddle parts and kits made to order. You can also send the files to a service that will print the parts and mail them to you; check out makezine.com/where-to-get-digital-fabrication-tool-access.

Cut the truss rod

If you haven’t already, cut down the 5/16″ drill rod to 355mm, +/– 2mm. I use a Dremel with a fiber cutoff tool. Clean off rod ends so that they aren’t too sharp to the touch. Keep some edge, though, to allow the rod to cut through any excess plastic. Lightly sand any burrs.

Caution: Wear safety glasses when cutting and cleaning up parts!

Check truss rod fit

Insert the rod into the bout and neck. You don’t need to go all the way, just make sure that the rod fits snugly with some pressure.

If the rod is just slightly loose, this could result in warp over time, but I recommend moving forward without reprinting. You could try using a bit of epoxy to secure the rod.

If the rod is too tight (takes a hammer to install), you risk cracking the parts — I’ve done it! You can drill out the nut area (top of neck) to make sure it won’t crack. If you’re unable to insert the rod at all, try drilling out both parts.

Note: If the truss rod hole on your part is too small or too large, it may mean that you need to print new parts. It’s good to check this early in the assembly process.

Clean and deburr parts

Wearing your safety glasses, use a flat file, deburring tool, and X-Acto knife to clean any rafts or support material (if used) off the printed parts. Don’t worry about getting the neck totally smooth, you’ll work on that later. If your printer is dialed, you may not need to do much cleaning.

Carefully clean support material out of the amp plug area and remove any drooping strands of plastic.

Install the truss rod

Install the rod into the bout of the instrument until it stops. This is the hardest part of the build!

Then, connect the bout and neck parts together with the rod. The rod should extend to the nut (the ridge at the top of the neck). A little long or short will be OK.

Fasten the bout and neck

Due to part warp during printing, the neck and bout parts may not meet perfectly. This is OK.

Insert the four 8-32 nuts into their slots, then poke them all the way down with a small screwdriver.

Insert the socket head cap screws — 1-1/2″ screws in the topside, 1″ screws on the bottom — and tighten until just barely snug.

Then very carefully turn them as tight as you can comfortably get with the short end of the Allen wrench. You should hear the plastic creaking, but not breaking or cracking.

Now the bout and the neck should be contacting evenly!

Tip: Tighten the screws in an x pattern. This helps ensure that the fasteners tighten evenly and securely.

Install machine heads (tuners)

The F-F-Fiddle CAD includes counterbored holes for the Gotoh Stealth tuner guides. These inserts aren’t functionally necessary, but they look nicer, and they may protect the plastic if a tuner becomes loose over time due to string tension. Drill out the counterbore with the 5/16″ bit if necessary, but be careful not to go all the way through.

The guides should insert with strong finger pressure.

These machine heads come in a pack of 6, 3 designed for mounting on the right side of a guitar and 3 for the left. They’ve been designed to fit efficiently and to allow you to tighten all strings with clockwise rotation of the knobs.

You’ll use 2 right-hand and 2 left-hand tuners. Test-fit them as shown, taking note of the correct orientation of the tuning knobs relative to the bodies. Take them all out, remembering the orientation.

Now install the machine heads one at a time with the included screws. Get both screws started and screwed in about halfway. Then tighten them carefully and evenly until they’re snug and there’s no play between the tuner and the bout. Double-check the orientation of your tuners.

Prepare the pickups

Whether you have the internal or external K-Spot Twin pickups, you’ll need to cut off the provided plug. Unthread and remove the plastic casing (for the external type) and cut the wires off about ½” above the solder joint. Set the old plug aside, you may want to refer to it later.

Test-fit the pickups to see that they lie flat in their homes on the bout. Clean up the area with a small file and knife if necessary.

Install pickups

Clean up the bridge area using a file and X-Acto knife. The bridge needs to rest only on the piezo pickups.

Install the pickups by threading their wires through the internal routing channel. They’ll exit by the plug pocket.

Solder the audio plug

Cut the protruding pickup wires to about 3″ long and carefully strip about 1″ of the outer sheath. Try to avoid cutting any of the fine copper grounding wires.

Then strip the white-sheathed wires (conductors) about ½” back. Twist the conductors together, and twist the grounding wires together. Pass everything through a piece of large-diameter heat-shrink tubing.

Pass a piece of small-diameter heat shrink over the grounding wires; this will act as a sheath to protect them. Wrap a large-diameter piece of heat-shrink over the first piece; this will cover the tab on the audio plug. Add a similar larger piece over the conductor wires.

Solder the audio plug (cont'd)

The audio plug has 2 tabs. Solder the conductor wires to the tab that’s sandwiched between the nonconductive layers. Then solder the grounding wires to the other tab. (If you’re unsure, take a look at the plug you previously cut off.) Insulate the connections with the heat-shrink tubing.

Tuck the plug into its pocket in the bout as shown. Tighten the hex nut as best you can — it’s an awkward combination of rotating the plug and holding the nut with pliers or a small screwdriver, and it needs improvement!

Neck detailing

Now’s the time to sand down your neck if you’d like to. I’ve played both sanded and unsanded necks — sanded is better. For dark parts, clean thoroughly after sanding, and perhaps even use a small amount of vegetable oil to restore the part’s luster.

File light but definite marks on the nut for your strings. The G and E strings should be 16mm apart, with the A and D strings positioned evenly between. I like to mark the positions with a Sharpie before I file. File lightly! If you file too far, you may need to add some epoxy and start over in order to build an instrument that feels right.

Install strings

Violin strings are color coded: here we have (from thick to thin) red for G, yellow for D, black for A, and green for E. Thread the strings through the neck of the instrument, so that the ball ends rest against the neck. Take care with the E string; if it sticks, blunt the tip by doubling it over.

Important: Pay close attention to the direction of the wrap of each string — it alternates. This allows a clockwise turn on any tuning peg to tighten its string. I have the hardest time getting this right the first time — so don’t worry if it takes a few tries!

Pass the covered end of the string through the hole in the tuner. Allow enough slack in the string to get at least 2 complete turns around the tuner.

Working with the main section of the string, not the tag end, pass the string around the tuner to make the first wrap, sending it over the tag end.

For the second wrap, cross over the first wrap and pass the string below the tag end. Crossing over ensures that the string’s tension will lock it in place.

Now it should be too tight to wrap by hand. Turn the tuning peg clockwise to tighten the string. Tighten until lightly snug, so the string won’t unwrap.

Install the bridge

Slide the bridge in underneath the strings. Ensure that it rests properly on the 2 pickups and that the pickups seat properly in their pockets.

Lay the strings across the bridge. Space them evenly across a 34mm span.

Like you did at the nut, lightly file a groove into the bridge to locate each string.

Tuning

Tune it up. Tighten all the strings together, don’t tune them one at a time. Increase tension by turning the pegs slowly. If you tighten too quickly strings may slip or break.

As you tune the instrument, you’ll notice that the tension on one string significantly influences the tension on the others. Because this instrument flexes more than a wooden violin, this effect is more pronounced.

Once the instrument is tuned and everything is looking good, trim off those tag ends, plug it in, and go learn some tunes!