Knowing the basics of sewing is all you need before starting this tutorial for making your own Playboy Bunny Costume. I take you through making a pattern based on your personal body measurements and explain the construction steps to make a costume just for you!

Project Steps

To begin designing my costume, I searched the internet for lots of photos of Playboy Bunnies. I compiled a moodboard of images.

Once I felt like I understood the silhouette, I created a technical sketch of what I wanted the final garment to look like.

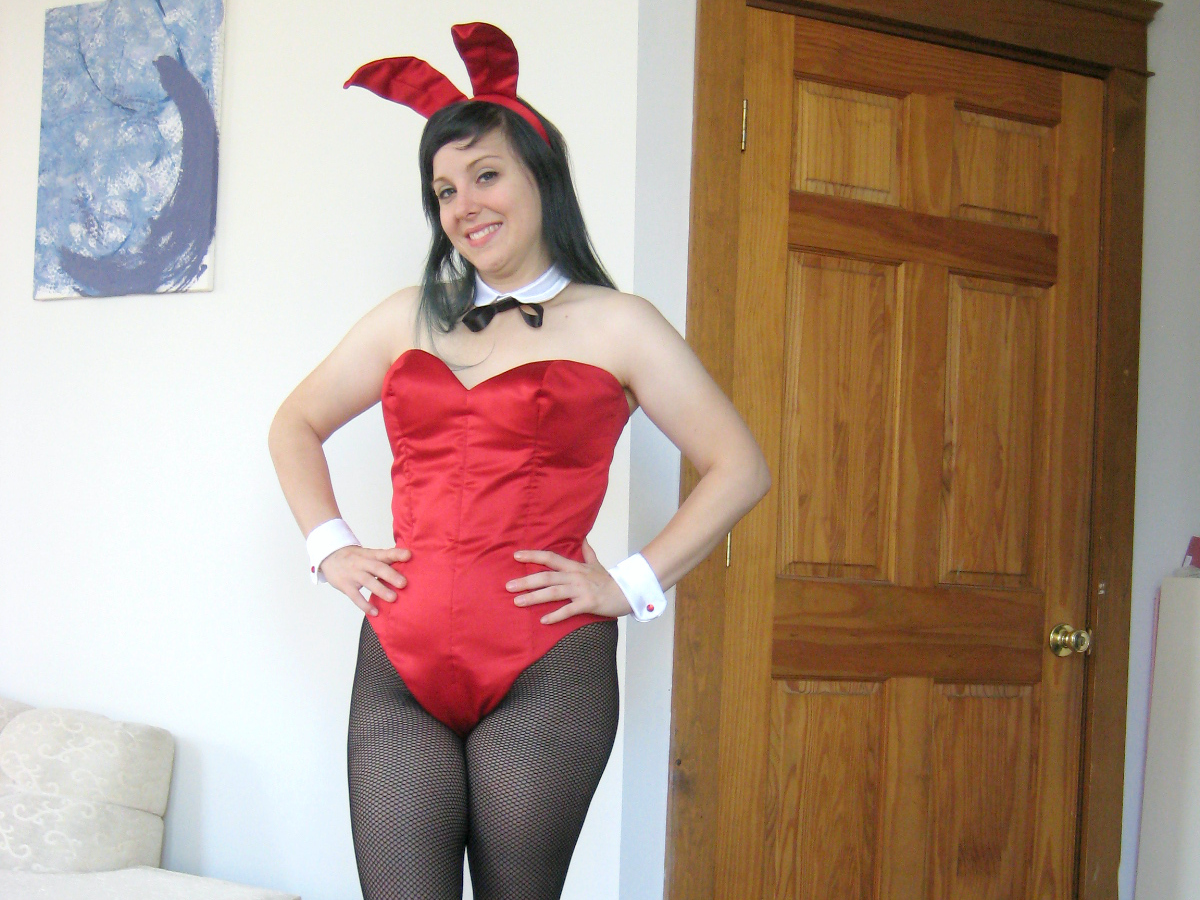
The bunny costume consists of the Bunny suit (a strapless playsuit cut like a maillot swim suit), bunny ears, a collar with a bow tie, cuffs with cufflinks, to-the-waist stockings, and closed toe high heels.

You will need a basic set of patterning tools including: a pencil & eraser, gridded rulers, a flexible ruler and/or hip & arm curve, pins, 12″ cork squares.

Body Measurements: bust, waist, hip, abdomen, side seam length, bust arc, waist to underbust, waist to hip, crotch depth, center front at waist to center back at waist between your legs, across chest, across back, mid shoulder to apex, neck, and wrist.

Fabric and Notions: heavy weight satin, heavy weight interfacing, light weight satin/lining, plastic boning such as rigilene, a 22″-24″ metal-teeth zipper, black satin or black ribbon, cufflinks or undecorated cufflinks with separate decoration items, jewelry wire, blank headband, skein of white yarn, skirt hooks, hook & eye closures.

Patterning the Bunny Suit: After you have taken your body measurements, lay out large-scale paper (a good cheap solution is butcher paper or those rolls of banner paper they sell with kids crafts). Let’s start the pattern!

Draw a long line on the left to create your Center Back (CB) Line. About 6″ from the top of your paper, square a line across to create your Bust line.

Measure down from your bust line the amount of your Side Seam measurement. Square across to create your Waist line. Measure down from your waist line the amount that is your Waist-to-Hip measurement. Square across to create your Hip line. Draw a line parallel to the CB line that is 1/2 your hip measurement. That line is the Center Front (CF) of your garment.

Draw a vertical line between the waist and hip lines that is exactly halfway between CF and CB.

Along the bust line, measure from CB the amount of 1/2 Across Back measurement plus 1/8″. Square up a couple inches.

Along the bust line, measure from CF the amount of 1/2 Across Front measurement plus 1″ to 2″ depending on your size. If you are small (like a size 4), add 1″ to the measurement. If you are larger (like a size 20), add 2″. I am around a size 10 and added 1 1/2″ to my measurement. Square up a few inches.

Find the halfway point between the front and back armscye lines and square down to the waist line.

Create some waist shaping by drawing the back side seam line 3/8″ to the back at the waist line.

Draw a curved line between the waist and hip to create hip shaping. Tip: try to emulate your body shape with this line to reduce alterations after your test fit later.

Find the halfway mark between the CB and the Back Armscye on the bust line. Square down to the waist line.

Create a 1″-wide waist dart on that line (1/2″ on either side of the line for a total width of 1″).

Extend the center line of the dart 5″ below the waist line to create the hip dart.

Connect the legs of the waist dart with the termination point of the hip dart (the end of the line you extended).

Find the halfway point between the CF and Front Armscye on the bust line. Square down to create the center line of the underbust dart.

Make a mark 1″ below the bust line. This is the Apex point and termination point of the underbust dart.

Create a dart that is 1 3/8″ wide at the waist line (11/16″ on either side of the center line).

Extend the center line of the dart 4″ below the waist.

Connect the dart legs of the underbust dart to the termination point of the hip dart.

Draw a circle with the Apex at the center point. The radius of the circle is your Bust Arc measurement.

Draw the front side seam line toward the front by 3/4″ at the waist.

Draw a slightly curved line between the waist side seam and hip line to create the hip seam for the front of the suit.

Let’s do some adjustments for a contour fit!

Underbust Dart: Widen the dart along the bust arc 3/8″ on each dart leg. Connect the widened dart legs to the original points along the waist line.

Dart so CF sits against chest: Draw a horizontal line between the apex and CF line. This line should be at a 90 degree angle from CF. Create a 1 1/2″ wide dart around that line (3/4″ on either side of the line).

Bust Dart: Because we are working without a proper block, we are making a line to an imaginary shoulder line. I drew my line at approximately 115-120 degrees from horizontal. The length of this line should be the length of your Apex to Mid Shoulder measurement. Draw a perpendicular line to emulate the shoulder seam. Along your hypothetical shoulder line, mark the legs of your bust dart. Remember back in Image 1 when you took half the Across Front measurement plus an amount between 1″ – 2″? The amount you chose to add is 1/2 your bust dart width. If you chose to add 1″ your dart width at the shoulder is 2″. I chose to add 1 1/2″ therefore my dart is 3″ wide at the shoulder seam. Connect your dart legs to the apex point. To contour the top so the bunny suit sits against your chest, widen the dart by 1″ along the bust arc (add 1/2″ to either dart leg).

On the CB line, measure down from the hip line the amount of your Crotch Depth. Square across.

Your body measurement from CF waist to CB waist between legs minus 2 x Crotch Depth is the fabric length that sits between your legs. Determine the measurement and split it between the front and back. Make the back a bit longer than the front – Example: If the amount is 5″, add 3″ to the back and 2″ to the front. Measure down from the crotch depth line along CF and CB respectively and square out a few inches.

The width of what is between your legs depends on your body. If you are a smaller size, you’ll want around a 2″-wide piece of fabric between your legs. Larger sizes will want 1 1/4″ – 1 1/2″ wide fabric between your legs. This is a bit of trial and error to find the right fit but those are great places to start. Draw a line parallel to CF/CB below the crotch depth line. The line should be 1/2 the amount you think you need between your legs away from CF/CB.

Create the leg curve by determining on your body how high you want the leg cut at your side seam. Measure from your waist along the side seam of the pattern and mark the point.

Draw a long smooth gradual curve to your crotch line. I use my hip curve to create this line but a flexible ruler works also.

Again using your hip curve or flexible ruler, draw an approximate line for the top edge.

Extend the center of the front and back dart to the leg line. This is your princess seam line!

Place a fresh piece of paper on top of the pattern you have already developed.

Trace around the CF pattern piece copying the CF line, the leg line (and between the leg), the princess line, the CF most half of the front dart. At the Apex point, transfer the bottom edge of the CF dart only.

You are now going to close the dart at the CF and transfer that dart to the bust dart. Place a pin in the apex and pivot your original pattern until the CF dart is closed. Trace the remaining part of the CF piece.

Trace each section onto a new piece of paper. Leave a bit of paper around each piece to allow for changes and seam allowance to be added.

The side back and side front pieces need a grainline. Make a line parallel to CF or CB to be the grainline. This line should run almost the length of the pattern piece as the longer a grainline is, the more likely the piece is to be cut on grain (if care is taken to lay the piece on grain).

Smooth the lines around the apex. Obviously, the points created by pivoting the pattern around the apex are not flattering nor easy to sew. I used the sharp curve of my Hip Curve ruler to recreate those lines. Try to limit the amount of fullness you add but do create nice curves. The dashed lines are my original marks. The continuous lines are what I added.

Match all of the seams as they will be sewn along the top edge and secure in place (I pinned through all the layers of paper).

Where the layers of paper overlap, trace the lines from pieces underneath so you can see the line you are working with.

Now that all the pieces are matched up as they will be when sewn, you can see how bumpy and irregular that line is. We don’t want that! Use your hip curve or flexible ruler to redraw that top edge into a smooth, appealing line. The dashed line is original line. The continuous line is what will be my final line.

Add your desired seam allowance around each pattern piece. Be sure that the pieces you sew together have the same seam allowance – example: front side seam and back side seam need to have the same seam allowance. The entire top edge should have the same seam allowance, as should the entire leg opening.

Cut out your pattern pieces.

Alterations: Once your pattern pieces are prepared, cut out a sample fit from a cheap fabric (not your fashion fabric). Sew the princess seams, side seam, and seam between your legs. Keep the back open where the zipper will be so you can get into the garment. Try it on and have someone pin you into the bunny suit. Using a marking device (chalk, pencil, pen, etc.), make any adjustments. I re-drew the leg line and at this point I figured out a big mistake that I made on my original pattern.

How to transfer test fit alterations to your paper pattern:

Place a couple of cork squares on your work surface. Lay the pattern piece that needs to be changed on top of the cork, then align the fabric on top of the pattern piece using a couple of pins to secure fabric. Place pins through the fabric of your test fit, through the paper pattern, and into the cork square along the adjustment line you drew on your test fit. This will leave a row of dots in your paper pattern so you know where that line should fall.

Remove the pins and test fit. Trace the line of dots with your pencil to indicate your new stitching line.

Place the next pattern piece that needs alterations on the cork, align the fabric, create a row of pin holes for your new sewing line, trace the line.

Transfer the marks to all pattern pieces that require alterations. Use a hip curve or flexible ruler to create a smooth finished line.

IMPORTANT: Transfer the alteration marks from both sides of your test fit, i.e., transfer the alteration marks from your Center Front Right and Center Front Left pieces of your test fit to the Center Front Pattern piece. This will create two lines of pin-holes. Split the difference between these lines when you determine what the final new sewing line will be. I made my alteration marks on my original bunny suit block and then transferred the new lines to the individual pattern pieces. Once you are happy with the fit, the pattern is ready to cut from fashion fabric.
Patterning the Cuffs: The cuffs are the easiest part to pattern. I patterned a half cuff with the paper folded so the cuff is the same on either side. You’ll need your wrist measurement.

Draw two lines parallel to each other the width you wish the cuffs to be. I suggest that this be 2-3″.

From the fold line of the paper, measure the distance of 1/2 your wrist measurement and draw a line to denote that distance.

Using a cufflink, determine how large the button hole should be. Create a curved line that is appealing to you for the outside “flap” of the French Cuff.

Add desired seam allowance.

With the paper folded, cut out your pattern piece.

Patterning the Collar: I patterned the collar in the same manner as the cuffs — on the fold — therefore I used 1/2 the neck measurement. You’ll need your Neck Measurement + 1/2″ for ease.

Create two parallel lines 1″ apart and perpendicular to the fold. Measure from the fold 1/2 of the neck measurement + 1/2 total ease (1/2 neck measurement + 1/4″) and draw a vertical line. Add a 1/2″ extension past the CF line.

Place a separate piece of paper over the collar and trace the CB line, the top edge to1/4″ less than CF, and draw a collar wing that is appealing to you. The collar wing should be wider than the collar stand to conceal the stand.

Divide the collar into 5 equal pieces. Cut out. Cut along the lines but attempt to not completely separate the pieces. Place your collar wing piece on top of another piece of paper. Spread the paper along the cut lines to create a bit of a curved line along the top edge. For this collar you don’t need much of a curve.

Trace the shape you create onto the paper below. Draw clear, smooth lines based on the traced marks.

Add seam allowance to your wing and stand pieces. Remember, the top edge of the wing will be sewn to the top edge of the collar stand so they need the same seam allowance. Cut out.

Patterning the Bunny Ears: I looked intensely at the photos of Bunnies and I looked at myself and I figured out that Bunny Ears are the same height as your face! The top of your head to your chin is how tall the ears should be.

Start with a horizontal line on your paper. Draw a line perpendicular to the first line and centered (make a T). Mark the height of your bunny ear.

Create a dart that is 3/4″ wide and 1/2 the height of your ear. Draw an appealing line for the outer edges of the ear. Add your seam allowance.

Fold the paper on the center line of the ear and cut away the paper from the sides of the ears. Fold the ear dart closed and re-draw the bottom line so it is straight.

Add your seam allowance (the width of the headband) and cut the paper with the dart folded closed.

Sewing the Bunny Suit: Cut 2 of each piece from heavy weight satin, heavy weight interfacing, and light satin/lining.

The interfacing piece is to be placed against the wrong side of the heavy-weight / shell satin. Throughout the entire sewing process, I will treat the shell and interfacing as 1 piece.

Sew the CF pieces and Side Front pieces together along the princess seam. Press.

Trim/Notch the curve for the bust so it lays smooth on the outside of the pattern.

Sew the CB piece to the Side Back piece along the princess seam. Press.

Add the zipper to the center back using a lapped zipper technique. Try this one if you don’t have a good sewing book.

Sew the CF seams together. Press. Sew the side seams together. Press. Sew the top edge of the lining to the top edge of the shell. Turn and press.

Using your original sewing pattern to determine the length, cut boning pieces for CF (top edge to hip line), Front Princess Seam (leg opening up to the bust arc — do not have the boning come up over the bust), the Side Seam (Leg opening to top edge of suit), and Back Princess Seam (leg opening to top edge of suit).

Position the boning between the shell and lining, centered over the seam line. Pin to hold in place.

Using a back-stick hand-sewing stitch, stitch-in-the-ditch through all layers of shell, boning, and lining.

Hand-sew the lining and the shell of the leg opening to each other after sewing the boning in place.

Hand-stitch the lining closed along the zipper tape at CB. Don’t let the stitches show on the front. Add a hook & loop closure to the top of the zipper.

I added snaps to the crotch (I thought it would allow me to use a public restroom without help since I planned on going out to party in this outfit). I did not feel like I could trust the snaps to not release while I was dancing and ended up safety pinning the thing closed down there. I included photos of my snaps for an inspiration point if you want to add them to your Bunny Suit!

Constructing the Bunny Cuffs: Cut 4 Bunny Cuff pieces from white satin. Cut 2 Bunny Cuff pieces from heavy weight interfacing.

Construction (do this for each cuff):

Place two pieces of white satin right sides together and align 1 layer of interfacing to one side. Pin to hold in place.

Sew almost all the way around. Leave a 2″-3″ opening on one flat edge for turning.

Turn right side out. Press.

Hand-stitch the opening closed.

Mark for making button holes.

Sew button holes and cut open.

Making Cufflinks that match your Bunny Suit:

I started with a basic cufflink finding. I had red rhinestones that matched the color of my Bunny Suit so I decided to make those the decorations on the cufflinks. A dab of E-6000 glue got the job done!

Constructing the Bunny Collar: Cut 2 collar wing pieces from white satin. Cut 2 collar stand pieces pieces from white satin. Cut 1 collar wing from heavy weight interfacing. Cut 1 collar stand from heavy weight interfacing.

Construction Order:

Place the two wing pieces right sides together and align the interfacing piece to one side. Pin to hold in place. Sew the outside (curved) edge of the wing pieces. Trim the curve, turn right side out, press.

Collar Stand: Press the seam allowance to the wrong side of the long edge of one collar stand piece. Sew the raw edge of the collar wing to the long edge of the collar stand piece you did not press. The wing should be centered on the collar stand piece. Align the raw (un-pressed) edge of the collar stand to the raw edge of the other collar stand (with the wing attached). Sew the short end, the long raw edges, and the other short end together. Clip your corners, turn, press.

Tuck that pressed edge to the inside and hand-sew it in place. Attach a skirt hook to the collar stand. Create a bow-tie with black satin fabric or with ribbon and attach it to the collar stand.

Constructing the bunny ears: You will need a blank headband jewelry wire, heavy weight interfacing, and heavy weight satin (the ears have to match the suit!). Cut 4 ear pieces out of heavy weight satin and cut 2 ear pieces out of heavy weight interfacing (trim the dart from the interfacing to reduce bulk).

Construction Order:

Press the seam allowance to one side on the interfacing piece. Cut a piece of wire to run along the folded edge of the interfacing. Hand-sew the seam allowance of the interfacing down with the wire trapped in the fold.

Construct the darts in the satin fabric. Sew 2 layers of bunny ears together along the sides (fabric right sides together). Turn right side out and press.

Insert the wire-edged interfacing into the satin ears.

Hand-sew the satin around the headband. Find the halfway point of the headband and mark the spot (I used a pin). Attach the ear by sewing it to the inside of the headband. The pin marking the halfway point should act as a point of reference in making the ears even and properly set on top of your head. Each of the ears should be the same distance from the headband’s center mark.

Making the tail requires a skein of white yarn, a yarn needle, and a scrap of cardboard.

Determine the size you want your Bunny Tail to be. Create 2 circles from cardboard that are slightly larger than the tail you desire. Cut holes in the center approximately 1 1/2″ in diameter.

Cut long pieces of yarn from your skein. Place your two cardboard circles together. Wrap the yarn around and around and around and around and around…. through the center hole of the circles. I used the entire skein of yarn for my tail. I left about 1 yard of yarn for the next step of the tail.

Cut the yarn along the outside edge of the circle. You should slip the blade of your scissors between the two layers of cardboard.

Use that yard of yarn you left over to wrap between the cardboard circles and tie tight knots to secure you pom-pon tail!

Pull one side of the cardboard off the pom-pon tail. I secured the center again with another round of yarn and knots just to be sure it was secure. Remove the other cardboard disk.

Cut a circle of satin that is smaller than the total tail size. Using a curved needle, sew through the yarn and satin to secure the tail to the satin circle. Attach the eye parts of skirt hooks to the back of the Bunny Suit where you want the tail to fall on your body. Attach the matching hook parts of the skirt hooks to the satin circle attached to your tail.

To complete the look, I acquired a pair of sheer-to-the-waist off-black tights and to-the-waist black fishnets. I happen to own red high-heel shoes already but I would have made or purchased shoes to match. Some bridal stores will dye shoes to match dresses and that could be an option to complete your look if you wanted the perfect finishing touch.

I plan on adding a couple of finishing touches to the outfit; one being the name-tag medallion, the other being ribbon lacing to each hip. The look works without those touches but wouldn’t it be great if the costume had those, too?

If you make a Bunny Suit for yourself, I hope you have as much fun wearing yours as I had wearing mine!

P.S. If you go dancing in your Bunny Suit, test your tail before you go. I kept dancing my tail off – literally!