
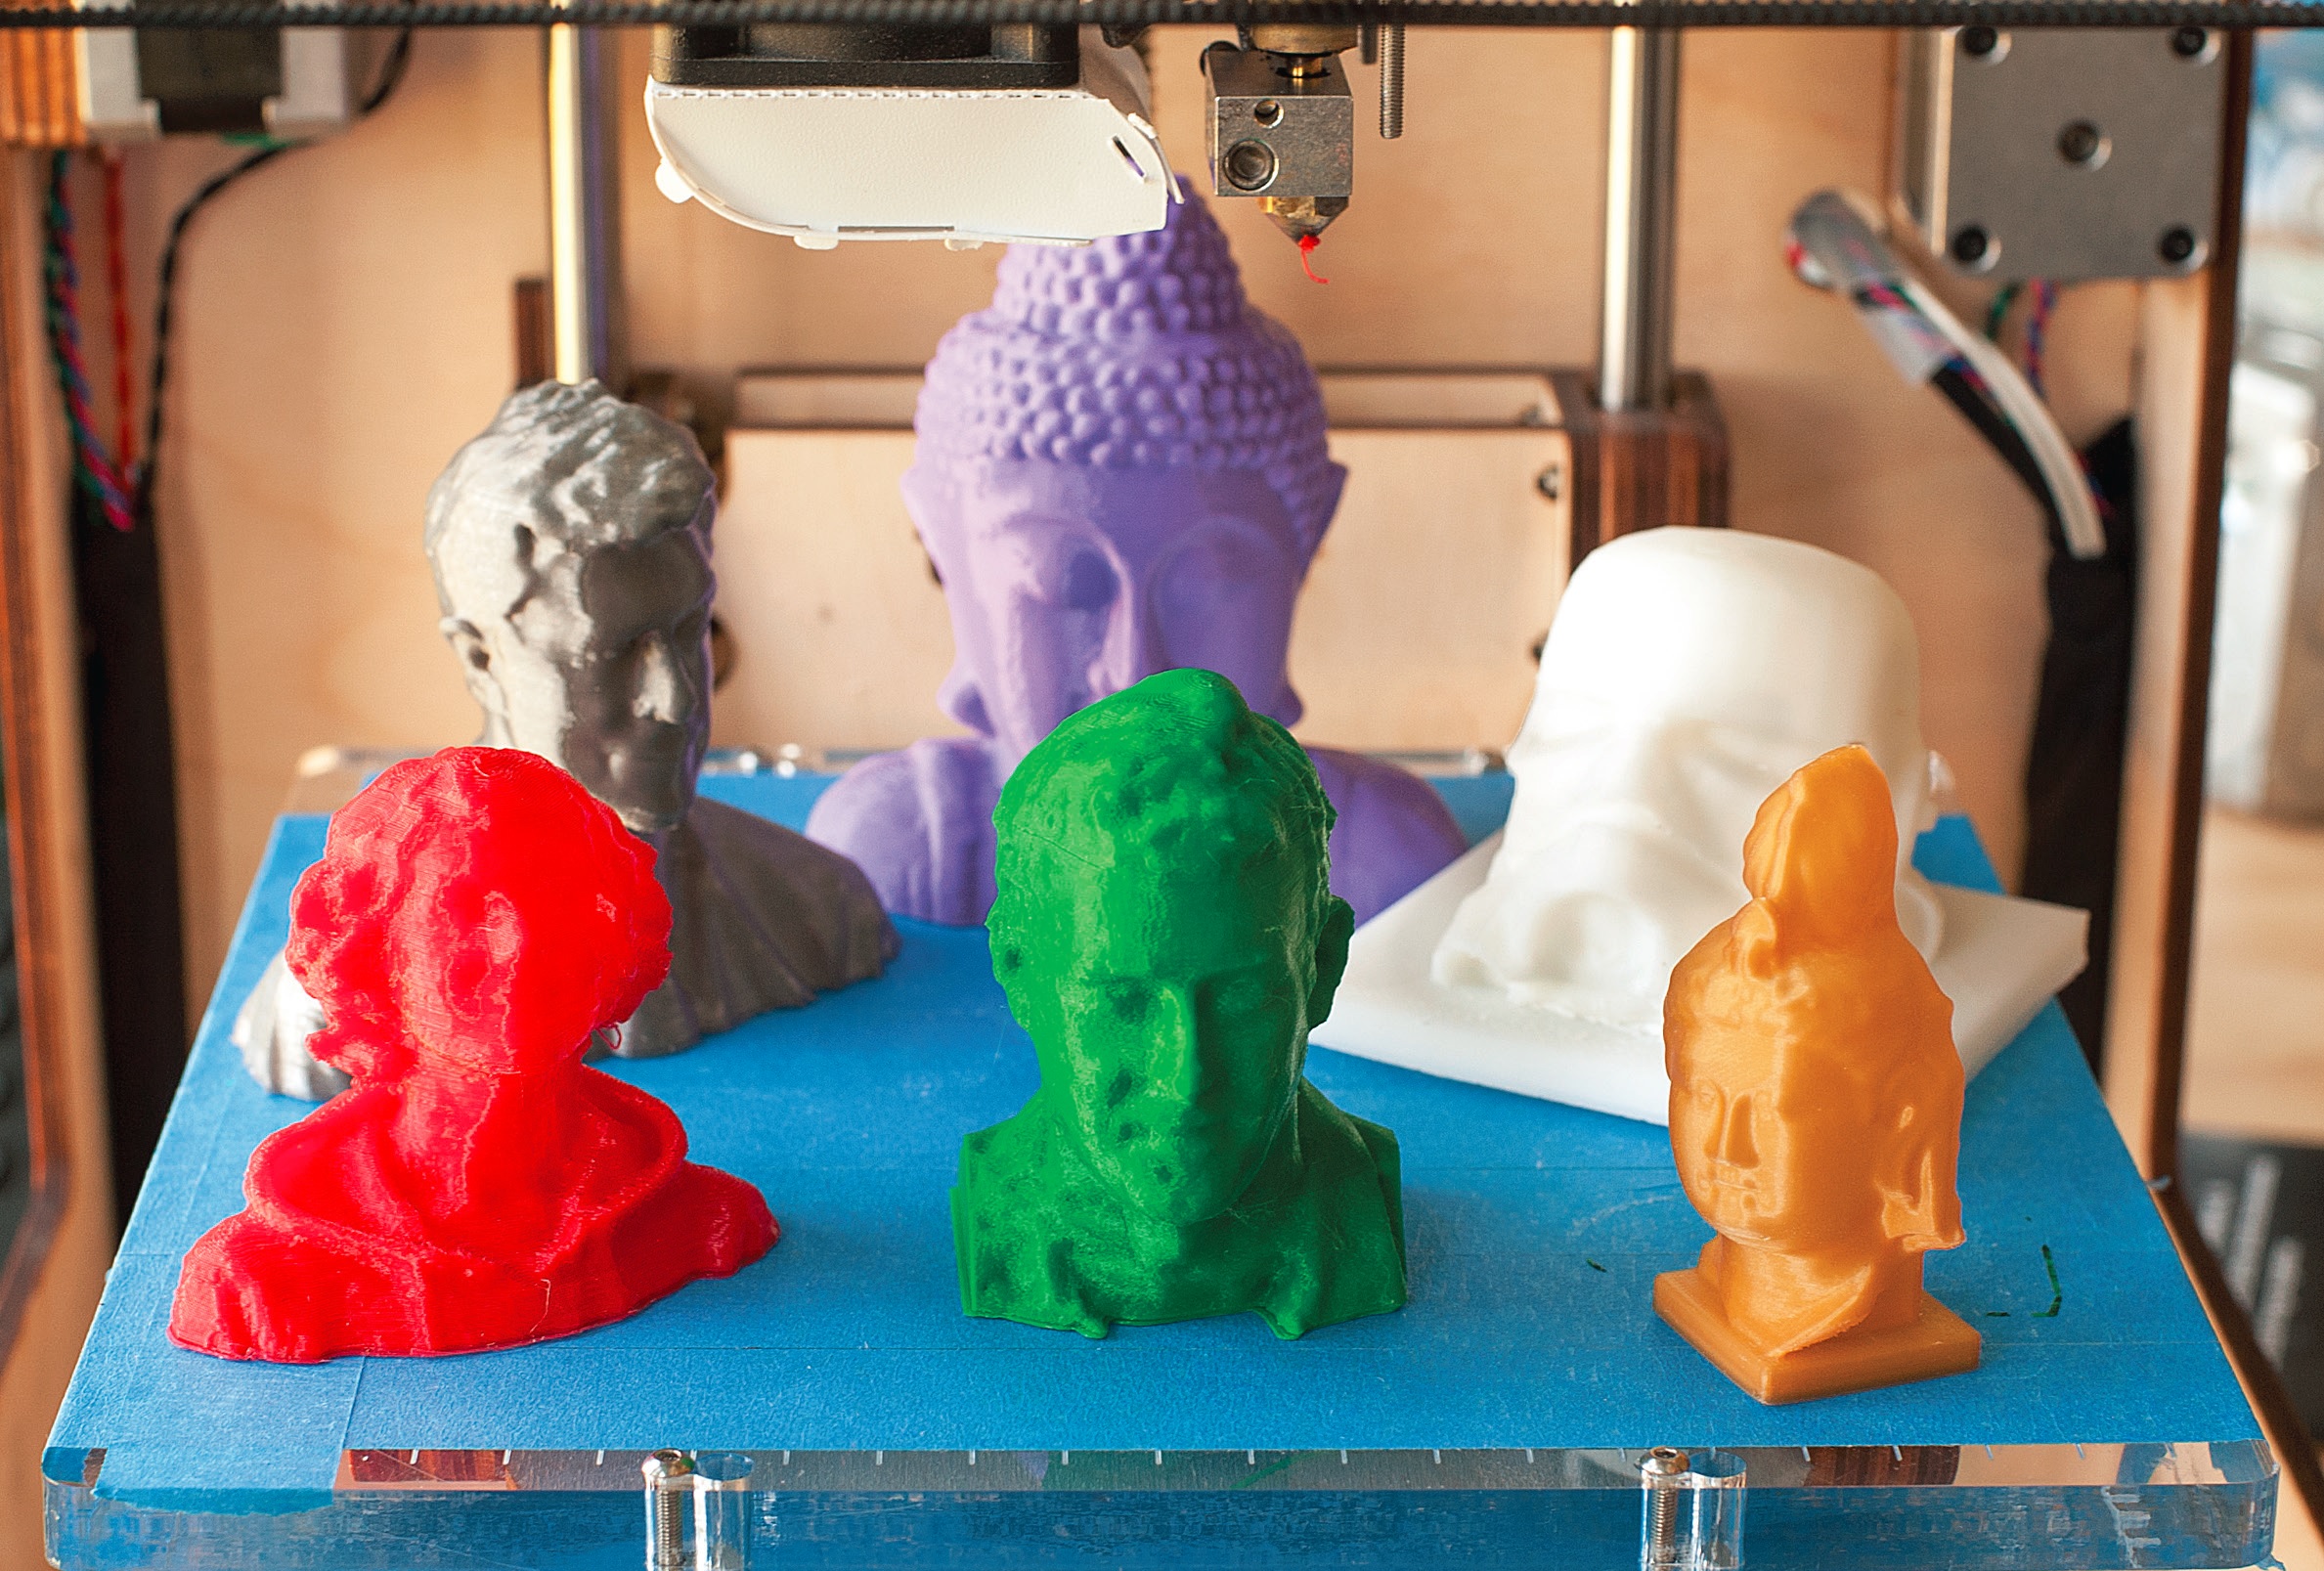

Here’s a great project to get you started in 3D printing — create a 3D model of your own head and then print it out in solid plastic!
A 3D printer makes an object by squirting out a tiny filament of hot plastic, adding one layer at a time. That’s why it’s called additive manufacturing. You send the printer a computer file that’s a 3D model of something — an iPod case, a bike part, your head — then it prints out the object for you. These machines are becoming affordable for schools, labs, libraries, and families, and there’s lots of software out there for creating 3D files to print.
We chose Autodesk 123D software for this project because it’s free, a lot of it is web-based so you can use it from any computer, and amazingly, it lets you create a 3D model directly from digital photos. That way, you can do it all from home, and you don’t have to go get yourself scanned by a laser scanner.
When you’re done making your 3D model, you can take it to a makerspace where they have a 3D printer, or you can send it out to a service and they’ll print it and mail it right to your home. We printed our heads on an Ultimaker printer, using Cura as the printer software. It was easy!
Imagine what else you could 3D-print with these tools. Instead of printing your head, why not replicas of buildings or sculptures at an art museum? Or you could make models of your pets, your car — almost anything you can capture
in photos.
Project Steps
Register with Autodesk 123D.

Go to http://123dapp.com and create a free account. For this project, we’ll use the web app for 123D Catch.
Autodesk recently updated 123D
Catch so you can 3D-print your head two
ways: either send your model out to be
printed for you, or download it so you
can print it yourself. (There’s a powerful
desktop PC version of 123D Catch, but
you won’t need it for this project.)
Take digital photos of your head.


You’ll want a friend’s help with this part. You can use a cellphone camera or a nice DSLR — the better the camera, the better 123D Catch will work. Shooting in full shade works best.
Sit still while your friend snaps 30 or 40 photos of your head, in 2 separate loops moving completely around you — one lower loop, and one higher loop where the top of your head is seen clearly. This will prevent unwanted holes in your head where the software is missing part of the scene. For best results, make sure your head fills most of the frame.
If you’re going to stick out your tongue or make a face, ask your friend to work fast so you can hold your expression. But remember to keep the camera still and focused when snapping each photo, because blurry images may confuse the software and cause weird horns on your head.
Create a new capture.

In 123D Catch, upload all of your
head photos. In the Model Resolution
pull-down menu, select High (For
Fabrication). Give your model a name
and click Create Model.
Autodesk’s computers will automatically
stitch all your photos together to
make a 3D model, and then put the
model in your My Projects section.
Open your 3D model.

You’re looking at yourself as a 3D model! It’s got a realistic texture, like your original photos. You can Dolly, Pan, and Orbit to move your view around, by using those 3 buttons on the right-hand toolbar.
On the same toolbar, select Material
& Outlines to see the 3D mesh that’s
underneath the texture. Cool!
Edit your 3D model.


My 3D model had a crazy horn on the
back of my head, maybe because we
took some photos that were blurry or too
far away. It also captured background
elements that we don’t want to print. To
remove major unwanted features, use
the Select Faces tool to highlight them,
and then Delete them. (Or highlight your
model, click Invert Selection, and delete
everything but your model.)
To snip a horn from your head, use the Delete &
Fill tool, then use the Smooth Brush to
round it off. Trim your model to size and save it under a new name.
Make it


Click on Inspect Model and Cap All to
automatically repair any holes.
The bottom of your model will be
closed now, but it might be an extended
blob. For best results on the 3D printer,
your model should be flat on the bottom.
Click on Plane Cut Model, then drag and/
or rotate the plane to where you want to
slice the bottom off your model. Click on
Apply and your model will have a flat bottom.
Re-save your model to My Projects.
You can export your model as an STL
file for printing now, or fool with it some
more using MeshMixer software as
shown in Step 7.
Embellish it (optional).

MeshMixer (free from meshmixer.com)
is a powerful tool for editing 3D models
and merging them together. Autodesk
recently acquired it, and it’s frequently
updated. Before using it, we recommend
that you watch the video tutorials at
youtube.com/user/meshmixer.
For a quick-and-dirty pedestal, open
your STL file in MeshMixer. Select the
whole mesh (Ctrl-A or Cmd-A), then
select Edits → Plane Cut to slice off the
bottom. Select the bottom face of the
model and click Edits → Extrude. In the
Tool Properties bar on the right, set the
EndType to Flat. Then click and drag the
Offset bar to extend your model, creating
a simple pedestal that’s perfectly flat.
Click Accept and save a new STL file.
To merge your head with a fancy pedestal,
start with a 123D mesh that’s still
open on the bottom. Select the whole
mesh, choose Edit → Convert to Part,
and click Accept. Look at the Parts bar
on the left: your head is now a “part” you
can merge with other parts. Now import
an STL file of a pedestal — I like the pawn
from Mark Durbin’s Column Chess Set
(thingiverse.com/thing:19659). Open it in
MeshMixer, scale it to match your head,
then drag your head onto it to merge the
two. If it doesn’t work the first time, try
Edit → Remesh. Save as a new STL file.
You can do lots more with MeshMixer.
Put bunny ears on your head, or stick
octopus tentacles on it, or make yourself
a two-headed monster. Or put your head
on a Pez candy dispenser!
Share your model (optional).
When your model is done, click Publish
to Gallery. Now anyone can open it in a
web browser and play with it. (If you’re
using the desktop version of 123D Catch,
you can make a video animation and
send it straight to YouTube.)
Save your final model as a printable file (optional).
To print your own head, you need a copy of your 3D model in a format that 3D printers can understand. Export your model from MeshMixer as an STL file. (Fun fact: STL stands for stereolithography, which is a different type of 3D printing.)
If you’re sending your head out to be printed by Autodesk, you can skip this step.
3D-print your head!

Find the nearest makerspace, hackerspace, or other place where you can use a 3D printer (see directories at http://makerspace.com and http://hackerspace.org). Bring your STL file on a thumb drive.
We printed our heads on the Ultimaker in the MAKE Labs, which we like because it’s fast and accurate — and because you can buy it as a kit and build it yourself. We’ve also had good success with a MakerBot Thing-O-Matic.
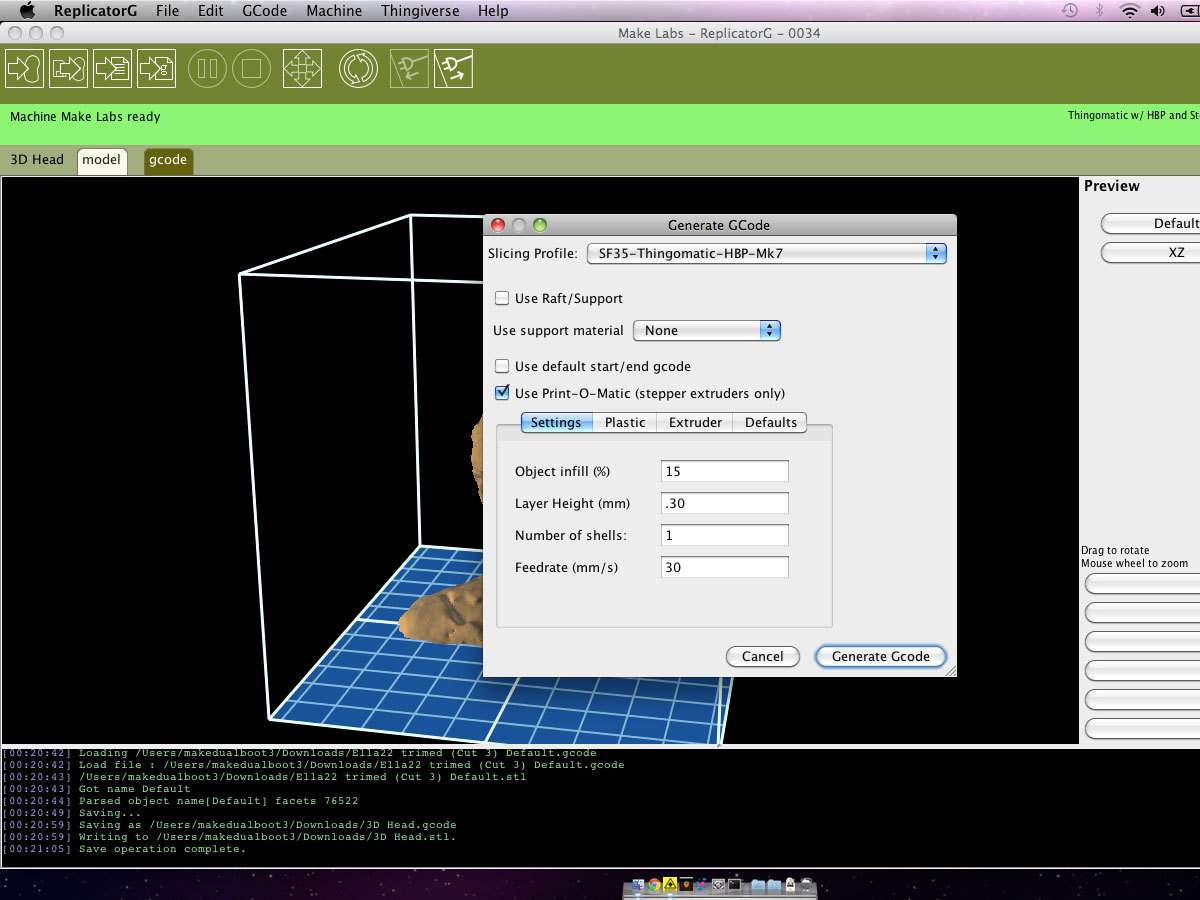
First, you’ll open your STL file in the 3D printer’s software, which tells the printer exactly where to make trails with the hot plastic to build up your object. If your printer uses ReplicatorG software, import your STL file, center the model and put it on the platform, then scale it to your desired size. Next, click Generate GCode, select the default print profile, and check the Use Print-O-Matic checkbox. Now hit Print.
Watch in amazement as your head materializes before your eyes!
If there’s no 3D printer close by, that’s OK — there are lots of service companies that will print out your 3D model for you. At 123dapp.
com, select your project and click
Fabricate → 3D Print to send your file to
Autodesk’s digital fabrication service and
receive your 3D-printed plastic head in
your mailbox. It only costs about $10 for
a 3″-tall head.
Or try sending your file to Shapeways (http://shapeways.com) or Ponoko (http://ponoko.com), or in Europe, try Sculpteo or i.materalise. Some of these services will even print your head out in ceramic, glass, steel, silver, gold, or titanium!
123D tutorial videos from Autodesk: http://youtube.com/123d and http://123dapp.com/catch/learn
Conclusion
This project first appeared in MAKE's School's Out! special issue, page 72.


